springboot整合springsecurity
接着上篇博客springboot整合springsecurity,本次主要是对其进行了优化
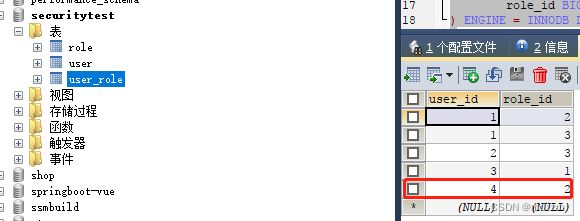
首先需要建立三张表,分别是user, role, user_role
创建表的时候特别需要注意:在创建role角色的时候,一定要按照 "ROLE_xxx"这种格式来写,这是security的规范,不然不会生效。
DROP TABLE IF EXISTS `user`;
DROP TABLE IF EXISTS `role`;
DROP TABLE IF EXISTS `user_role`;
CREATE TABLE `user` (
	id INT PRIMARY KEY AUTO_INCREMENT,
	`name` VARCHAR(10),
	`password` VARCHAR(10)
) ENGINE = INNODB DEFAULT CHARSET = utf8;

CREATE TABLE `role` (
	id INT PRIMARY KEY AUTO_INCREMENT,
	`name` VARCHAR(10)
) ENGINE = INNODB DEFAULT CHARSET = utf8;

CREATE TABLE `user_role` (
	user_id BIGINT(10),
	role_id BIGINT(10)
) ENGINE = INNODB DEFAULT CHARSET = utf8;

INSERT INTO `user`(`name`,`password`) VALUES('zhangsan','123456');
INSERT INTO `user`(`name`,`password`) VALUES('lisi','123456');
INSERT INTO `user`(`name`,`password`) VALUES('wangwu','123456');
INSERT INTO `user`(`name`,`password`) VALUES('赵六','123456');

INSERT INTO `role`(`name`) VALUES('ROLE_VIP1');
INSERT INTO `role`(`name`) VALUES('ROLE_VIP2');
INSERT INTO `role`(`name`) VALUES('ROLE_VIP3');

INSERT INTO `user_role`(`user_id`,`role_id`) VALUES(1,2);
INSERT INTO `user_role`(`user_id`,`role_id`) VALUES(1,3);
INSERT INTO `user_role`(`user_id`,`role_id`) VALUES(2,3);
INSERT INTO `user_role`(`user_id`,`role_id`) VALUES(3,1);
user是用户表,role是角色表,通过user_role将两张表建立联系
创建好数据库之后,创建项目
pom文件:
    4.0.0

    com.atguigu
    springboot-05-security
    0.0.1-SNAPSHOT
    jar

    springboot-05-security
    Demo project for Spring Boot


        org.springframework.boot
        spring-boot-starter-parent
        1.5.12.RELEASE


        UTF-8
        UTF-8
        1.8
        3.0.9.RELEASE
        2.3.0
        3.0.2.RELEASE


            org.thymeleaf.extras
            thymeleaf-extras-springsecurity4


            org.springframework.boot
            spring-boot-starter-thymeleaf


            org.springframework.boot
            spring-boot-starter-security


            org.springframework.boot
            spring-boot-starter-web


            org.mybatis.spring.boot
            mybatis-spring-boot-starter
            2.1.0


            mysql
            mysql-connector-java


            javax.persistence
            persistence-api
            1.0


            org.projectlombok
            lombok


            org.springframework.boot
            spring-boot-starter-test
            test


                org.springframework.boot
                spring-boot-maven-plugin
然后创建application.yml文件,完成数据库相关配置
spring:
  datasource:
    driver-class-name: com.mysql.jdbc.Driver
    username: root
    password: root
    url: jdbc:mysql://localhost:3306/securitytest?useUnicode=true&characterEncoding=utf-8&useSSL=false&serverTimezone=GMT
创建实体类:users, role
package com.example.security.entity;

import lombok.Data;

import javax.persistence.Table;

@Data
@Table(name = "user")
public class Users {

    private int id;

    private String name;

    private String password;

}
package com.example.security.entity;

import lombok.Data;

import javax.persistence.Table;

@Data
@Table(name = "role")
public class Role {

    private int id;

    private String name;

}
创建mapper: userMapper, roleMapper
package com.example.security.mapper;

import com.example.security.entity.Users;
import org.apache.ibatis.annotations.Select;

public interface UserMapper {

    @Select("select * from user where name = #{name}")
    Users loadUserByUsername(String name);

}
package com.example.security.mapper;

import com.example.security.entity.Role;
import org.apache.ibatis.annotations.Select;

import java.util.List;

public interface RoleMapper {

    @Select("SELECT r.`name` FROM role r WHERE r.id IN (SELECT role_id FROM user_role s inner JOIN `user` u ON s.`user_id` = u.`id` and u.id = #{id})")
    List findRoleByUserId(int id);

}
创建service: userService 继承UserDetailsService,
package com.example.security.service;

import org.springframework.security.core.userdetails.UserDetailsService;

public interface UserService extends UserDetailsService {
}
实现类
package com.example.security.service.Impl;

import com.example.security.entity.Role;
import com.example.security.entity.Users;
import com.example.security.mapper.RoleMapper;
import com.example.security.mapper.UserMapper;
import com.example.security.service.UserService;
import org.springframework.security.core.authority.SimpleGrantedAuthority;
import org.springframework.security.core.userdetails.User;
import org.springframework.security.core.userdetails.UserDetails;
import org.springframework.security.core.userdetails.UsernameNotFoundException;
import org.springframework.stereotype.Service;

import javax.annotation.Resource;
import java.util.ArrayList;
import java.util.List;

@Service
public class UserServiceImpl implements UserService {

    @Resource
    private UserMapper userMapper;

    @Resource
    private RoleMapper roleMapper;

    @Override
    public UserDetails loadUserByUsername(String name) throws UsernameNotFoundException {

        try {
           //获取用户信息,如果没有用户信息直接返回
            Users users = userMapper.loadUserByUsername(name);
            if(users == null){
                return null;
            }

            List authorityList = new ArrayList<>();
            List roles = roleMapper.findRoleByUserId(users.getId());
            for(Role role: roles){
                authorityList.add(new SimpleGrantedAuthority(role.getName()));
            }

            UserDetails userDetails = new User(users.getName(),users.getPassword(),authorityList);
            return userDetails;

        }catch (Exception e){
            e.printStackTrace();
            return null;
        }

    }
}
最后配置类:
package com.example.security.config;

import com.example.security.service.Impl.UserServiceImpl;
import org.springframework.beans.factory.annotation.Autowired;
import org.springframework.security.config.annotation.authentication.builders.AuthenticationManagerBuilder;
import org.springframework.security.config.annotation.web.builders.HttpSecurity;
import org.springframework.security.config.annotation.web.configuration.EnableWebSecurity;
import org.springframework.security.config.annotation.web.configuration.WebSecurityConfigurerAdapter;

@EnableWebSecurity
public class SecurityConfig extends WebSecurityConfigurerAdapter {

    @Autowired
    private UserServiceImpl userServiceImpl;

    @Override
    protected void configure(HttpSecurity http) throws Exception {
        //super.configure(http);
        //定制请求的授权规则
        http.authorizeRequests().antMatchers("/").permitAll()
                .antMatchers("/level1/**").hasRole("VIP1")
                .antMatchers("/level2/**").hasRole("VIP2")
                .antMatchers("/level3/**").hasRole("VIP3");

        //开启自动配置的登陆功能,效果,如果没有登陆,没有权限就会来到登陆页面
        http.formLogin().usernameParameter("user").passwordParameter("pwd")
                .loginPage("/userlogin");
        //1、/login来到登陆页
        //2、重定向到/login?error表示登陆失败
        //3、更多详细规定
        //4、默认post形式的 /login代表处理登陆
        //5、一但定制loginPage;那么 loginPage的post请求就是登陆


        //开启自动配置的注销功能。
        http.logout().logoutSuccessUrl("/");//注销成功以后来到首页
        //1、访问 /logout 表示用户注销,清空session
        //2、注销成功会返回 /login?logout 页面;

        //开启记住我功能
        http.rememberMe().rememberMeParameter("remember");
        //登陆成功以后,将cookie发给浏览器保存,以后访问页面带上这个cookie,只要通过检查就可以免登录
        //点击注销会删除cookie

    }

    //定义认证规则
    @Override
    protected void configure(AuthenticationManagerBuilder auth) throws Exception {

//        //super.configure(auth);
//        auth.inMemoryAuthentication()
//                .withUser("zhangsan").password("123456").roles("VIP1","VIP2")
//                .and()
//                .withUser("lisi").password("123456").roles("VIP2","VIP3")
//                .and()
//                .withUser("wangwu").password("123456").roles("VIP1","VIP3");
        auth.userDetailsService(userServiceImpl);

    }

}
最后启动类:
package com.example.security;

import org.mybatis.spring.annotation.MapperScan;
import org.springframework.boot.SpringApplication;
import org.springframework.boot.autoconfigure.SpringBootApplication;

@SpringBootApplication
@MapperScan("com.example.security.mapper")
public class SecurityApplication {

    public static void main(String[] args) {
        SpringApplication.run(SecurityApplication.class, args);
    }

}
最终结果:

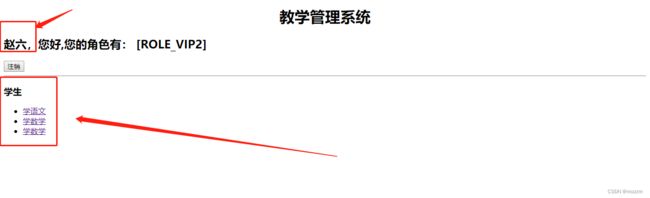
可以看到,用户名为赵六,密码123456,对应的数据库信息如下:id为4,再通过user_role表查看id为4对应的role_id,结果为2,查看role表,id为2时对应的角色为VIP2,对应的是学生,结果正确