UE4运用C++和框架开发坦克大战教程笔记(二)(第5~6集)
UE4运用C++和框架开发坦克大战教程笔记(二)(第5~6集)
- 5. 全局类与接口
-
- 两种全局类
- 接口
-
- 可作为蓝图 Event 节点的接口
- 不可以作为蓝图 Event 节点的接口
- 一个对象如何调用另一个对象的接口方法
- 6. 委托与函数传递
-
- 委托的蓝图节点
- 函数传递
-
- 函数传递方法一:TFunction
- 函数传递方法二:TMemFunPtrType
- 函数传递方法三:FMethodPtr
- 函数传递方法四:FMethodPtr 通过泛型来进行扩展
- 函数传递方法五:TFunction 通过泛型来进行扩展
5. 全局类与接口
两种全局类
全局类分为下面两种:
(一)UBlueprintFunctionLibrary:UE4 的静态类,主要是给蓝图提供静态函数,如果只在 C++ 用不必要用这个。
关于上面这个全局类,读者可以阅读这篇文章进行了解:【UE4】Blueprint Function Libraries在c++和蓝图中的使用方式
该文章简单而又不失详细地讲解了蓝图函数库的 C++ 实现。当然,我们也可以直接创建其蓝图版本,然后在里面添加静态方法,不过这个不在本笔记的讨论范围之内。
(二)GEngine->GameSingleton:一个在 GEngine 下的 UObject 指针,UE4 专门提供出来作为全局变量给所有对象调用。可以在编辑器指定类型来使用它,UE4 建议放置不需要修改的数据在这个对象。
接下来我们来试着编写一下这个类。新建一个 C++ 的 Object 类,路径为 Public/Common,取名为 FWDataSingleton。老师打算在里面放置一些变量作为全局变量,供其他类访问。
FWDataSingleton.h
class UTexture2D;	// 提前声明

UCLASS(Blueprintable, BlueprintType)	// 分别代表可以以这个类为基类创建蓝图、可以作为蓝图里的一个变量类型
class FRAMECOURSE_API UFWDataSingleton : public UObject
{
	GENERATED_BODY()

public:

	UFWDataSingleton();

	// 声明 4 种类型的、可供蓝图读写的测试用变量
	UPROPERTY(EditAnywhere, BlueprintReadWrite, Category = "FrameWork")
	TArray<UClass*> SourceBlueprints;

	UPROPERTY(EditAnywhere, BlueprintReadWrite, Category = "FrameWork")
	UTexture2D* SourceT2D;

	UPROPERTY(EditAnywhere, BlueprintReadWrite, Category = "FrameWork")
	FVector SourceVector;

	UPROPERTY(EditAnywhere, BlueprintReadWrite, Category = "FrameWork")
	FString SourceFilePath;
};
FWDataSingleton.cpp
UFWDataSingleton::UFWDataSingleton()
{
	SourceFilePath = "bilibala";
}
编译后,在 Blueprint 文件夹下创建名为 Common 的文件夹,在它里面创建一个以 FWDataSingleton 为基类的蓝图,取名为 FWDataSingleton_BP。
点开蓝图,可以看到细节面板的 Source File Path 的值为 bilibala。随意设置下刚刚在头文件里声明的 SourceVector 的值,随后到项目设置里把 Game Singleton Class 设置为 FWDataSingleton_BP。
来到 GameMode 里来测试是否可以获取到这个全局类的内容。
FWGameMode.h
protected:

	virtual void BeginPlay() override;
FWGameMode.cpp
// 引入头文件
#include "Common/FWCommon.h"
#include "Common/FWDataSingleton.h"

void AFWGameMode::BeginPlay()
{
	Super::BeginPlay();

	UFWDataSingleton* DataSingleton = Cast<UFWDataSingleton>(GEngine->GameSingleton);
	// Debug 语句,测试完后可以注释掉或者删掉
	FWHelper::Debug(DataSingleton->SourceVector.ToString(), 500.f);
}
编译后运行游戏,可以看见左上角输出了 SourceVector 里的数据。(可以把 FWAffectWidget_BP 移开以便查看 Debug 输出)
需要注意的是,UE4 不建议在运行状态下修改全局类蓝图里面的变量。所以我们在运行时将其当成已经被赋值的常量就好了。
接口
UE4 的接口指代基于 UInterface 创建的类;C++ 层面的接口则指代利用纯虚函数实现的像接口一样功能的类。尽管后者也可以用,不过老师还是推荐我们使用 UE4 提供的接口为佳,因为后者不能接受使用 UFUNCTION() 宏的方法,而前者可以。
可作为蓝图 Event 节点的接口
在 Public/FWInter 路径下创建以下 C++ 文件:
新建一个 Unreal Interface 类,取名为 FWInterface。
再创建一个 Actor 类,取名为 FWInterActor。
可以看到 FWInterface 里有两个类,但实际上我们要用接口的时候只需要用下面的 IFWInterface。
并且可以看到两个类里面都有 GENERATED_BODY() 的宏。
梁迪老师说如果不修改这两个宏的话,我们只能用不带任何说明符的 UFUNCTION() 宏;需要修改成另外两个宏才能在 IFWInterface 里写带有 UFUNCTION() 宏和说明符的方法。
但是实际上在笔者的 4.26 版本,这个写法已经可以摒弃了。笔者这里会用注释标明旧版本的写法,实际运行时会使用新版的写法。
我们把四个方法都加上了 Event 的说明符,则四个方法都会拥有 Event 的蓝图节点。
FWInterface.h
UINTERFACE(MinimalAPI)
class UFWInterface : public UInterface
{
	GENERATED_BODY()	// 下面的旧版本写法的宏已经被整合进这个初始宏了
	//GENERATED_UINTERFACE_BODY()	// 旧版本写法,修改宏
};

class FRAMECOURSE_API IFWInterface
{
	GENERATED_BODY()	// 下面的旧版本写法的宏已经被整合进这个初始宏了
	//GENERATED_IINTERFACE_BODY()	// 旧版本写法,修改宏

public:

	// 不需要在接口的 .cpp 里实现,留给继承这个接口的对象来实现;蓝图可调用
	UFUNCTION(BlueprintNativeEvent, BlueprintCallable, Category = "FrameWork")
	void FWFunOne(const FString& HitResult);

	// 只能在蓝图里实现;蓝图可调用
	UFUNCTION(BlueprintImplementableEvent, BlueprintCallable, Category = "FrameWork")
	void FWFunTwo(const FString& HitResult);

	// 不需要在接口的 .cpp 里实现,让继承接口的对象来实现方法;蓝图不可调用
	UFUNCTION(BlueprintNativeEvent, Category = "FrameWork")
	void FWFunThree(const FString& HitResult);

	// 蓝图里实现;蓝图不可以调用
	UFUNCTION(BlueprintImplementableEvent, Category = "FrameWork")
	void FWFunFour(const FString& HitResult);
};
FWInterface.cpp
// 此处旧版本写法才需要加这里的构造函数,新版本不需要
// 由于修改成了 GENERATED_UINTERFACE_BODY() 宏,其构造函数的参数要变成这个初始化器,并且要继承父类的初始化器
/*
UFWInterface::UFWInterface(const class FObjectInitializer& ObjectInitializer) : Super(ObjectInitializer)
{

}
*/
关于 UInterface 的相关知识点,推荐读者阅读这篇文章:《UE4 Interface原理与使用》
文章清晰易懂地讲解了 UInterface 和 IInterface 之间的关系,以及使用它们的方法。
来到 FWInterActor,让它继承上面的 IFWInterface。
FWInterActor.h
#include "FWInter/FWInterface.h"	// 引入头文件
#include "FWInterActor.generated.h"

UCLASS()
class FRAMECOURSE_API AFWInterActor : public AActor, public IFWInterface	// 继承接口
{
	GENERATED_BODY()

public:

	AFWInterActor();

	// C++ 实现接口的方法需要加后缀来跟蓝图的实现方法区分开来
	virtual void FWFunOne_Implementation(const FString& HitResult) override;

	virtual void FWFunThree_Implementation(const FString& HitResult) override;

};
FWInterActor.cpp
// 引入头文件
#include "Common/FWCommon.h"

void AFWInterActor::FWFunOne_Implementation(const FString& HitResult)
{
	FWHelper::Debug("FWFunOne", 500.f);
}

void AFWInterActor::FWFunThree_Implementation(const FString& HitResult)
{
	FWHelper::Debug("FWFunThree", 500.f);
}
编译后,在 Blueprint 路径下新建一个叫 Interface 的文件夹,在里面创建 FWInterActor 的蓝图,取名 FWInterActor_BP。
打开后来到蓝图脚本界面,可以看到我们声明在接口里的方法:
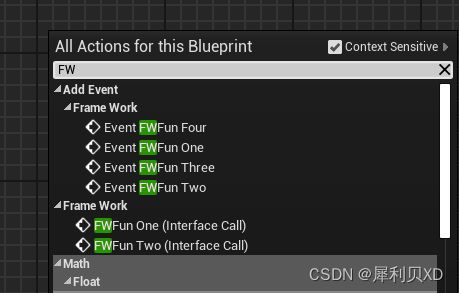
给 Event BeginPlay 蓝图节点连上 FWFunOne (Interface Call) 的节点,然后把 FWInterActor_BP 放进场景。
运行游戏,可以看见左上角输出了在 FWInterActor.cpp 里重写的 FWFunOne() 方法里的 Debug 语句。(注意,如果脚本编辑界面存在 FWFunOne 的 Event 节点,则游戏会优先执行 Event 节点的重写逻辑,导致 C++ 的 FWFunOne() 里面的 Debug 语句无法输出)
测试完了把 FWFunOne (Interface Call) 节点删除。
不可以作为蓝图 Event 节点的接口
如果不想接口的方法可以作为蓝图里的 Event 节点,并不是不添加 Event 说明符就可以了。如果这样做的话编译器会报错。UE4 提供了一个 meta 说明符来限定这个情况,即 meta = (CannotImplementInterfaceInBlueprint)。下面会进行讲解:
在 Public/FWInter 路径下创建以下 C++ 文件:
新建一个 Unreal Interface 类,命名为 FWCallInter。(怎么小写 L 和大写 i 长一个样,要注意是 FWCa L L i nter)
新建一个 Actor 类,命名为 FWCallActor。
这里就不再写生成宏的旧写法了,直接用现在的写法。
FWCallInter.h
UINTERFACE(MinimalAPI, meta = (CannotImplementInterfaceInBlueprint))	// 添加这个 meta 说明符
class UFWCallInter : public UInterface
{
	GENERATED_BODY()
};

class FRAMECOURSE_API IFWCallInter
{
	GENERATED_BODY()

public:

	// 不能再添加 Event 说明符,且必须变成纯虚函数
	UFUNCTION(BlueprintCallable, Category = "FrameWork")
	virtual void FWCallFun(const FString& HitResult) = 0;
};
来到 FWCallActor,继承接口并重写接口的方法。
FWCallActor.h
#include "CoreMinimal.h"
#include "GameFramework/Actor.h"
#include "FWCallInter.h"	// 引入头文件
#include "FWCallActor.generated.h"

UCLASS()
class FRAMECOURSE_API AFWCallActor : public AActor, public IFWCallInter	// 继承接口
{
	GENERATED_BODY()

public:

	AFWCallActor();

	// 重写
	virtual void FWCallFun(const FString& HitResult) override;
};
FWCallActor.cpp
// 引入头文件
#include "Common/FWCommon.h"

void AFWCallActor::FWCallFun(const FString& HitResult)
{
	FWHelper::Debug("FWCallFun", 500.f);
}
来到 Blueprint/Interface 目录下创建 FWCallActor 的蓝图,取名为 FWCallActor_BP。
打开蓝图,可以试出来,继承的接口的方法没有 Event 的节点了。让 Event BeginPlay 节点调用 FWCall Fun (Interface Call)节点,然后将这个蓝图对象放置到场景。
运行游戏,可见左上角输出了 FWCallActor 重写的 FWCallFun() 里的 Debug 语句。
测试完了把 FWCall Fun (Interface Call) 节点删除。
一个对象如何调用另一个对象的接口方法
这个是下一节课开头才讲的,为了连贯性我把它放在这里。
其实就是获取场景里的对象,然后强转为接口,以带前缀的方式调用方法。
FWCallActor.cpp
// 引入头文件
#include "FWInter/FWInterActor.h"
#include "Kismet/GameplayStatics.h"

void AFWCallActor::BeginPlay()
{
	Super::BeginPlay();

	TArray<AActor*> ActArray;
	UGameplayStatics::GetAllActorsOfClass(GetWorld(), AFWInterActor::StaticClass(), ActArray);
	if (ActArray.Num() > 0) {
		// 强制转换,因为 Actor 继承了接口
		IFWInterface* ActorPtr = Cast<IFWInterface>(ActArray[0]);
		// 注意,UE4 要求要以下面这样带前缀的方式调用接口方法,第一个参数是继承了接口的对象,第二个参数开始才是接口方法需要的参数
		// 这条 Debug 语句测试完可以注释掉
		ActorPtr->Execute_FWFunThree(ActArray[0], FString("ssss"));
	}
}
编译后,确保场景里有 FWCallActor_BP 和 FWInterActor_BP 的实例。运行游戏,可以看到左上角输出了 FWInterActor 的 FWFunThree() 方法里的 Debug 语句。
6. 委托与函数传递
关于委托,笔者在《UE4开发C++沙盒游戏教程笔记(二)》 也有给出过推荐文章:《UE4中的委托及实现原理》
相信从那个系列笔记看过来的读者,现在回头再来看,应该会有新的理解 : )
委托的蓝图节点
在 Public/DeleEvent 路径下创建以下 C++ 类:
创建两个 Actor,分别命名为 FWDEActor 和 FWReceActor。
FWDEActor.h
// 无参数单播委托,即只能绑定一个方法
DECLARE_DELEGATE(FWDE_Single_Zero)
// 两个参数的单播委托
DECLARE_DELEGATE_TwoParams(FWDE_Single_Two, FString, int32)
// 无参数多播委托,多播其实就是可以绑定多个方法
DECLARE_MULTICAST_DELEGATE(FWDE_Multi_Zero)
// 注意,动态委托的结尾需要加分号 ";"
// 无参数动态单播委托
DECLARE_DYNAMIC_DELEGATE(FWDE_Dy_Sl_Zero);
// 一个参数的动态多播委托,第三个参数是参数的名字
// 老师把 Multi 命名成 Sl 了,这里我改过来
DECLARE_DYNAMIC_MULTICAST_DELEGATE_OneParam(FWDE_Dy_Multi_One, FString, InfoStr);

UCLASS()
class FRAMECOURSE_API AFWDEActor : public AActor
{
	GENERATED_BODY()

public:

	AFWDEActor();

	// 委托变量作为参数
	UFUNCTION(BlueprintCallable, Category = "FrameWork")
	void RegFunDel(FWDE_Dy_Sl_Zero TargetFun);

public:

	// 对于委托变量,用 UPROPERTY() 宏的必须是动态多播委托,其他的不行
	// 老师起名有点乱= =我这里就按自己的起名来了
	UPROPERTY(BlueprintAssignable, Category = "FrameWork")
	FWDE_Dy_Multi_One FDMOFun;
};
FWDEActor.cpp
void AFWDEActor::RegFunDel(FWDE_Dy_Sl_Zero TargetFun)
{
	TargetFun.ExecuteIfBound();
}
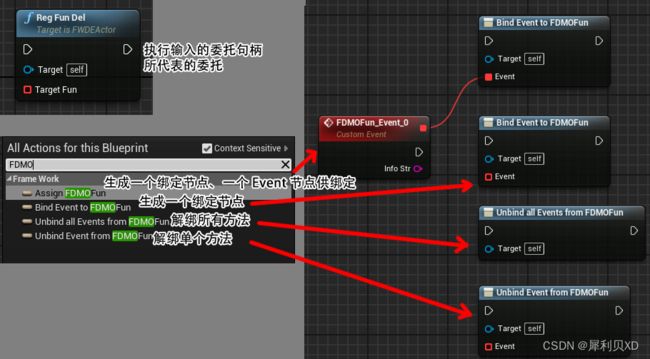
在 Blueprint 目录下创建名为 DeleEvent 的文件夹,在它里面创建一个 FWDEActor 的蓝图,命名为 FWDEActor_BP。
打开蓝图,输入 RegFun 或者 FDMO 可以看到这些不同的节点:
函数传递
函数传递方法一:TFunction
梁迪老师说 UE4 的函数传递跟 C++ Boost 里的函数传递是差不多的,只不过笔者对 Boost 了解不多,也没有找到比较好的文章,还请读者自行了解。
在 FWDEActor 添加一个函数指针和一个接受函数指针为参数的方法。二者的函数指针指向的函数无返回值,并且只接受一个 FString 类型的参数。
FWDEActor.h
public:

	// TFunction 传递函数
	void RegFunOne(TFunction<void(FString)> TargetFun);

private:

	// 函数指针
	TFunction<void(FString)> TFunOne;
RegFunOne() 要做的是将形参赋给自身类的函数指针 TFunOne,然后给它注入 FString 类型的 “RegFunOne” 文本。
FWDEActor.cpp
void AFWDEActor::RegFunOne(TFunction<void(FString)> TargetFun)
{
	TFunOne = TargetFun;
	// 这里直接赋值调用,方便测试,实际上你可以在任何地方获取并调用它
	TFunOne(FString("RegFunOne"));
}
来到 FWReceActor,添加一个方法,其作用是接收 FString 类型的参数并输出它。
FWReceActor.h
public:

	void EchoInfoOne(FString InfoStr);
在 BeginPlay() 注入本地方法到 FWDEActor 接收函数指针的方法。
FWReceActor.cpp
// 引入头文件
#include "Common/FWCommon.h"
#include "Kismet/GameplayStatics.h"
#include "DeleEvent/FWDEActor.h"

void AFWReceActor::BeginPlay()
{
	Super::BeginPlay();

	TArray<AActor*> ActArray;
	UGameplayStatics::GetAllActorsOfClass(GetWorld(), AFWDEActor::StaticClass(), ActArray);
	if (ActArray.Num() > 0) {
		AFWDEActor* DEActor = Cast<AFWDEActor>(ActArray[0]);

		// 方法一:TFunction 的函数传递(此处用到了 Lambda 表达式)
		DEActor->RegFunOne([this](FString InfoStr) { EchoInfoOne(InfoStr); });
	}
}

void AFWReceActor::EchoInfoOne(FString InfoStr)
{
	FWHelper::Debug(InfoStr, 500.f);
}
关于 Lambda 表达式,此处推荐阅读这篇文章:一文深入了解C++ lambda(C++17) 初看可能会有点绕,读者可以多看几遍做下笔记。
编译后,在 Blueprint/DeleEvent 目录下创建 FWReceActor 的蓝图,取名 FWReceActor_BP。随后将它和 FWDEActor_BP 都放入场景中。
运行游戏,可以看见左上角输出了 FWDEActor 类的 RegFunOne() 方法里给函数指针传入的 FString 文本。注释着重标明的这句代码解析如下:
- 捕获变量 this 代表的是 FWReceActor。
- 函数形参声明了 FString 类型的 InfoStr,它只属于这个 Lambda 表达式。
- 由于前面的 this 捕获了 FWReceActor,Lambda 表达式的函数体内容实际上是
this.EchoInfoOne(InfoStr)。 - 回过头看
RegFunOne()的逻辑:整个 Lambda 表达式传入给了 FWDEActor 的函数指针 TFunOne,最后调用这个函数指针,传入 FString 类型的 “RegFunOne” 文本,所以这个文本传给了 Lambda 表达式的 InfoStr,InfoStr 又作为EchoInfoOne()的实参。于是最后便输出了 “RegFunOne” 的 Debug 语句。
函数传递能在一定程度上解耦,这个技巧也是梁迪老师的框架要用到的一部分。
函数传递方法二:TMemFunPtrType
TMemFunPtrType 是 UE4 提供的一个成员函数指针类型,它也可以用来传递函数。这里我们声明一个模板方法来测试一下。
TMemFunPtrType 的第一个 bool 值代表该函数指针是否为 const 函数;第二个则是要传递函数的类;第三个就是要传递的函数的签名。
typename 的作用就是将意义模糊的对象当作一个类型。
FWDEActor.h
UCLASS()
class FRAMECOURSE_API AFWDEActor : public AActor
{
	GENERATED_BODY()

public:

	// TMemFunPtrType 传递函数
	template<class UserClass>
	void RegFunTwo(UserClass* TarObj, typename TMemFunPtrType<false, UserClass, void(FString, int32)>::Type InMethod);

};

template<class UserClass>
void AFWDEActor::RegFunTwo(UserClass* TarObj, typename TMemFunPtrType<false, UserClass, void(FString, int32)>::Type InMethod)
{
	FWDE_Single_Zero ExeDel;
	ExeDel.BindUObject(TarObj, InMethod, FString("HAHAHA"), 54);
	ExeDel.ExecuteIfBound();
}
来到 FWReceActor,声明一个方法用于传递给 FWDEActor 那边。
FWReceActor.h
public:

	void EchoInfoTwo(FString InfoStr, int32 Count);
FWReceActor.cpp
void AFWReceActor::BeginPlay()
{


	if (ActArray.Num() > 0) {
		AFWDEActor* DEActor = Cast<AFWDEActor>(ActArray[0]);

		//DEActor->RegFunOne([this](FString InfoStr) { EchoInfoOne(InfoStr); });

		// 方法二: TMemFunPtrType 传递函数
		DEActor->RegFunTwo(this, &AFWReceActor::EchoInfoTwo);
	}
}


void AFWReceActor::EchoInfoTwo(FString InfoStr, int32 Count)
{
	FWHelper::Debug(InfoStr + FString(" --> ") + FString::FromInt(Count), 500.f);
}
运行游戏,可以看到左上角输出了 FWDEActor 的 RegFunTwo() 内的提供的实参,说明函数传递成功了。
函数传递方法三:FMethodPtr
FMethodPtr 也是 UE4 提供的一个函数指针,不过它总是伴随着委托一起出现。
方法二和方法三的模板方法里面的逻辑的区别在于,前者在绑定的时候就需要提供参数了;后者可以在执行的时候才提供参数。
FWDEActor.h
UCLASS()
class FRAMECOURSE_API AFWDEActor : public AActor
{
	GENERATED_BODY()

public:

	// FMethodPtr 传递函数
	template<class UserClass>
	void RegFunThree(UserClass* TarObj, typename FWDE_Single_Two::TUObjectMethodDelegate<UserClass>::FMethodPtr InMethod);

};

template<class UserClass>
void AFWDEActor::RegFunThree(UserClass* TarObj, typename FWDE_Single_Two::TUObjectMethodDelegate<UserClass>::FMethodPtr InMethod)
{
	FWDE_Single_Two ExeDel;
	ExeDel.BindUObject(TarObj, InMethod);
	ExeDel.ExecuteIfBound(FString("I am Xilibei"), 36);
}
FWReceActor.cpp
void AFWReceActor::BeginPlay()
{


	if (ActArray.Num() > 0) {
		AFWDEActor* DEActor = Cast<AFWDEActor>(ActArray[0]);

		//DEActor->RegFunTwo(this, &AFWReceActor::EchoInfoTwo);

		// 方法三:FMethodPtr 传递函数
		DEActor->RegFunThree(this, &AFWReceActor::EchoInfoTwo);
	}
}
编译后运行游戏,可以看到左上角输出了 FWDEActor 的 RegFunThree() 方法里面提供的实参,说明函数传递成功。
函数传递方法四:FMethodPtr 通过泛型来进行扩展
其实还可以通过泛型来定义统一接口,这样就可以传过去任意数量的参数了。
FWDEActor.h
UCLASS()
class FRAMECOURSE_API AFWDEActor : public AActor
{
	GENERATED_BODY()

public:

	// 泛型定义统一接口 FMethodPtr
	template<class DelegateType, class UserClass, typename... VarTypes>
	void RegFunFour(UserClass* TarObj, typename DelegateType::template TUObjectMethodDelegate<UserClass>::FMethodPtr InMethod, VarTypes... Vars);

};

template<class DelegateType, class UserClass, typename... VarTypes>
void AFWDEActor::RegFunFour(UserClass* TarObj, typename DelegateType::template TUObjectMethodDelegate<UserClass>::FMethodPtr InMethod, VarTypes... Vars)
{
	FWDE_Single_Zero ExeDel;
	ExeDel.BindUObject(TarObj, InMethod, Vars...);
	ExeDel.ExecuteIfBound();
}
FWReceActor.cpp
void AFWReceActor::BeginPlay()
{


	if (ActArray.Num() > 0) {
		AFWDEActor* DEActor = Cast<AFWDEActor>(ActArray[0]);

		//DEActor->RegFunThree(this, &AFWReceActor::EchoInfoTwo);

		// 方法四:FMethodPtr 扩展
		DECLARE_DELEGATE_TwoParams(FTempDele, FString, int32)
		// 其实还可以把传参的步骤放在 RegFunFour 里边,作为小练习
		DEActor->RegFunFour<FTempDele>(this, &AFWReceActor::EchoInfoTwo, FString("RegFunFour"), 56);
	}
}
编译后运行游戏,可以看到左上角输出了 FWReceActor 的 BeginPlay() 方法里面提供给泛型方法 RegFunFour 的实参,说明函数传递成功。
函数传递方法五:TFunction 通过泛型来进行扩展
先来到 FWReceActor 这边声明一个要传递的函数。
FWReceActor.h
public:

	bool EchoInfoThree(FString InfoStr, int32 Count);
FWDEActor.h
#include "Common/FWCommon.h"	//引入头文件
#include "FWDEActor.generated.h"

UCLASS()
class FRAMECOURSE_API AFWDEActor : public AActor
{
	GENERATED_BODY()

public:

	// 泛型定义统一接口 TFunction
	template<typename RetType, typename... VarTypes>
	void RegFunFive(TFunction<RetType(VarTypes...)> TarFun);

};

template<typename RetType, typename... VarTypes>
void AFWDEActor::RegFunFive(TFunction<RetType(VarTypes...)> TarFun)
{
	// 只有知道了传递的函数的签名才知道如何传参
	if (TarFun(FString("RegFunFive"), 78)) FWHelper::Debug("return true", 500.f);
}
FWReceActor.cpp
void AFWReceActor::BeginPlay()
{


	if (ActArray.Num() > 0) {
		AFWDEActor* DEActor = Cast<AFWDEActor>(ActArray[0]);

		/*
		DECLARE_DELEGATE_TwoParams(FTempDele, FString, int32)
		DEActor->RegFunFour(this, &AFWReceActor::EchoInfoTwo, FString("RegFunFour"), 56);
		*/

		// 方法五: TFunction 的扩展(这里也用到了 Lambda 表达式)
		// 测试完毕后注释掉该语句
		DEActor->RegFunFive<bool, FString, int32>([this](FString InfoStr, int32 Count) { return EchoInfoThree(InfoStr, Count); });
	}
}

bool AFWReceActor::EchoInfoThree(FString InfoStr, int32 Count)
{
	FWHelper::Debug(InfoStr + FString(" --> ") + FString::FromInt(Count), 500.f);
	return true;
}
编译后运行游戏,可以看到左上角输出了 FWDEActor 的泛型方法 RegFunFive() 里面传给 TarFun 的实参和自己的 Debug 语句,说明函数传递成功。
方法五目前其实是有缺陷的,就是必须要先知道传递函数的返回类型与参数类型才能正确传递,后续老师会继续改进。