数据库–Cobar分布式数据库集群MySQL中间件
运行环境:
- 主机1:Ubuntu14.04 Desktop + MySQL5.5 + JDK 1.7(HP Z400) 内网IP地址:192.168.137.8
- NODE1:Ubuntu 13.04 server + MySQL5.5 内网IP地址:192.168.137.31
- NODE2:Ubuntu 13.04 server + MySQL5.5 内网IP地址:192.168.137.32
注:(NODE1和NODE2运行于XEN虚拟化平台,硬件环境HP Z800)
Cobar简介:
Cobar是关系型数据库的分布式处理系统,它可以在分布式的环境下看上去像传统数据库一样为您提供海量数据服务。
- 产品在阿里巴巴B2B公司已经稳定运行了3年以上。
- 目前已经接管了3000+个MySQL数据库的schema,为应用提供数据服务。
- 据最近统计cobar集群目前平均每天处理近50亿次的SQL执行请求。
Cobar最主要解决的问题是:分布式和HA。
分布式:主要是通过将同一个表的数据拆分成多个,放入不同的数据库实例,查询的时候也会按照同样的操作方式,来更新具体数据库实例中的对应的数据。
HA:高可用性,在设置了MYSQL心跳的情况下,如果主数据库发生了异常,Cobar会自动连接从数据库,如果主数据库恢复正常,只能手动恢复到主数据库。Cobar只负责切换数据库实例,不负责主从数据库的同步,所以需要提前将主从数据库设置双向同步。
存在的不足:
- (1).不支持跨库情况下的join、分页、排序、子查询操作。
- (2).SET语句执行会被忽略,事务和字符集设置除外。
- (3).分库情况下,insert语句必须包含拆分字段列名。
- (4).分库情况下,update语句不能更新拆分字段的值。
- (5).不支持SAVEPOINT操作。
- (6).暂时只支持MySQL数据节点。
- (7).使用JDBC时,不支持rewriteBatchedStatements=true参数设置(默认为false)。
- (8).使用JDBC时,不支持useServerPrepStmts=true参数设置(默认为false)。
- (9).使用JDBC时,BLOB, BINARY, VARBINARY字段不能使用setBlob()或setBinaryStream()方法设置参数。
当然,如果想努力实现这些功能,可以fork官方的源码:https://github.com/alibaba/cobar
环境搭建
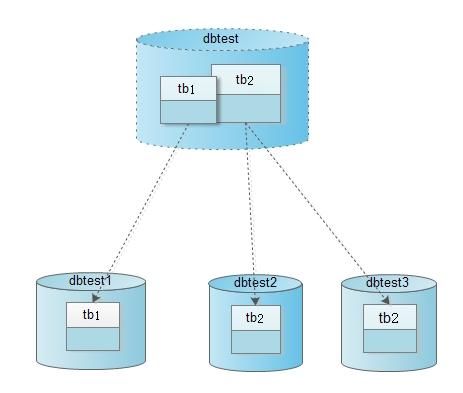
- Cobar服务器:192.168.137.8:8066 用户名/密码:root/sa 实例名:dbtest
- 主机1:192.168.137.8:3306 用户名/密码:cobar/sa 实例名:dbtest1
- Node1:192.168.137.31:3306 用户名/密码:cobar/sa 实例名:dbtest2
- Node2:192.168.137.32:3306 用户名/密码:cobar/sa 实例名:dbtest3
Cobar-Server-1.2.7版本下载:http://pan.baidu.com/s/1pJudQh9
实验拓扑图如下:
首先分别在三个主机创建数据库实例:
#创建dbtest1脚本

   dropdatabaseif exists dbtest1;

   createdatabasedbtest1;

   use dbtest1;

   #在dbtest1上创建tb1

   createtabletb1(

   id   intnotnull,

   gmt   datetime);

#创建dbtest2

   dropdatabaseif exists dbtest2;

   createdatabasedbtest2;

   use dbtest2;

   #在dbtest2上创建tb2

   createtabletb2(

   id   intnotnull,

   val  varchar(256));

#创建dbtest3

   dropdatabaseif exists dbtest3;

   createdatabasedbtest3;

   use dbtest3;

   #在dbtest3上创建tb2

   createtabletb2(

   id   intnotnull,

   val  varchar(256));
Cobar配置:
schema.xml配置如下
<!DOCTYPE cobar:schema SYSTEM "schema.dtd">

<cobar:schema xmlns:cobar="http://cobar.alibaba.com/">

  <!-- schema定义 -->

  <schema name="dbtest" dataNode="dnTest1">

    <table name="tb2" dataNode="dnTest2,dnTest3" rule="rule1" />

  </schema>

  <!-- 数据节点定义,数据节点由数据源和其他一些参数组织而成。-->

  <dataNode name="dnTest1">

    <property name="dataSource">

      <dataSourceRef>dsTest[0]</dataSourceRef>

    </property>

  </dataNode>

  <dataNode name="dnTest2">

    <property name="dataSource">

      <dataSourceRef>dsTest[1]</dataSourceRef>

    </property>

  </dataNode>

  <dataNode name="dnTest3">

    <property name="dataSource">

      <dataSourceRef>dsTest[2]</dataSourceRef>

    </property>

  </dataNode>

  <!-- 数据源定义,数据源是一个具体的后端数据连接的表示。-->

  <dataSource name="dsTest" type="mysql">

    <property name="location">

      <location>192.168.137.8:3306/dbtest1</location>

      <location>192.168.137.31:3306/dbtest2</location>

      <location>192.168.137.32:3306/dbtest3</location>

    </property>

    <property name="user">cobar</property>

    <property name="password">sa</property>

    <property name="sqlMode">STRICT_TRANS_TABLES</property>

  </dataSource>

</cobar:schema>
server.xml简单配置
<!DOCTYPE cobar:server SYSTEM "server.dtd">

<cobar:server xmlns:cobar="http://cobar.alibaba.com/">

  <!-- 用户访问定义,用户名、密码、schema等信息。 -->

  <user name="root">

    <property name="password">sa</property>

    <property name="schemas">dbtest</property>

  </user>

</cobar:server>
rule.xml配置
<!DOCTYPE cobar:rule SYSTEM "rule.dtd">

<cobar:rule xmlns:cobar="http://cobar.alibaba.com/">

  <!-- 路由规则定义,定义什么表,什么字段,采用什么路由算法 -->

  <tableRule name="rule1">

    <rule>

      <columns>val</columns>

      <algorithm><![CDATA[ func2(${val}) ]]></algorithm>

    </rule>

  </tableRule>

  <!-- 路由函数定义 -->

  <function name="func1" class="com.alibaba.cobar.route.function.PartitionByLong">

    <property name="partitionCount">2</property>

    <property name="partitionLength">512</property>

  </function>

  <!-- 路由函数定义 -->

  <function name="func2" class="com.alibaba.cobar.route.function.PartitionByString">

    <property name="partitionCount">2</property>

    <property name="partitionLength">512</property>

    <property name="hashSlice">-5:</property>

  </function>

</cobar:rule>
这里需要说明,INSERT语句中必须包含路由规则定义的字段,否则Cobar不会对数据进行拆分,同时存储到多个数据库实例中,比如上面的tb2表中,id字段如果设置了auto_increment,插入语句中不用指明id字段,这样就无法达到数据包拆分的目的。
准备完成之后直接运行bin目录下的./startup.sh即可。
然后查看输入的日志:
yan@yan-Z400:~/cobar-server-1.2.7/logs$ tail -f stdout.log

09:57:00,155 INFO  Cobar is ready to startup ...

09:57:00,155 INFO  Startup processors ...

09:57:00,198 INFO  Startup connector ...

09:57:00,202 INFO  Initialize dataNodes ...

09:57:00,811 INFO  dnTest1:0 init success

09:57:00,816 INFO  dnTest3:0 init success

09:57:00,821 INFO  dnTest2:0 init success

09:57:00,835 INFO  CobarManager is started and listening on 9066

09:57:00,837 INFO  CobarServer is started and listening on 8066

09:57:00,837 INFO  ===============================================
这样cobar服务端就已经启动。
直接使用jdbc或mysql终端连接cobar:
yan@yan-Z400:~$ mysql -uroot -psa -P8066 -h192.168.137.8

Welcome to the MySQL monitor.  Commands end with ; or \g.

Your MySQL connection id is 1

Server version: 5.1.48-cobar-1.2.7 Cobar Server (ALIBABA)


Copyright (c) 2000, 2013, Oracle and/or its affiliates. All rights reserved.


Oracle is a registered trademark of Oracle Corporation and/or its

affiliates. Other names may be trademarks of their respective

owners.


Type 'help;' or '\h' for help. Type '\c' to clear the current input statement.
下面使用几句Pyhton进行数据库的插入操作:
#!/usr/bin/env python

#coding=utf-8

import MySQLdb


#连接

cxn = MySQLdb.Connect(host='192.168.137.8',port=8066, user = 'root', passwd = 'sa')

#游标

cur = cxn.cursor()


cur.execute("USE dbtest")


for i in range(1,200):

    cur.execute("INSERT INTO tb2 (val) values ('this is a test record %d')"%i)

    print 'insert the %d record into cobar'%i


cur.close()

cxn.commit()

cxn.close()
插入后查看数据库dbtest2和数据dbtest3的情况:
可以看到有100条数据插入了dbtest2,99条数据插入了dbtest3。
后面会对Cobar进行更深入的了解。我的Fork分支
(完)
原创作品,转载请标明:http://blog.geekcome.com/archives/252
