jquery.uploadify+struts2 实现多文件上传
开发环境:
struts 2:
---struts2-core-2.3.15.2.jar
---xwork-core-2.3.15.2.jar
---ognl-3.0.6.jar
---commons-fileupload-1.3.jar
---commons-io.2.0.1.jar
---commons-lang-2.4.jar
---commons-lang3-3.1.jar
---commons-logging-1.1.3.jar
---freemarker-2.3.19.jar
---javassist-3.12.0.GA.jar
jquery:
---jquery-1.8.min.js
jquery.uploadify的包,下载地址:http://www.uploadify.com/wp-content/uploads/files/uploadify.zip 下载的是3.2版本。
环境准备好了,开始做页面,
在页面导入需要的文件:
  <script type="text/javascript" src="jquery-1.8.min.js"></script>

    <script type="text/javascript" src="uploadify/jquery.uploadify.min.js"></script>

    <link rel="stylesheet" type="text/css" href="uploadify/uploadify.css">
JS代码:
<script type="text/javascript">

        $(document).ready(function(){

            $("#imageify").uploadify({

                'fileObjName' : 'file', //提交时候的字段名,和struts2里面用来接收File的字段名一致

                method : 'get',            //以get方式上传


                'buttonText':'上传',        //上传按钮的文字

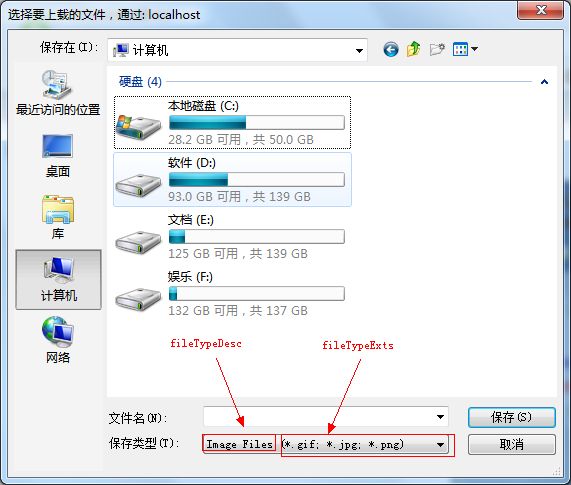
                'fileTypeDesc':'Image Files',    //可上传文件格式的描述

                'fileTypeExts':'*.gif; *.jpg; *.png',    //可上传的文件格式

                'auto':true,    //选择一个文件是否自动上传

                'multi':true,    //是否允许多选(这里多选是指在弹出对话框中是否允许一次选择多个,但是可以通过每次只上传一个的方法上传多个文件)

                swf : 'uploadify/uploadify.swf',    //指定swf文件的,默认是uploadify.swf

                uploader : 'upload.action',                //服务器响应地址

                'formData' : {'name':'lmy'},        //这里是上传时候指定的参数,如果需要动态指定参数需要在onUploadStart方法里面指定

                'onUploadStart' : function(file) {    //上传前触发的事件


                   //在这里添加  $('#imageify').uploadify('cancel'); 可以取消上传

                    //$("#imageify").uploadify("settings","formData",{'name':'lmy1'}); //动态指定参数

                } ,

                'onUploadSuccess' : function(file, data, response) {    //上传成功后触发的事件

                    alert("上传成功");

                }

            });

        });


    </script>
html代码:
<div id="queue"></div> <!-- 上传文件存放的地方,ID为queue -->

<input id="imageify" name="imageify" type="file"/>
前台页面准备完毕,如果没有问题的话 imageify 会变成这样的样式:
 jquery.uploadify会把id为imageify的file变成一个按钮,单击按钮会弹出一个对话框让你选择文件

选择一个文件,双击获得选择之后点保存,就会开始上传文件,现在没有开始做后台,所以上传会失败
接下来准备开始做后台,添加struts2需要的包,搭建好struts2的环境,在web.xml里面提价struts2的过滤器,
配置upload.action,需要注意的是,struts2默认的上传文件大小最大为2M,如果需要上传的文件大于2M,需要在struts.xml添加一句代码:
<constant name="struts.multipart.maxSize" value="1024000000"/>
这里的value是以字节为单位。
upload.action的内容:
    private File file = null;    //和在JS中指定的fileObjName的值相同

    private String fileFileName = null;    //[fileName]FileName    获得上传文件的名称

    private String fileContentType = null;//[fileName]ContentType  获得上传文件的类型


    public String execute()throws Exception{


        String path = "D:\\"; //存储地址为D盘根目录

        FileOutputStream fos = new FileOutputStream(path+fileFileName); //输出流

        FileInputStream fis = new FileInputStream(file);    //输出流


        byte[] buffer = new byte[1024];

        int len = 0;

        while((len=fis.read(buffer))!=-1){


            fos.write(buffer);;

        }

        fos.close();

        fis.close();

        return null;    //这里不需要返回任何东西

    }

    //get set方法...
后台写完之后再回到页面上,选择需要上传的文件,就会进行上传,提示上传成功

开发时候遇到问题:jquery.uploadify这个插件小巧,简单,功能实用,支持多文件上传(这里虽然说是多文件上传,但是底层还是一个一个的上传,不是一次上传所有,是当一个上传成功之后马上上传下一个),而且这里是使用flash上传的,后台响应的时候得到的session和通过ajax提交得到的session不同,也就是说虽然是同一个页面,但会产生两个不同的session。也就是说上传的时候不能得到之前存在session里面的用户信息,这就需要在页面里面指定参数'formData' : {'name':'lmy'}生成用户标识信息,后台根据标识信息得到是哪个用户上传的。