Mate-基于标签的框架
Mate有两个架构层面的图表。一个是来自Yakov Fain of Farata Systems,另一个来自ASFusion。我更喜欢后者,其构架图如下:
http://mate.asfusion.com/assets/content/diagrams/two_way_view_injection.png
来看看用Mate的编程方式来建立buddyList应用程序。
1,建立Mate的核心组件:EventMap。
EventMap是Mate的心脏,它黏着了所有的组件和控件。其代码如下:
BuddyListEventMap.mxml:
- <?xml version=”1.0″ encoding=”utf-8″?>
- <EventMap xmlns=”http://mate.asfusion.com/”
- xmlns:mx=http://www.adobe.com/2006/mxml>
- </EventMap>
其它内容稍后再填写,现在我们需要告诉主程序(Main Application)初始化EventMap:
主程序 Flex_Mate.mxml:
- <?xml version="1.0" encoding="utf-8"?>
- <mx:Application xmlns:map="com.ny.flex.mate.map.*" xmlns:views="com.ny.flex.mate.views.*" xmlns:mx="http://www.adobe.com/2006/mxml" layout="absolute">
- <mx:Script>
- <![CDATA[
- [Bindable]
- public var viewStackSelectedIndex :int = 0;
- ]]>
- </mx:Script>
- <span style="color: rgb(255, 102, 0);"><strong><em><map:BuddyListEventMap/></em></strong></span>
- <mx:HBox horizontalAlign="center" verticalAlign="top" width="100%" height="100%" y="0" x="0">
- <mx:ViewStack id="viewStack" resizeToContent="true" selectedIndex="{viewStackSelectedIndex}" >
- <views:LoginView />
- <views:BuddyListView/>
- </mx:ViewStack>
- </mx:HBox>
- </mx:Application>
2. 建立LoginView :
- <?xml version="1.0" encoding="utf-8"?>
- <mx:Panel xmlns:mx="http://www.adobe.com/2006/mxml" layout="absolute" width="300" height="200" horizontalAlign="center" verticalAlign="middle" title="Flex Cirngorm Login">
- <mx:Script>
- <![CDATA[
- import com.ny.flex.mate.event.LoginEvent;
- import com.ny.flex.mate.vo.User;
- import mx.validators.Validator;
- private function login():void{
- if(Validator.validateAll(validators).length == 0){
- var loginUser:User = new User();
- loginUser.userName=username.text;
- loginUser.password=password.text;
- <span style="color: rgb(255, 102, 0);"><strong><em>var loginEvent:LoginEvent = new LoginEvent(LoginEvent.LOGIN);
- loginEvent.loginUser = loginUser;
- dispatchEvent(loginEvent);</em></strong></span>
- }
- }
- ]]>
- </mx:Script>
- <!-- Validators-->
- <mx:Array id="validators">
- <mx:StringValidator id="userNameValidator" source="{username}" property="text" required="true"/>
- <mx:StringValidator id="passwordValidator" source="{password}" property="text" required="true" />
- </mx:Array>
- <mx:Form id="loginForm" x="0" y="0">
- <mx:FormItem label="Username:" >
- <mx:TextInput id="username" />
- </mx:FormItem>
- <mx:FormItem label="Password:" >
- <mx:TextInput id="password" displayAsPassword="true" />
- </mx:FormItem>
- <mx:FormItem direction="horizontal" verticalGap="15" paddingTop="5" width="170">
- <mx:Button id="loginBtn" label="Login" click="login()"/>
- </mx:FormItem>
- </mx:Form>
- </mx:Panel>
从上面可以看出在方法login()中发送(dispatch)了LoginEvent, 来看看LoginEvent代码:
- package com.ny.flex.mate.event
- {
- import com.ny.flex.mate.vo.User;
- import flash.events.Event;
- public class LoginEvent extends Event
- {
- public static const LOGIN:String = "login";
- public var loginUser:User;
- public function LoginEvent(type:String, <span style="color: rgb(255, 102, 0);"><strong><em>bubbles:Boolean=true</em></strong></span>, cancelable:Boolean=false)
- {
- super(type, bubbles, cancelable);
- }
- }
- }
在代码中“bubbles”属性必须为“true”,以使得上层的组件(EventMap)可以处理它。
Mate的魔法完全存在于EventMap中,LoginEvent在这里被标签化处理:
- …..
- <EventHandlers type=”{LoginEvent.LOGIN}“>
- <RemoteObjectInvoker destination=”flexmvcRO”
- method=”authenticate”
- arguments=”{event.loginUser}“>
- <resultHandlers>
- <MethodInvoker generator=”{<span style="color: rgb(255, 102, 0);"><strong><em>LoginService</em></strong></span>}”
- method=”<span style="color: rgb(255, 0, 0);"><strong><em>onResult_Authenticate</em></strong></span>”
- arguments=”{<span style="color: rgb(128, 0, 0);"><strong><em>resultObject</em></strong></span>}“/>
- </resultHandlers>
- </RemoteObjectInvoker>
- </EventHandlers>
- ……
在EvevntHandler代码中,用户可以定义service函数(RemoteObjectInvoker),同时也定义了结果处理的类、方法和参数。
来看看 LoginService.as代码::
- package com.ny.flex.mate.service
- {
- import com.ny.flex.mate.vo.User;
- public class <span style="color: rgb(255, 102, 0);"><strong><em>LoginService</em></strong></span>
- {
- [Bindable]
- public var authUserName:String;
- [Bindable]
- public var viewStackSelectedIndex:int ;
- public function <span style="color: rgb(255, 0, 0);"><strong><em>onResult_Authenticate</em></strong></span>(<span style="color: rgb(128, 0, 0);"><strong><em>user:User</em></strong></span>):void{
- authUserName = user.userName;
- viewStackSelectedIndex = 1;
- }
- }
- }
Service类处理结果,返回绑定的对象。然后我们就需要更新目标视窗。
Mate另一个闪光点就是注射(Injecting)可绑定的对象到目标视窗!用户只需要在EventMap类中增加另一个标签Injector。(Coolest 部分):
- <Injectors target=”{BuddyListView}“>
- <PropertyInjector targetKey=”authUserName”
- source=”{LoginService}”
- sourceKey=”authUserName“/>
- </Injectors>
- <Injectors target=”{Flex_Mate}“>
- <PropertyInjector targetKey=”viewStackSelectedIndex”
- source=”{LoginService}”
- sourceKey=”viewStackSelectedIndex“/>
- </Injectors>
在此定义目标视窗、目标关键词,资源服务对象和资源关键词。 你根本不需要写任何glue code。
最后定义目标视窗: BuddyListView.mxml:
- <?xml version="1.0" encoding="utf-8"?>
- <mx:Panel xmlns:mx="http://www.adobe.com/2006/mxml" title="Buddy List of {authUserName}" creationComplete="getBuddyList()" width="500" height="320">
- <mx:Script>
- <![CDATA[
- import mx.collections.ArrayCollection;
- import com.ny.flex.mate.event.GetBuddyListEvent;
- [Bindable]
- public var authUserName:String;
- [Bindable]
- public var buddyCollection:ArrayCollection;
- private function getBuddyList():void{
- var getBuddyListEvent:GetBuddyListEvent = new GetBuddyListEvent(GetBuddyListEvent.GET_BUDDY_LIST);
- getBuddyListEvent.authUserName = authUserName;
- dispatchEvent(getBuddyListEvent);
- }
- ]]>
- </mx:Script>
- <mx:DataGrid id="buddyList" dataProvider="{buddyCollection}" borderStyle="none" width="100%" height="100%" >
- <mx:columns>
- <mx:DataGridColumn dataField="firstName" headerText="First Name"/>
- <mx:DataGridColumn dataField="lastName" headerText="Last Name"/>
- </mx:columns>
- </mx:DataGrid>
- </mx:Panel>
整个开发流程是这样的:
Action–>Dispatch Event–>Config Handler–>create service–>Inject Bindable Object –>another Action….
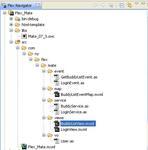
整个项目结构图 见附件
总结:
在我5篇blog中讨论过的Flex编程框架中,哪一个是最好的呢?
我认为中央管理(central management)最适合进阶水准的小型项目。因为无须学习新的框架,并且也一样有清晰的架构。 而且 他也是走向框架的起点。
对于Mate和Cairngorm,在我看来Mate略占上风,原因如下:
对于Cairngorm:
1,Cairngorm过于复杂,学习曲线较高
2,我觉得Cairngorm有一些垃圾代码(例如Frontcontroller,event 和Command)。
对于Mate:
1,比Cairngorm更简单易学,貌似继承和发扬了Flex的特质。
2,从EventMap中得益,因为无须编写在事件和服务之间的黏着代码。
但另一个方面, EventMap也会带来痛苦,试想一下,用户有50个行为和100个对象需要绑定,那就需要在EventMap中写入大量的configration代码。那么EventMap就成为一个灾难。
因此,如果用户使用Cairngorm,就可以选用 Cairngorm without FrontContoller的方案。
对于Mate,如果使用Meta标签来代替EventMap,就无须设置太多的东西,示例如下:
[EventHadler ={name ="myHandler", serviceclass="myservice" result , taget ...}]
MateDispatch(myevent).
我在期待着它的来临。


