Android(java)学习笔记95:Android原理揭秘系列之View、ViewGroup
作过Android 应用开发的朋友都知道,Android的UI界面都是由View和ViewGroup及其派生类组合而成的。其中,View是所有UI组件的基类,而ViewGroup是容纳这些组件的容器,其本身也是从View派生出来的。AndroidUI界面的一般结构可参见下面的示意图: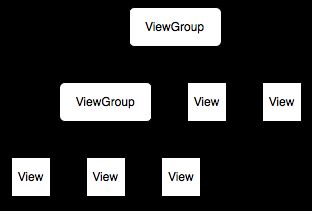
可见,作为容器的ViewGroup可以包含作为叶子节点的View,也可以包含作为更低层次的子ViewGroup,而子ViewGroup又可以包含下一层的叶子节点的View和ViewGroup。事实上,这种灵活的View层次结构可以形成非常复杂的UI布局,开发者可据此设计、开发非常精致的UI界面。
一般来说,开发Android应用程序的UI界面都不会直接实用View和ViewGroup,而是使用这两大基类的派生类。
View派生出的直接子类有:AnalogClock,ImageView,KeyboardView, ProgressBar,SurfaceView,TextView,ViewGroup,ViewStub
View派生出的间接子类有:AbsListView,AbsSeekBar, AbsSpinner, AbsoluteLayout, AdapterView<T extends Adapter>,AdapterViewAnimator, AdapterViewFlipper, AppWidgetHostView, AutoCompleteTextView,Button,CalendarView, CheckBox, CheckedTextView, Chronometer, CompoundButton,
ViewGroup派生出的直接子类有:AbsoluteLayout,AdapterView<T extends Adapter>,FragmentBreadCrumbs,FrameLayout,LinearLayout,RelativeLayout,SlidingDrawer
ViewGroup派生出的间接子类有:AbsListView,AbsSpinner, AdapterViewAnimator, AdapterViewFlipper, AppWidgetHostView, CalendarView, DatePicker, DialerFilter, ExpandableListView, Gallery, GestureOverlayView,GridView,HorizontalScrollView, ImageSwitcher,ListView,
上面View、ViewGroup的直接子类和间接别子类中标记为红色的类是我们再应用开发中接触和用得比较频繁的类,需要初学者重点熟悉和掌握,其详细的API及用法可参见SDK的说明。这里特别指出,ImageView是布局具有图片效果的UI常用的类,SurfaceView是用来进行游戏开发的与一般View相比较为特殊的非常重要的类(后续会对原理作深入分析),而AbsoluteLayout、FrameLayout,LinearLayout, RelativeLayout这几个ViewGroup的直接子类是Android UI布局中最基本的布局元素。
值得一提的是,上述的所有基类、派生类都是Android framework层集成的标准系统类,开发者在应用开发中可直接引用SDK中这些系统类及其API。但事实上,在UI开发的很多场景下,直接使用这些系统类并不能满足应用开发的需要。比如说,我们想用ImageView在默认情况下加载一幅图片,但是希望在点击该View时View变换出各种图像处理效果,这个时候直接使用ImageView是不行的,此时我们可以重载ImageView,在新派生出的子控件中重载OnDraw等方法来实现我们的定制效果。这种派生出系统类的子类方法我们通常称之为自定义控件。自定义控件可像标准View控件那样在XML及我们的Java文件中进行布局和实例化,但在布局时必须指出其完整的包名和类名。事实上,自定义控件的使用是我们进行Android 开发的必不可少的基本用法,是必须掌握的基本技巧。
下面我们来看一个典型的例子,我们待机Launcher 的XML布局,这个例子能够很好的说明上面的一些概念。
  1 <?xml version="1.0" encoding="utf-8"?>

  2

  3 <!-- Copyright (C) 2007 The Android Open Source Project

  4

  5      Licensed under the Apache License, Version 2.0 (the "License");

  6

  7      you may not use this file except in compliance with the License.

  8

  9      You may obtain a copy of the License at

 10

 11           http://www.apache.org/licenses/LICENSE-2.0

 12

 13      Unless required by applicable law or agreed to in writing, software

 14

 15      distributed under the License is distributed on an "AS IS" BASIS,

 16

 17      WITHOUT WARRANTIES OR CONDITIONS OF ANY KIND, either express or implied.

 18

 19      See the License for the specific language governing permissions and

 20

 21      limitations under the License.

 22

 23 -->

 24

 25

 26

 27 <com.android.launcher2.DragLayer

 28

 29     xmlns:android="http://schemas.android.com/apk/res/android"

 30

 31     xmlns:launcher="http://schemas.android.com/apk/res/com.android.launcher"

 32

 33

 34

 35     android:id="@+id/drag_layer"

 36

 37     android:layout_width="match_parent"

 38

 39     android:layout_height="match_parent">

 40

 41

 42

 43     <include layout="@layout/all_apps" />

 44

 45

 46

 47     <!-- The workspace contains 3 screens of cells -->

 48

 49     <com.android.launcher2.Workspace

 50

 51         android:id="@+id/workspace"

 52

 53         android:layout_width="match_parent"

 54

 55         android:layout_height="match_parent"

 56

 57         launcher:defaultScreen="2">

 58

 59

 60

 61         <include android:id="@+id/cell1" layout="@layout/workspace_screen" />

 62

 63         <include android:id="@+id/cell2" layout="@layout/workspace_screen" />

 64

 65         <include android:id="@+id/cell3" layout="@layout/workspace_screen" />

 66

 67         <include android:id="@+id/cell4" layout="@layout/workspace_screen" />

 68

 69         <include android:id="@+id/cell5" layout="@layout/workspace_screen" />

 70

 71

 72

 73     </com.android.launcher2.Workspace>

 74

 75

 76

 77     <ImageView

 78

 79         android:id="@+id/previous_screen"

 80

 81         android:layout_width="93dip"

 82

 83         android:layout_height="@dimen/button_bar_height"

 84

 85         android:layout_gravity="bottom|left"

 86

 87         android:layout_marginLeft="6dip"

 88

 89

 90

 91         android:scaleType="center"

 92

 93         android:src="@drawable/home_arrows_left"

 94

 95

 96

 97         android:onClick="previousScreen"

 98

 99

100

101         android:focusable="true"

102

103         android:clickable="true" />

104

105

106

107     <ImageView

108

109         android:id="@+id/next_screen"

110

111         android:layout_width="93dip"

112

113         android:layout_height="@dimen/button_bar_height"

114

115         android:layout_gravity="bottom|right"

116

117         android:layout_marginRight="6dip"

118

119

120

121         android:scaleType="center"

122

123         android:src="@drawable/home_arrows_right"

124

125

126

127         android:onClick="nextScreen"

128

129

130

131         android:focusable="true"

132

133         android:clickable="true" />

134

135

136

137     <com.android.launcher2.DeleteZone

138

139         android:id="@+id/delete_zone"

140

141         android:layout_width="@dimen/delete_zone_size"

142

143         android:layout_height="@dimen/delete_zone_size"

144

145         android:paddingTop="@dimen/delete_zone_padding"

146

147         android:layout_gravity="bottom|center_horizontal"

148

149

150

151         android:scaleType="center"

152

153         android:src="@drawable/delete_zone_selector"

154

155         android:visibility="invisible"

156

157         launcher:direction="horizontal"

158

159         />

160

161

162

163     <RelativeLayout

164

165         android:id="@+id/all_apps_button_cluster"

166

167         android:layout_width="fill_parent"

168

169         android:layout_height="@dimen/button_bar_height"

170

171         android:layout_gravity="bottom|center_horizontal"

172

173         android:paddingTop="2dip"

174

175         >

176

177

178

179         <com.android.launcher2.HandleView

180

181             style="@style/HotseatButton"

182

183             android:id="@+id/all_apps_button"

184

185             android:layout_centerHorizontal="true"

186

187             android:layout_alignParentBottom="true"

188

189

190

191             android:src="@drawable/all_apps_button"

192

193             launcher:direction="horizontal"

194

195             />

196

197

198

199         <ImageView

200

201             android:id="@+id/hotseat_left"

202

203             style="@style/HotseatButton.Left"

204

205             android:layout_toLeftOf="@id/all_apps_button"

206

207

208

209             android:src="@drawable/hotseat_phone"

210

211

212

213             android:onClick="launchHotSeat"

214

215             />

216

217

218

219         <ImageView

220

221             android:id="@+id/hotseat_right"

222

223             style="@style/HotseatButton.Right"

224

225             android:layout_toRightOf="@id/all_apps_button"

226

227

228

229             android:src="@drawable/hotseat_browser"

230

231

232

233             android:onClick="launchHotSeat"

234

235             />

236

237

238

239     </RelativeLayout>

240

241

242

243 </com.android.launcher2.DragLayer>
在上面的XML布局中,最顶层的控件com.android.launcher2.DragLayer是一个自定义控件,其继承自ViewGroup的直接子类FrameLayout。在DragLayer的布局内部,其子View既有ImageView类本身,也有从ImageView的派生出的子定义控件HandleView,既有ViewGroup的框架中的直接子类RelativeLayout,也有从派生出的自定义控件Workspace。总之,这布局的例子是大家学习Android布局、应用开发和理解Android View、ViewGroup概念的非常优秀的例子,大家可下载Launcher模块的源代码来进行深入分析(Launcher单个模块的下载方法可参见博文Android源码下载——用git clone实现单个目录下载 )。
最后,给大家介绍下View和ViewGroup最重要的几个方法——
protected void onDraw(Canvas canvas):View类中用于重绘的方法,这个方法是所有View、ViewGroup及其派生类都具有的方法,也是Android UI绘制最重要的方法。开发者可重载该方法,并在重载的方法内部基于参数canvas绘制自己的各种图形、图像效果。
protected void onLayout(boolean changed, int left, int top, int right, int bottom):View类中布局发生改变时会调用的方法,这个方法是所有View、ViewGroup及其派生类都具有的方法,重载该类可以在布局发生改变时作定制处理,这在实现一些特效时非常有用。
protected void dispatchDraw(Canvas canvas):ViewGroup类及其派生类具有的方法,这个方法主要用于控制子View的绘制分发,重载该方法可改变子View的绘制,进而实现一些复杂的视效,典型的例子可参见Launcher模块Workspace的dispatchDraw重载。
protected boolean drawChild(Canvas canvas, View child, long drawingTime)):ViewGroup类及其派生类具有的方法,这个方法直接控制绘制某局具体的子view,重载该方法可控制具体某个具体子View。
View、ViewGroup是Android UI体系至关重要的两大基类,本文仅对一些最基本的概念、原理和API进行了介绍,大家要全面掌握还需要阅读SDK中对这两个类的介绍并熟悉其API ,并在应用开发中逐渐的加深理解和掌握其用法。