Windows 下安装 triton 教程
目录
- 背景
- 解决方法
-
- 方法一:(治标不治本)
- 方法二:(triton-windows)
-
- - 安装 MSVC 和 Windows SDK
- - vcredist 安装
- - whl 安装
- - 验证
背景
triton 目前官方只有Linux 版本,若未安装,则会出现报错:
ModuleNotFoundError: No module named 'triton'
在 Windows 系统中,如果直接用 pip install triton 来安装,则会报错:
ERROR: Could not find a version that satisfies the requirement triton (from versions: none)
ERROR: No matching distribution found for triton
解决方法
方法一:(治标不治本)
有大神强行在Windows平台上编译了 triton 的whl,参考博客【window平台安装 triton】【Python|Windows 系统安装 triton 的方法】,在下载路径下 pip install 安装 whl 文件即可。
即直接去 HuggingFace 上下载 triton 的 Windows 包:https://hf-mirror.com/madbuda/triton-windows-builds。
在此给出各个版本的下载链接:
- 【triton 2.0.0 (Python 3.10)】
- 【triton 2.1.0 (Python 3.10)】【triton 2.1.0 (Python 3.11)】
- 【triton 3.0.0(Python 3.10)】【triton 3.0.0(Python 3.11)】【triton 3.0.0(Python 3.12)】
但是,实测上述安装包里面 triton 核心的 triton.jit 和 torch.compile 等功能均无法像Linux下正常运行,上述安装包只是从形式上完成编译。
方法二:(triton-windows)
主要参考大佬的工作:triton-windows。
环境要求:
torch >= 2.4.0;CUDA >=12;- 安装
MSVC和Windows SDK; - 环境需要有
msvcp140.dll和vcruntime140.dll。如果 - 然后就可以安装他编译的 whl,实现真正的功能。
- 安装 MSVC 和 Windows SDK
参考博客:【Windows 如何仅安装 MSVC 而不安装 Visual Studio】
-
下载 Visual Studio Installer,下载地址为:https://aka.ms/vs/17/release/vs_BuildTools.exe。
-
运行下载的exe,然后安装单个组件:
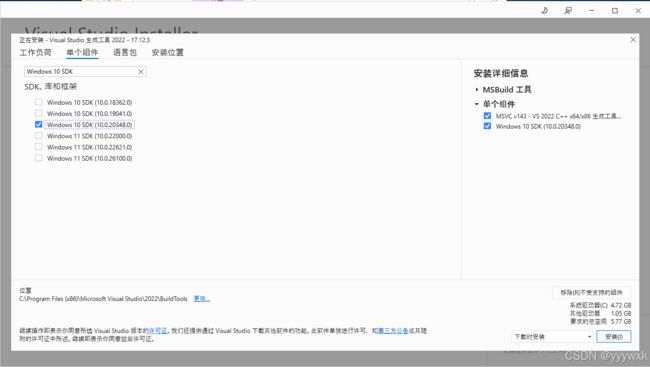
注意只需要下载单个组件,无需安装Visual Studio。 -
修改环境变量,请参考博客:【Windows 如何仅安装 MSVC 而不安装 Visual Studio】
位置为:系统高级设置-环境变量-系统变量。注意修改版本号为你自己的版本- 选择 Path ,添加:
C:\Program Files (x86)\Microsoft Visual Studio\2022\BuildTools\VC\Tools\MSVC\14.40.33807\bin\Hostx64\x64
C:\Program Files (x86)\Windows Kits\10\bin\10.0.20348.0\x64 - 添加 LIB,添加3条:
C:\Program Files (x86)\Microsoft Visual Studio\2022\BuildTools\VC\Tools\MSVC\14.40.33807\lib\x64; C:\Program Files (x86)\Windows Kits\10\Lib\10.0.20348.0\ucrt\x64; C:\Program Files (x86)\Windows Kits\10\Lib\10.0.20348.0\um\x64 - 添加 INCLUDE,添加6条:
C:\Program Files (x86)\Microsoft Visual Studio\2022\BuildTools\VC\Tools\MSVC\14.40.33807\include; C:\Program Files (x86)\Windows Kits\10\Include\10.0.20348.0\ucrt; C:\Program Files (x86)\Windows Kits\10\Include\10.0.20348.0\um; C:\Program Files (x86)\Windows Kits\10\Include\10.0.20348.0\winrt; C:\Program Files (x86)\Windows Kits\10\Include\10.0.20348.0\cppwinrt; C:\Program Files (x86)\Windows Kits\10\Include\10.0.20348.0\shared
- 选择 Path ,添加:
-
验证 MSVC 和 Windows SDK 安装成功
命令行里输入cl,输出Microsoft (R) C/C++ Optimizing Compiler ...即可。
- vcredist 安装
vcredist 是必需的(也称为“Visual C++ Redistributable for Visual Studio 2015-2022”,msvcp140.dll,vcruntime140.dll)。如果没有,可以从 https://aka.ms/vs/17/release/vc_redist.x64.exe 中安装。
- whl 安装
前期环境都配置无误后,直接下载 whl 安装:
pip install https://github.com/woct0rdho/triton-windows/releases/download/v3.1.0-windows.post5/triton-3.1.0-cp310-cp310-win_amd64.whl
也可手动下载下来然后在下载路径下安装:
pip install triton-3.1.0-cp310-cp310-win_amd64.whl
- 验证
验证脚本为:
import torch
import triton
import triton.language as tl

@triton.jit
def add_kernel(x_ptr, y_ptr, output_ptr, n_elements, BLOCK_SIZE: tl.constexpr):
    pid = tl.program_id(axis=0)
    block_start = pid * BLOCK_SIZE
    offsets = block_start + tl.arange(0, BLOCK_SIZE)
    mask = offsets < n_elements
    x = tl.load(x_ptr + offsets, mask=mask)
    y = tl.load(y_ptr + offsets, mask=mask)
    output = x + y
    tl.store(output_ptr + offsets, output, mask=mask)

def add(x: torch.Tensor, y: torch.Tensor):
    output = torch.empty_like(x)
    assert x.is_cuda and y.is_cuda and output.is_cuda
    n_elements = output.numel()
    grid = lambda meta: (triton.cdiv(n_elements, meta["BLOCK_SIZE"]),)
    add_kernel[grid](x, y, output, n_elements, BLOCK_SIZE=1024)
    return output

a = torch.rand(3, device="cuda")
b = a + a
b_compiled = add(a, a)
print(b_compiled - b)
print("If you see tensor([0., 0., 0.], device='cuda:0'), then it works")
不报错即说明配置成功。