RepVGGBlock实现
文章目录
- 前言
- 1、Block结构
- 2、Block代码实现
- 总结
前言
在上一篇博文conv+bn算子融合中,介绍了conv+bn算子融合。本文将要介绍的RepVGG(Re-parameterized Convolutional Neural Network)是一种通过重新参数化技术将复杂的神经网络结构转换为简单的卷积层的方法。这种方法可以在训练时使用复杂的多分支结构,在推理时将其简化为单一的卷积层,从而显著提高推理速度。
1、Block结构
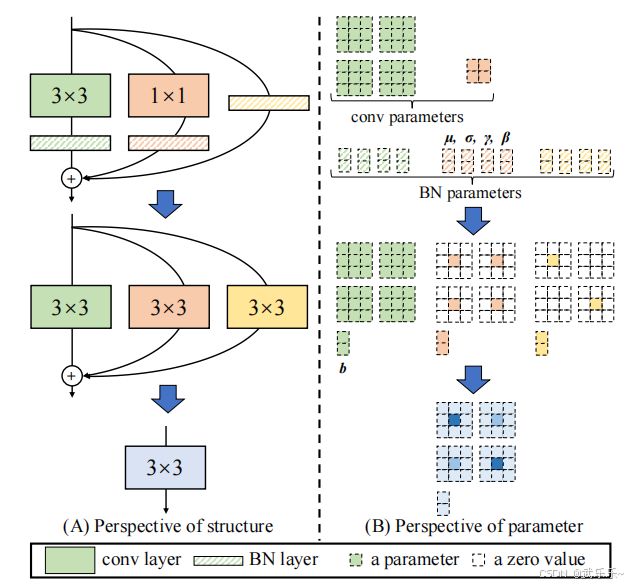
RepVGGBlock 是 RepVGG 网络的基本构建单元,它结合了 3x3 卷积、1x1 卷积和恒等映射,并通过了非共享权重的Batch Normalization (BN) 层来优化性能。具体来说:
3x3 卷积:用于捕捉局部特征。
1x1 卷积:用于降维和升维操作,减少计算量。
恒等映射:确保输入和输出通道数相同。
2、Block代码实现
本节提供了一个完整的Block单元测试,来模拟RepVGG的训练和测试(算子合并后),计算结果相等。读者可一键运行。
import torch
import torch.nn as nn
class RepVGGBlock(nn.Module):
def __init__(self, in_channels, out_channels):
super().__init__()
assert in_channels == out_channels, "输入输出通道必须相同!"
# 3x3卷积 + 独立BN
self.conv3x3 = nn.Conv2d(in_channels, out_channels, kernel_size=3, padding=1, bias=False)
self.bn3x3 = nn.BatchNorm2d(out_channels)
# 1x1卷积 + 独立BN
self.conv1x1 = nn.Conv2d(in_channels, out_channels, kernel_size=1, bias=False)
self.bn1x1 = nn.BatchNorm2d(out_channels)
# 恒等映射 + 独立BN
self.identity = nn.BatchNorm2d(in_channels)
# 初始化权重
self._init_weights()
def _init_weights(self):
# 3x3卷积:Kaiming初始化
nn.init.kaiming_normal_(self.conv3x3.weight, mode='fan_out', nonlinearity='relu')
# 1x1卷积:初始化为零(等效于无操作,与恒等映射互补)
nn.init.zeros_(self.conv1x1.weight)
# 恒等映射:BN的gamma初始化为1,beta为0
nn.init.ones_(self.identity.weight)
nn.init.zeros_(self.identity.bias)
def forward(self, x):
# 训练时三支路独立计算
branch3x3 = self.bn3x3(self.conv3x3(x))
branch1x1 = self.bn1x1(self.conv1x1(x))
branch_id = self.identity(x)
return branch3x3 + branch1x1 + branch_id
def reparameterize(self):
# 分别融合各分支的卷积和BN
kernel3x3, bias3x3 = self._fuse_conv_bn(self.conv3x3, self.bn3x3)
kernel1x1, bias1x1 = self._fuse_conv_bn(self.conv1x1, self.bn1x1)
kernel_id, bias_id = self._fuse_identity_bn(self.identity)
# 填充1x1和恒等映射到3x3
kernel1x1_padded = self._pad_1x1_to_3x3(kernel1x1)
kernel_id_padded = self._pad_1x1_to_3x3(kernel_id)
# 合并权重和偏置
final_kernel = kernel3x3 + kernel1x1_padded + kernel_id_padded
final_bias = bias3x3 + bias1x1 + bias_id
# 构建合并后的卷积
merged_conv = nn.Conv2d(
self.conv3x3.in_channels,
self.conv3x3.out_channels,
kernel_size=3,
padding=1,
bias=True
)
merged_conv.weight.data = final_kernel
merged_conv.bias.data = final_bias
return merged_conv
def _fuse_conv_bn(self, conv, bn):
"""融合卷积和BN的权重与偏置"""
kernel = conv.weight
running_mean = bn.running_mean
running_var = bn.running_var
gamma = bn.weight
beta = bn.bias
eps = bn.eps
std = (running_var + eps).sqrt()
scale_factor = gamma / std
# 调整权重和偏置
fused_kernel = kernel * scale_factor.reshape(-1, 1, 1, 1)
fused_bias = beta - running_mean * scale_factor
return fused_kernel, fused_bias
def _fuse_identity_bn(self, bn):
"""融合恒等映射的BN(视为1x1单位矩阵卷积)"""
identity_kernel = torch.eye(bn.num_features, dtype=bn.weight.dtype, device=bn.weight.device)
identity_kernel = identity_kernel.view(bn.num_features, bn.num_features, 1, 1)
# 处理BN参数
scale_factor = bn.weight / (bn.running_var + bn.eps).sqrt()
fused_kernel = identity_kernel * scale_factor.view(-1, 1, 1, 1)
fused_bias = bn.bias - bn.running_mean * scale_factor
return fused_kernel, fused_bias
def _pad_1x1_to_3x3(self, kernel):
"""将1x1卷积核填充为3x3,中心为原权重,其余为0"""
if kernel.size(-1) == 1:
padded = torch.zeros(kernel.size(0), kernel.size(1), 3, 3, device=kernel.device)
padded[:, :, 1, 1] = kernel.squeeze()
return padded
return kernel
# ----------------------
# 严格测试用例
# ----------------------
def test_repvgg():
torch.manual_seed(42)
# 输入数据(确保数值范围合理)
x = torch.randn(2, 3, 4, 4) # 小方差数据,加速BN收敛
# 初始化模块
block = RepVGGBlock(3, 3)
# 训练模式:更新BN统计量
block.train()
for _ in range(100): # 强制更新BN参数
y = block(x)
y.sum().backward() # 伪反向传播
# 推理模式:合并权重
block.eval()
with torch.no_grad():
# 原始输出
orig_out = block(x)
# 合并后的卷积
merged_conv = block.reparameterize()
merged_out = merged_conv(x)
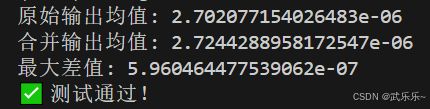
# 打印关键数据
print("原始输出均值:", orig_out.mean().item())
print("合并输出均值:", merged_out.mean().item())
print("最大差值:", torch.abs(orig_out - merged_out).max().item())
# 验证一致性(容差1e-6)
assert torch.allclose(orig_out, merged_out, atol=1e-6), f"合并验证失败!最大差值:{torch.abs(orig_out - merged_out).max().item()}"
print("✅ 测试通过!")
test_repvgg()
总结
下一篇将介绍QARepVGG Block,来解决RepVGG Block量化int8掉点问题,敬请期待。