【读书笔记-《Android游戏编程之从零开始》】4.Android 游戏开发常用的系统控件(EditText、CheckBox、Radiobutton)
3.4 EditText
EditText类官方文档地址:http://developer.android.com/reference/android/widget/EditText.html
EditText继承TextView,所以EditText具有TextView的属性特点,下面主要介绍一些EditText的特有的输入法的属性特点
android:layout_gravity="center_vertical":设置控件显示的位置:默认top,这里居中显示,还有bottom
android:hin:Text为空时显示的文字提示信息,可通过textColorHint设置提示信息的颜色。
android:singleLine:设置单行输入,一旦设置为true,则文字不会自动换行。
android:gray="top" :多行中指针在第一行第一位置et.setSelection(et.length());:调整光标到最后一行
android:autoText :自动拼写帮助。这里单独设置是没有效果的,可能需要其他输入法辅助才行
android:capitalize :设置英文字母大写类型。设置如下值:sentences仅第一个字母大写;words每一个单词首字母大小,用空格区分单词;characters每一个英文字母都大写。
android:digits :设置允许输入哪些字符。如“1234567890.+-*/%\n()”
android:singleLine :是否单行或者多行,回车是离开文本框还是文本框增加新行android:numeric :如果被设置,该TextView接收数字输入。有如下值设置:integer正整数、signed带符号整数、decimal带小数点浮点数。
android:inputType:设置文本的类型
android:password :密码,以小点”.”显示文本
android:phoneNumber :设置为电话号码的输入方式。
android:editable :设置是否可编辑。仍然可以获取光标,但是无法输入。
android:autoLink=”all” :设置文本超链接样式当点击网址时,跳向该网址
android:textColor = "#ff8c00":字体颜色
android:textStyle="bold":字体,bold, italic, bolditalic
android:textAlign="center":EditText没有这个属性,但TextView有
android:textColorHighlight="#cccccc":被选中文字的底色,默认为蓝色
android:textColorHint="#ffff00":设置提示信息文字的颜色,默认为灰色
android:textScaleX="1.5":控制字与字之间的间距
android:typeface="monospace":字型,normal, sans, serif, monospace
android:background="@null":空间背景,这里没有,指透明
android:layout_weight="1":权重在控制控件显示的大小时蛮有用的。
android:textAppearance="?android:attr/textAppearanceLargeInverse":文字外观,这里引用的是系统自带的一个外观,?表示系统是否有这种外观,否则使用默认的外观。
<?xml version="1.0" encoding="utf-8"?>
<LinearLayout xmlns:android="http://schemas.android.com/apk/res/android"
    android:layout_width="match_parent"
    android:layout_height="match_parent"
    android:orientation="vertical" >

    <TextView
        android:id="@+id/tv"
        android:layout_width="match_parent"
        android:layout_height="wrap_content"
        android:text="@string/hello_world" />

    <EditText
        android:id="@+id/et"
        android:layout_width="match_parent"
        android:layout_height="wrap_content"
        android:hint="@string/txt_hint" />

    <Button
        android:id="@+id/btn"
        android:layout_width="match_parent"
        android:layout_height="wrap_content"
        android:text="@string/btn_GetEditTextStr" />

</LinearLayout>
public class MainActivity extends Activity {
    private EditText et; // 创建一个文本编辑器对象
    private Button btn;
    private TextView tv;
    @Override
    protected void onCreate(Bundle savedInstanceState) {
        // TODO Auto-generated method stub
        super.onCreate(savedInstanceState);
        setContentView(R.layout.activity_main);
        et = (EditText) findViewById(R.id.et);
        btn = (Button) findViewById(R.id.btn);
        tv = (TextView) findViewById(R.id.tv);

        btn.setOnClickListener(new OnClickListener() {

            @Override
            public void onClick(View v) {
                // TODO Auto-generated method stub
                // 获取EditText中的文本内容
                String str = et.getText().toString();
                // 让TextView将获取到的EditText内容str显示出来
                tv.setText(str);
            }
        });
    }
}
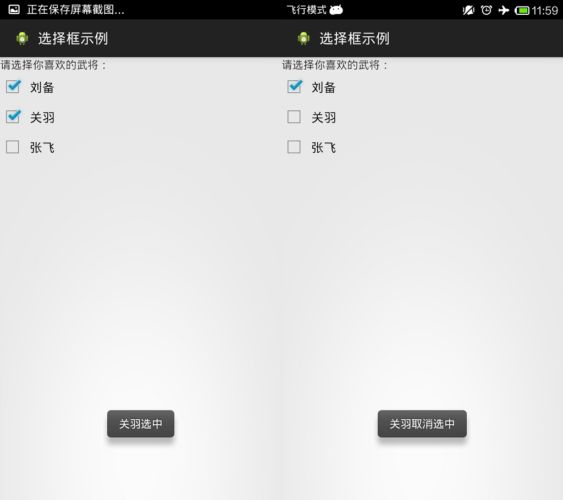
3.5 CheckBox
CheckBox类官方文档地址:http://developer.android.com/reference/android/widget/CheckBox.html
<?xml version="1.0" encoding="utf-8"?>
<LinearLayout xmlns:android="http://schemas.android.com/apk/res/android"
    android:layout_width="match_parent"
    android:layout_height="match_parent"
    android:orientation="vertical" >

    <TextView
        android:layout_width="match_parent"
        android:layout_height="wrap_content"
        android:text="@string/hello_world" />

    <CheckBox
        android:id="@+id/cb1"
        android:layout_width="match_parent"
        android:layout_height="wrap_content"
        android:button="@drawable/checkboxstyle"
        android:text="@string/checkbox1" />

    <CheckBox
        android:id="@+id/cb2"
        android:layout_width="match_parent"
        android:layout_height="wrap_content"
        android:button="@drawable/checkboxstyle"
        android:text="@string/checkbox2" />

    <CheckBox
        android:id="@+id/cb3"
        android:layout_width="match_parent"
        android:layout_height="wrap_content"
        android:button="@drawable/checkboxstyle"
        android:text="@string/checkbox3" />

</LinearLayout>
import android.app.Activity;
import android.os.Bundle;
import android.widget.CheckBox;
import android.widget.CompoundButton;
import android.widget.CompoundButton.OnCheckedChangeListener;
import android.widget.Toast;

public class MainActivity extends Activity implements OnCheckedChangeListener {
    private CheckBox cb1, cb2, cb3;

    @Override
    protected void onCreate(Bundle savedInstanceState) {
        // TODO Auto-generated method stub
        super.onCreate(savedInstanceState);
        setContentView(R.layout.activity_main);
        // 实例化3个CheckBox
        cb1 = (CheckBox) findViewById(R.id.cb1);
        cb2 = (CheckBox) findViewById(R.id.cb2);
        cb3 = (CheckBox) findViewById(R.id.cb3);
        cb1.setOnCheckedChangeListener(this);
        cb2.setOnCheckedChangeListener(this);
        cb3.setOnCheckedChangeListener(this);
    }

    // 重写监听器的抽象函数
    /*
     * onCheckedChanged(CompoundButton buttonView, boolean isChecked)
     * 第一个参数确定哪一个CheckBox状态发生改变 第二个参数确定改变的CheckBox的具体状态值,true为勾选,false为未勾选。
     */
    @Override
    public void onCheckedChanged(CompoundButton buttonView, boolean isChecked) {
        // buttonView 选中状态发生改变的那个按钮
        // isChecked 表示按钮新的状态(true/false)
        if (cb1 == buttonView || cb2 == buttonView || cb3 == buttonView) {
            if (isChecked) {
                // 显示一个提示消息
                toastDisplay(buttonView.getText() + "选中");
            } else {
                toastDisplay(buttonView.getText() + "取消选中");
            }
        }
    }

    private void toastDisplay(String str) {
        /*
         * Toast.makeText(Context context, CharSequence text,int duration);
         * 第一个参数是上下文对象 第二个参数是显示的文本内容
         * 第三个参数是显示提示消息的持续时间;其值有2个参数LENGTH_SHORT(短暂持续)和LENGTH_LONG(略长持续):
         * 最后,使用Toast对象调用show()方法即可
         */
        Toast.makeText(this, str, Toast.LENGTH_SHORT).show();
    }

}
CheckBox样式修改:
在res/drawable中添加checkbox自定义样式的xml文件。
<?xml version="1.0" encoding="utf-8"?>
<selector xmlns:android="http://schemas.android.com/apk/res/android">
<!-- 选中状态样式 -->
    <item android:drawable="@drawable/checkbox_checked" android:state_checked="true"></item>
    <!-- 未选中状态样式 -->
    <item android:drawable="@drawable/checkbox_normol" android:state_checked="false"></item>

</selector>
然后在布局文件中引用就可以了。
 <CheckBox
        android:id="@+id/cb1"
        android:layout_width="match_parent"
        android:layout_height="wrap_content"
        android:button="@drawable/checkboxstyle"
        android:text="@string/checkbox1" />
3.6 Radiobutton
Radiobutton类官方文档地址:http://developer.android.com/reference/android/widget/RadioButton.html
RadioButton与CheckBox监听步骤类似,但RadioButton监听需要注意三点:
1.RadioButton与CheckBox使用的监听器不同。
2.RadioButton绑定监听的时候,不是每个RadioButton都去绑定,因为所有的RadioButton都被放在了RadioGroup单选组中,所以只需要将RadioGroup绑定上监听器即可。
3.重写监听器函数onCheckedChanged(RadioGroup group, int checkedId),这个函数的第一个参数是单选组,注意第二个参数,这里的checkedId不是RadioGroup单选组中的每个RadioButton的下标,而是发生状态改变的RadioButton的内存ID。所以在进行判断哪个RadioButton发生状态改变的时候,可以利用RadioButton.getID来与checkedId进行对比
<?xml version="1.0" encoding="utf-8"?>
<LinearLayout xmlns:android="http://schemas.android.com/apk/res/android"
    android:layout_width="match_parent"
    android:layout_height="match_parent"
    android:orientation="vertical" >

    <RadioGroup
        android:id="@+id/radGrp"
        android:layout_width="wrap_content"
        android:layout_height="wrap_content" >

        <RadioButton
            android:id="@+id/rb1"
            android:layout_width="match_parent"
            android:layout_height="wrap_content"
            android:text="@string/rb1" />

        <RadioButton
            android:id="@+id/rb2"
            android:layout_width="match_parent"
            android:layout_height="wrap_content"
            android:text="@string/rb2" />

        <RadioButton
            android:id="@+id/rb3"
            android:layout_width="match_parent"
            android:layout_height="wrap_content"
            android:text="@string/rb3" />
    </RadioGroup>

</LinearLayout>
import android.app.Activity;
import android.os.Bundle;
import android.widget.RadioButton;
import android.widget.RadioGroup;
import android.widget.RadioGroup.OnCheckedChangeListener;
import android.widget.Toast;

public class MainActivity extends Activity implements OnCheckedChangeListener {
    private RadioButton rb1, rb2, rb3;
    private RadioGroup rg;

    @Override
    protected void onCreate(Bundle savedInstanceState) {
        super.onCreate(savedInstanceState);
        setContentView(R.layout.activity_main);
        rb1 = (RadioButton) findViewById(R.id.rb1);
        rb2 = (RadioButton) findViewById(R.id.rb2);
        rb3 = (RadioButton) findViewById(R.id.rb3);
        rg = (RadioGroup) findViewById(R.id.radGrp);
        rg.setOnCheckedChangeListener(this);// 将单选组绑定监听器
    }

    // 重写监听器函数
    /*
     * onCheckedChanged(RadioGroup group, int checkedId) 第一个参数是单选组
     * 第二个参数这里的checkedId发生改变的RadioButton的内存ID。
     * 在进行判断哪个RadioButton发生状态改变的时候,可以利用RadioButton.getID来与checkedId进行对比
     */
    @Override
    public void onCheckedChanged(RadioGroup group, int checkedId) {
        if (group == rg)
        {
            String rbName = null;
            if (checkedId == rb1.getId()) {
                rbName = rb1.getText().toString();
            } else if (checkedId == rb2.getId()) {
                rbName = rb2.getText().toString();
            } else if (checkedId == rb3.getId()) {
                rbName = rb3.getText().toString();
            }

            Toast.makeText(this, "选择了下标为“" + rbName + "”的单选按钮",
                    Toast.LENGTH_SHORT).show();
        }
    }

}


