IOS工作笔记(四)
说明:记录下学习IOS的一些琐碎,有些在现在看起来很简单幼稚,不过权当学习足迹吧!
1.ios7中,对状态栏的调整是在控制器中进行的。
1 //设置状态栏为白色
2 -(UIStatusBarStyle)preferredStatusBarStyle{
3     return UIStatusBarStyleLightContent;
4 }
5 //隐藏状态栏
6 -(BOOL)prefersStatusBarHidden{
7     return YES;
8 }
2.给UIImageView或UILabel添加事件,可以这样
1 UIImageView *imgView = [[UIImageView alloc]initWithFrame:CGRectMake(0,0,12,23)];
2 imgView.userInteractionEnabled = YES;//必须设为YES,否则点击无反应
3 UITapGestureRecognizer *singTap = [[UITapGestureRecognizer alloc]initWithTarget:self action:@selector(imgEnlarge:)];
4 [imgView addGestureRecognizer:singTap];
5
6 //放大事件
7 -(void)imgEnlarge:(UIButton *)btn{
8     NSLog(@"图片被点击");
9 }
3.获取按钮上的文字。
1 [btn setTitle:@"aaaa" forState:UIControlStateNormal];//设置按钮文字
2 NSString *titleLabel = [btn titleForState:UIControlStateNormal]; //获取文字
4.UITableView一般要实现两个协议,UITableViewDataSource,UITableViewDelegate.
并且有NSIndexPath类,主要用来标识当前cell在tableView中的位置,该类有两个属性,section和row,前者表示当前cell位于哪个section中,后者表示在section的第几行。
当UITableView往下拉时,若自动弹回来,则很可能是因为tableView的frame有问题,其高度超过了它的父view高度。
5.tableViewCell的重用,需要使用
 1 -(UITableViewCell *)tableView:(UITableView *)tableView cellForRowAtIndexPath:(NSIndexPath *)indexPath{
 2     //声明静态字符串对象,用来标记重用表格
 3     static NSString *cellIdentifier = @"cellIdentifier";
 4     //用该标记表示需要重用的cell
 5     UITableViewCell *cell = [tableView dequeueReusableCellWithIdentifier:cellIdentifier];
 6     //如果没有多余的cell,则需要创建新的
 7     if (cell==nil) {
 8         cell = [[UITableViewCell alloc]initWithStyle:UITableViewCellStyleValue1 reuseIdentifier:cellIdentifier];
 9     } 14
15     //设置cell的属性
16     //………………
17     return cell;
18 }
6.自定义UIPageControl,大小,颜色等。
 1 @property(nonatomic,strong) UIPageControl *pageControl;
 2
 3 /** 添加分页器 */
 4 -(void)setupPageControl{
 5     self.pageControl = [[UIPageControl alloc]init];
 6     self.pageControl.frame = CGRectMake(450, 400, 100, 80);
 7     //设置pageControl的总页数
 8     self.pageControl.numberOfPages = 3;
 9     self.pageControl.currentPage = 0;
10     //当前页面所在小点颜色
11     self.pageControl.currentPageIndicatorTintColor = [UIColor redColor];
12     //其余小点颜色
13     self.pageControl.pageIndicatorTintColor = [UIColor blueColor];
14
15     [self addSubview:self.pageControl];
16 }
7.UIScrollView中分页很简单,一个属性就搞定。
pagingEnabled = YES ;
即可。如
self.myScrollView.pagingEnabled = YES;
分页的依据是scrollView的宽度,所以在做类似图片轮播器时要设置imgView的宽度要与scrollView宽度一致。
8.设置代理时,除了要使用协议外,还需设置代理是哪个,一般由类似这样的代码实现
self.myScrollView.delegate = self;
在.h文件中,遵守协议的代码为
@interface ImageCycle : UIView<UIScrollViewDelegate>
@end
9.scrollView中的contentOffSet就是已经滚出屏幕的部分的x值
10.NSArray的count方法返回值类型为NSUInteger,所以当定义类似的
int appNum = self.appArray.count;
时,会给出警告
Implicit conversion loses integer precision: 'NSUInteger' (aka 'unsigned long') to 'int'
可以用强制转换来解决,
int appNum = (int) self.appArray.count;
11.获取设备的高度、宽度
1 CGFloat deviceHeight = [UIScreen mainScreen].bounds.size.height;
2 CGFloat deviceHeight = [UIScreen mainScreen].bounds.size.width;
用实际设备测试发现,ipad air的宽度=768,高度=1024 ;ipad mini的宽度=1024,高度=768
所以在解决键盘遮住文本框问题时,需要用到这些。
12.关于子控件和父控件的一些小问题需要注意,在使用initWithFrame中,父控件的frame何时定义对子控件也有影响。比如在
@interface ActivityListCell : UIView中,定义
 1 -(id)initWithFrame:(CGRect)frame{
 2     //先调用父类的initWithFrame方法,所以父类的frame是否定义对于子类很重要
 3     self = [super initWithFrame:frame];
 4     if (self) {
 5         UILabel *label = [[UILabel alloc]init];
 6         label.text = @"asasa";
 7         label.frame = self.frame;
 8         [self addSubview:label];
 9     }
10     return self;
11 }
然后在controller中
1 - (void)viewDidLoad {
2     [super viewDidLoad];
3     ActivityListCell *actTabView = [[ActivityListCell alloc]init];
4     actTabView.frame = CGRectMake(0, 0, 800, 600);
5     actTabView.backgroundColor = [UIColor lightGrayColor];
6     [self.view addSubview:actTabView];
7 }
定义子控件,有时会发现不会出现任何东西。原因在于在controller中定义actTabView时,是先初始化,再定义frame.
只有直接定义才会出现label
ActivityListCell *actTabView = [[ActivityListCell alloc]initWithFrame:CGRectMake(0, 0, 800, 600)];
切记。
13.往controller的跳转,除了设置rootViewController,或
[self.presentViewController:myViewCOntroller animated:YES completion:nil];
外,还可以使用push.
如界面A(Acontroller)往界面B(Bcontroller)跳,可以在Acontroller里写
[self.navigationController pushViewController:Bcontroller];
此时在B界面可以直接返回A界面,程序会自动在导航栏顶部添加返回按钮。但若想自定义事件返回A界面,可以在Bcontroller里写
[self.navigationController popToRootViewControllerAnimated:YES];
当然,前提是在AppDelegate必须设置UINavigationController,否则用pushViewController无效。
并且使用pushViewController后,在B页面,会自带一个“Back”按钮返回上一页。
14.如何自定义tableViewCell?如想在cell里添加两个button,则需要自定义一个类,如
在.h文件中,button必须在.h文件中定义,这样给第三方view暴露了接口。
1 @interface ActivieyViewCell : UITableViewCell
2 /** 活动内容btn */
3 @property(nonatomic,strong) UIButton *contentBtn;
4 /** 活动花费btn */
5 @property(nonatomic,strong) UIButton *costBtn;
6
7 /** 设置button的位置等信息 */
8 - (void)setupCellBtn;
9 @end
在.m文件中,直接在自定义方法里定义cell要添加的内容就行。
 1 @implementation ActivieyViewCell
 2 -(void)setupCellBtn{
 3     self.contentBtn = [UIButton buttonWithType:UIButtonTypeCustom];
 4     self.contentBtn.frame = CGRectMake(10, 10, 400, 20);
 5     self.contentBtn.backgroundColor = [UIColor brownColor];
 6     [self addSubview:self.contentBtn];
 7
 8     self.costBtn = [UIButton buttonWithType:UIButtonTypeCustom];
 9     self.costBtn.frame = CGRectMake(500, 10, 40, 20);
10     self.costBtn.backgroundColor = [UIColor lightGrayColor];
11     [self addSubview:self.costBtn];
12 }
13 @end
在tableView的cellForRowAtIndexPath中添加
 1 - (UITableViewCell *)tableView:(UITableView *)tableView cellForRowAtIndexPath:(NSIndexPath *)indexPath{
 2     static NSString *cellIdentify = @"activityList";
 3     //在该处就可以使用自定义的tableViewCell
 4     //前边的都是用
 5     //UITableViewCell *actTabCell = [tableView dequeueReusableCellWithIdentifier:cellIdentify];
 6     ActivieyViewCell *actTabCell = [tableView dequeueReusableCellWithIdentifier:cellIdentify];
 7
 8     if (actTabCell==nil) {
 9         actTabCell = [[ActivieyViewCell alloc]initWithStyle:UITableViewCellStyleDefault reuseIdentifier:cellIdentify];
10     }
11
12     //在该处定义button的位置信息等
13     [actTabCell setupCellBtn];
14
15     [actTabCell.contentBtn setTitle:actModel.activityContent forState:UIControlStateNormal];
16     [actTabCell.contentBtn setBackgroundColor:[UIColor brownColor]];
17     actTabCell.contentBtn.titleLabel.numberOfLines = 0;
18
19     [actTabCell.costBtn setTitle:actModel.activityCost forState:UIControlStateNormal];
20     [actTabCell.costBtn setBackgroundColor:[UIColor lightGrayColor]];
21     actTabCell.costBtn.titleLabel.numberOfLines = 0;
22
23     return actTabCell;
24 }
这样写的好处就是tableViewCell在复用时不会出现位置混乱等bug.
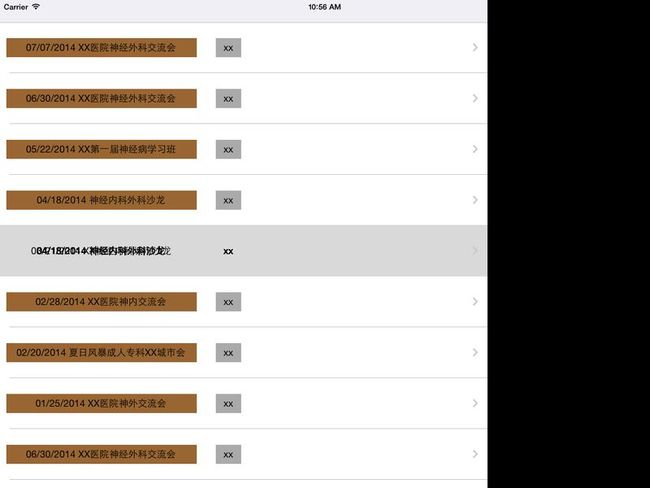
PS:上述自定义cell的方法还有一个bug,还是cell的复用问题。点击cell时,背景有时会变乱.如图
原因在于[actTabCell setupCellBtn]方法会不停地创建新的cell,所以复用时会出问题。改进方法是将setupCellBtn方法写到
initWithStyle中,在初始化时就设置。改后如下:
在.m中
 1 @implementation ActivieyViewCell
 2 //重写该方法,防止复用时混乱
 3 - (instancetype)initWithStyle:(UITableViewCellStyle)style reuseIdentifier:(NSString *)reuseIdentifier{
 4     self = [super initWithStyle:style reuseIdentifier:reuseIdentifier];
 5     if (self) {
 6         [self setupBtnFrame];
 7     }
 8     return self;
 9 }
10
11 -(void)setupCellBtn{
12     self.contentBtn = [UIButton buttonWithType:UIButtonTypeCustom];
13     self.contentBtn.frame = CGRectMake(10, 10, 400, 20);
14     self.contentBtn.backgroundColor = [UIColor brownColor];
15     [self addSubview:self.contentBtn];
16
17     self.costBtn = [UIButton buttonWithType:UIButtonTypeCustom];
18     self.costBtn.frame = CGRectMake(500, 10, 40, 20);
19     self.costBtn.backgroundColor = [UIColor lightGrayColor];
20     [self addSubview:self.costBtn];
21 }
22 @end
然后在cellForRowAtIndexPath方法中删除
[actTabCell setupCellBtn];
即可。
自定义tableViewCell最忌讳的就是在cellForRowAtIndexPath中定义frame,复用时容易cell混乱,如
 1 - (UITableViewCell *)tableView:(UITableView *)tableView cellForRowAtIndexPath:(NSIndexPath *)indexPath
 2 {
 3     static NSString *cellIdentify = @"activityList";
 4     UITableViewCell *actTabCell = [tableView dequeueReusableCellWithIdentifier:cellIdentify];
 5
 6     if (actTabCell==nil) {
 7         actTabCell = [[UITableViewCell alloc]initWithStyle:UITableViewCellStyleDefault reuseIdentifier:cellIdentify];
 8     }
 9
10     //定义cell内容
11     for (UIView *view in actTabCell.contentView.subviews) {
12         [view removeFromSuperview];
13     }
14
15     ActivityModel *actModel = self.dataArray[indexPath.row];
16
17     /** 不能在该方法内定义frame,该处就用错了 */
18     UIButton *contentBtn = [UIButton buttonWithType:UIButtonTypeRoundedRect];
19     contentBtn.frame = CGRectMake(10, 0, 100, 20);
20     [contentBtn setTitle:actModel.activityContent forState:UIControlStateNormal];
21     [contentBtn setTitleColor:[UIColor blackColor] forState:UIControlStateNormal];
22     [contentBtn setBackgroundColor:[UIColor brownColor]];
23     [actTabCell.contentView addSubview:contentBtn];
24
25     UIButton *costBtn = [UIButton buttonWithType:UIButtonTypeRoundedRect];
26     costBtn.frame = CGRectMake(200 , 0, 50, 20);
27     [costBtn setTitle:actModel.activityCost forState:UIControlStateNormal];
28     [costBtn setBackgroundColor:[UIColor lightGrayColor]];
29     [actTabCell.contentView addSubview:costBtn];
30
31     return actTabCell;
32
33 }
15.tableView有tableHeaderView和tableFooterView属性,可以这样定义
self.activityTabView.tableHeaderView = self.choiceView;

