ASP.NET MVC实用技术:自定义AuthorizeAttribute与ActionLink的隐藏
在有些情况下,我们希望界面上的Action Link不仅仅是限制未授权用户的进一步访问,而是对于这些用户直接隐藏。比如,以普通用户登录时,只能在页面上看到一些常规的链接,而以管理员身份登录时,除了能看到这些常规链接外,还能够看到网站管理的链接。本文将介绍如何使用自定义的AuthorizeAttribute来实现这样的功能。
为了方便介绍,在这里不打算使用那些复杂的权限管理子系统或者权限验证机制,我们就做一个非常简单的假设:如果输入的用户名是“daxnet”,则表示这个账户是一个管理员账户,否则,它就是一个普通用户账户。在实际应用过程中,读者朋友可以采用自己的一套权限验证逻辑来判断某个账户是否为管理员。
WCF Service
在《ASP.NET MVC实用技术:开篇》一文,我已经介绍过了三种不同的ASP.NET MVC应用模式,其中第二种“Data Transfer Object as View Model”是在企业级应用中最为常见的一种方式,本文(及以后的系列文章)都会使用这种应用模式进行介绍。所以,在这里我们也还是需要建立一个WCF Service,用来向客户端返回登录用户权限认证的结果。
新建一个WCF Service,在其中定义一个enum类型,用来表示登录用户的账户类型。在这里我们只讨论两种类型:RegularUser,表示普通用户账户;SiteAdmin,表示网站管理员账户。这个enum类型定义如下:
/// <summary>
/// Represents the type of the account.
/// </summary>
[Flags]
public enum AccountType
{
    /// <summary>
    /// Indicates that the account is a regular user.
    /// </summary>
    [EnumMember]
    RegularUser = 1,
    /// <summary>
    /// Indicates that the account is the site administrator.
    /// </summary>
    [EnumMember]
    SiteAdmin = 2
}
使用FlagsAttribute来标记这个AccountType枚举,是为了今后能够更方便地处理更多类型的账户,事实上在我们这个案例中,并没有太大的实际意义。
然后,新建一个Service Contract,为了简化案例,这个Service Contract只包含一个操作,就是根据传入的用户账户名称,返回AccountType。
[ServiceContract(Namespace="http://aspnetmvcpractice.com")]
public interface IAccountService
{
    [OperationContract]
    AccountType GetAccountType(string userName);
}
之后在WCF Service中实现这个接口,根据我们上面的约定,当用户名为“daxnet”的时候,就返回SiteAdmin,否则就返回RegularUser,因此这个实现类还是非常简单的:
public class AccountService : IAccountService
{
    #region IAccountService Members
    public AccountType GetAccountType(string userName)
    {
        if (userName == "daxnet")
            return AccountType.SiteAdmin;
        else
            return AccountType.RegularUser;
    }
    #endregion
}
至此,我们完成了WCF Service部分的开发,接下来,需要在ASP.NET MVC中使用这个WCF Service来完成用户的验证操作。在通常情况下,我们会在ASP.NET MVC的应用程序上直接添加WCF Service的引用,这样做其实也没有什么太大的问题,不过我还是比较习惯另外新建一个Class Library,然后将WCF Service Reference添加到这个Class Library上,这样做的好处是,可以把所有与ASP.NET MVC扩展相关的内容都集中起来,而且这种扩展相关的类型和方法都有可能需要用到WCF Service提供的服务,这样也不至于将ASP.NET MVC应用程序的结构弄得很乱。在这个案例中,我们新建一个名为WebExtensions的Class Library,在这个Library中使用刚刚创建好的WCF Service来实现我们的自定义授权特性。
Web Extensions
CustomAuthorizeAttribute
在新建的这个Class Library中直接添加WCF Service Reference,这将在这个Library中产生一系列的代理类型,以及一个app.config文件。不要去关注这个app.config文件,因为它在这个Class Library中并不起什么作用;但是也不要去删除这个文件,因为后面我们还是需要用到它里面的内容的。
在Class Library中,新建一个CustomAuthorizeAttribute类,使这个类继承于AuthorizeAttribute。我们会在后面将这个Attribute用在action上,以限制未授权用户对页面的访问。在这个类中,重载AuthorizeCore方法,它的处理逻辑如下:首先判断当前账户是否被认证,如果没有,则返回false;然后调用WCF Service来获取当前账户的类型,并跟给定的类型进行比较,如果类型相同,则返回true,否则返回false。假设这个给定的账户类型是通过CustomAuthorizeAttribute类的构造函数传入的,那么,当我们在某个action上应用[CustomAuthorizeAttribute(AccountType.SiteAdmin)]这个特性的时候,只要访问这个action的用户账户不是SiteAdmin,程序就会自动跳转到登录页面,请求用户以网站管理员的身份登录。CustomAuthorizeAttribute类的代码如下:
public class CustomAuthorizeAttribute : AuthorizeAttribute
{
    private readonly AccountType requiredType;

    public CustomAuthorizeAttribute(AccountType comparedWithType)
    {
        this.requiredType = comparedWithType;
    }

    internal bool PerformAuthorizeCore(System.Web.HttpContextBase httpContext) { return this.AuthorizeCore(httpContext); }

    protected override bool AuthorizeCore(System.Web.HttpContextBase httpContext)
    {
        if (httpContext == null)
            throw new ArgumentNullException("httpContext");

        if (!httpContext.User.Identity.IsAuthenticated)
            return false;

        if (this.requiredType == (AccountType.SiteAdmin | AccountType.RegularUser))
            return true;

        using (AccountServiceClient client = new AccountServiceClient())
        {
            var calculatedAccountType = client.GetAccountType(httpContext.User.Identity.Name);

            switch(this.requiredType)
            {
                case AccountType.RegularUser:
                    if ((calculatedAccountType & AccountType.RegularUser) == AccountType.RegularUser)
                        return true;
                    else
                        return false;
                case AccountType.SiteAdmin:
                    if ((calculatedAccountType & AccountType.SiteAdmin) == AccountType.SiteAdmin)
                        return true;
                    else
                        return false;
                default:
                    return base.AuthorizeCore(httpContext);
            }
        }
    }
}
在这个类中有一个internal的方法:PerformAuthorizeCore,它的作用就是向程序集的其它方法暴露AuthorizeCore的执行逻辑,以避免相同的逻辑需要在程序集内部的其它类型中重复实现。这个PerformAuthorizeCore的方法会在自定义的HtmlHelper扩展方法中使用,目的就是为了能够对未授权的账户隐藏Action Link。
HtmlHelper Extension
现在我们来扩展HtmlHelper类,使得其中的ActionLink方法能够支持对未授权账户的隐藏。同样也是在当前这个Class Library中,新建一个静态类,命名为MvcExtensions,然后使用下面的代码实现这个类:
public static class MvcExtensions
{
    private static bool Visible(HtmlHelper helper, AccountType accountType)
    {
        return new CustomAuthorizeAttribute(accountType).PerformAuthorizeCore(helper.ViewContext.HttpContext);
    }
    /// <summary>
    /// Returns an anchor element (a element) that contains the virtual path of the specified action.
    /// </summary>
    /// <param name="htmlHelper">The HTML helper instance that this method extends.</param>
    /// <param name="linkText">The inner text of the anchor element.</param>
    /// <param name="actionName">The name of the action.</param>
    /// <param name="controllerName">The name of the controller.</param>
    /// <param name="accountTypeRequired">The required account type.</param>
    /// <returns>The anchor element (a element) that contains the virtual path of the specified action.</returns>
    public static MvcHtmlString ActionLink(this HtmlHelper htmlHelper,
        string linkText,
        string actionName,
        string controllerName,
        AccountType accountTypeRequired)
    {
        MvcHtmlString link = MvcHtmlString.Empty;
        if (Visible(htmlHelper, accountTypeRequired))
            link = htmlHelper.ActionLink(linkText, actionName, controllerName);
        return link;
    }
}
这个ActionLink方法首先将link设置为MvcHtmlString.Empty,表示为一个空的string,然后调用私用静态方法Visible,来判断当前用户是否应该看到这个ActionLink,如果Visible返回的是true,则直接调用HtmlHelper中已有的ActionLink重载方法,否则直接返回MvcHtmlString.Empty。在Visible方法中,我们可以看到,所执行的逻辑正是CustomAuthorizeAttribute中的AuthorizeCore方法。
接下来要做的,就是在ASP.NET MVC应用程序中使用这些扩展方法和自定义特性。
ASP.NET MVC应用程序
在ASP.NET MVC应用程序上添加对上述Class Library的引用,然后我们打开Views\Shared\_Layout.cshtml文件,在这个Razor View中添加对所需命名空间的引用:
然后,根据需要,我们向主菜单中添加两个ActionLink:Regular Users Only和Site Admins Only,前者仅允许普通用户访问,后者仅允许站点管理员访问。在此所使用的ActionLink就是在上文中我们自定义的那个重载:
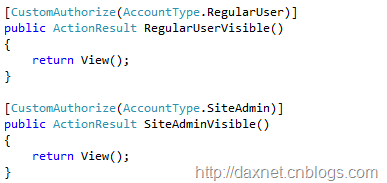
接下来在HomeController中定义两个action:RegularUserVisible和SiteAdminVisible,并将CustomAuthorizeAttribute应用在这两个action上。事实上这个步骤与隐藏Action Link并没有太大关系,只是确保用户无法通过在浏览器中输入URL而直接访问到这两个页面。
最后别忘了把Class Library下app.config中有关system.serviceModel的配置复制到ASP.NET MVC应用程序的web.config中。
运行程序
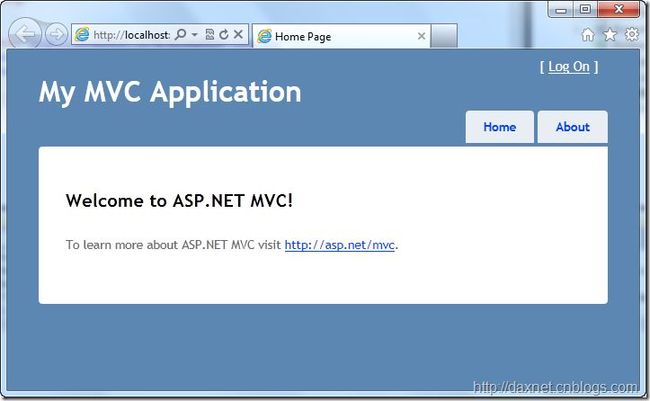
现在让我们来启动程序,看看会产生什么效果。首先启动WCF Service,然后直接运行ASP.NET MVC应用程序,得到如下界面:
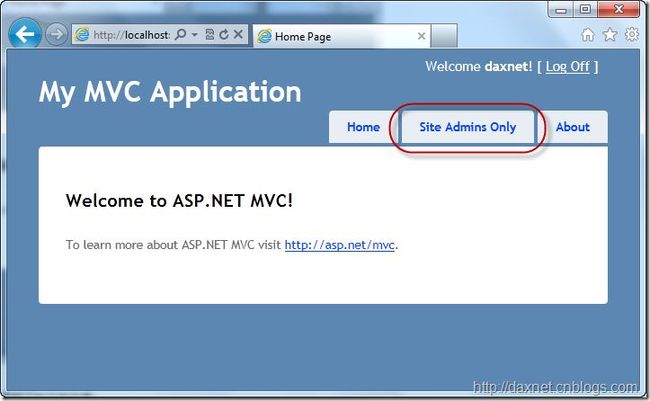
现在点击“Log On”链接,以daxnet账户登录,我们得到了如下的效果,可以看到页面上显示了“Site Admins Only”的链接选项:
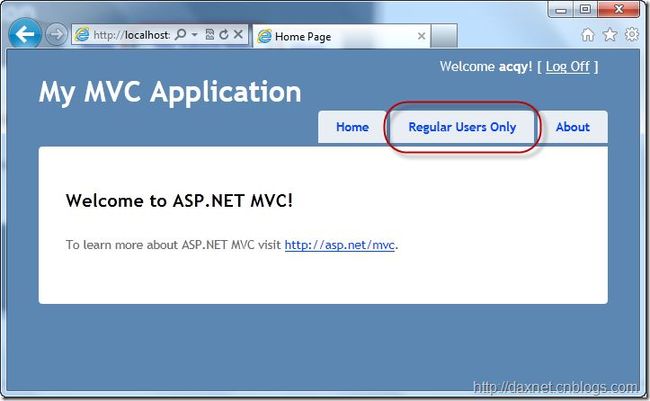
退出登录,再以“acqy”账户登录,我们又得到了如下效果,看到页面上显示了“Regular Users Only”的选项:
本文案例源代码下载
下载链接
请单击此处下载本文案例源代码
有关数据库配置
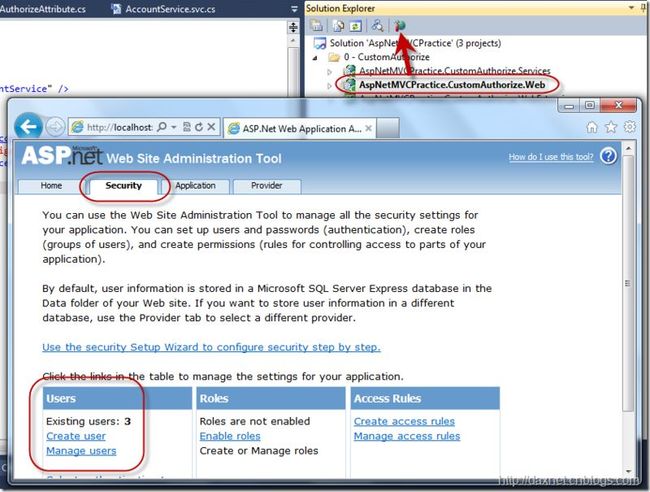
本文使用的是SQL Server Enterprise Edition作为ASP.NET MVC的后台数据库,如果你打算选用SQL Server Express作为数据库,请修改本文案例中web.config里的连接字符串,并使用《ASP.NET MVC实用技术:开篇》一文中所介绍的方法重建你的数据库结构。根据本文案例需要,你需要在ASP.NET MVC应用程序启动以后,新建两个用户账户:daxnet以及另一个任意名称的账户。当你正确地配置好了ASP.NET MVC的数据库以后,你可以在Solution Explorer中单击ASP.NET Configuration按钮来配置你的ASP.NET MVC站点,以添加所需的用户账户:

