IOS UI 第四篇:基本UI
ViewController 应用
再第一个XIB页面创建另一个XIB页面,并且通过按钮调用它
- (
IBAction
)GoSecond:(
id
)sender {
secondViewController *secVC = [[ secondViewController alloc ] initWithNibName : @"secondViewController" bundle : nil ];
secondViewController *secVC = [[ secondViewController alloc ] initWithNibName : @"secondViewController" bundle : nil ];
secVC.
modalTransitionStyle
=
UIModalPresentationPageSheet
;
[
self
presentViewController
:secVC
animated
:
YES
completion
:^{
NSLog ( @"success " );
}];
}
NSLog ( @"success " );
}];
}
在第二个XIB页面创建一个按钮,按钮PRESS返回第一个页面
- (
IBAction
)Backfirst:(
id
)sender {
[ self dismissViewControllerAnimated : YES completion :^{
NSLog ( @"dismiss" );
}];
}
[ self dismissViewControllerAnimated : YES completion :^{
NSLog ( @"dismiss" );
}];
}
创造生命周期函数:
-( void )viewWillAppear:( BOOL )animated{
[ super viewWillAppear :animated];
NSLog ( @"view will appear" );
}
-( void )viewDidAppear:( BOOL )animated{
[ super viewDidAppear :animated];
NSLog ( @"view did appear" );
}
-( void )viewWillDisappear:( BOOL )animated{
[ super viewWillDisappear :animated];
NSLog ( @"view will disappear" );
}
-( void )viewDidDisappear:( BOOL )animated{
[ super viewDidDisappear :animated];
NSLog ( @"view did disappear" );
}
页面切换方法:
secVC.
modalTransitionStyle
=
UIModalPresentationPageSheet
;
UIModalPresentationFullScreen =
0
,
#if __IPHONE_OS_VERSION_MAX_ALLOWED >= __IPHONE_3_2
UIModalPresentationPageSheet,
UIModalPresentationFormSheet,
UIModalPresentationCurrentContext,
#endif
#if __IPHONE_OS_VERSION_MAX_ALLOWED >= __IPHONE_7_0
UIModalPresentationCustom,
UIModalPresentationNone = - 1 ,
#if __IPHONE_OS_VERSION_MAX_ALLOWED >= __IPHONE_3_2
UIModalPresentationPageSheet,
UIModalPresentationFormSheet,
UIModalPresentationCurrentContext,
#endif
#if __IPHONE_OS_VERSION_MAX_ALLOWED >= __IPHONE_7_0
UIModalPresentationCustom,
UIModalPresentationNone = - 1 ,
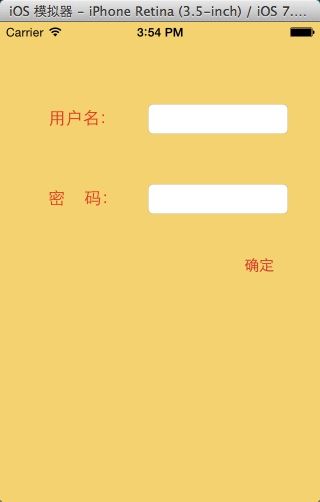
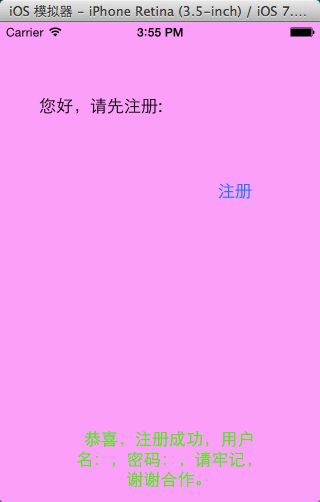
做成如下图片,类型:


主视图代码:
#import
"UserModel.h"
@interface Xib_1 : UIViewController
@property ( nonatomic , weak ) UserModel *model;
-( void )sentRegistMessage:( UserModel *)user;
@end
@interface Xib_1 : UIViewController
@property ( nonatomic , weak ) UserModel *model;
-( void )sentRegistMessage:( UserModel *)user;
@end
- (
IBAction
)FirstButton:(
id
)sender {
Xib_2 *xib2 = [[ Xib_2 alloc ] initWithNibName : @"Xib_2" bundle : nil ];
xib2. parentVC = self ;
xib2. modalTransitionStyle = UIModalPresentationPageSheet ;
[ self presentViewController :xib2 animated : YES completion :^{
}];
}
Xib_2 *xib2 = [[ Xib_2 alloc ] initWithNibName : @"Xib_2" bundle : nil ];
xib2. parentVC = self ;
xib2. modalTransitionStyle = UIModalPresentationPageSheet ;
[ self presentViewController :xib2 animated : YES completion :^{
}];
}
-(
void
)sentRegistMessage:(
UserModel
*)user{
self . Label_1 . text = [ NSString stringWithFormat : @" 恭喜,注册成功,用户名: %@ ,密码: %@ ,请牢记,谢谢合作。 " , user.name, user.pass];
self . Label_1 . numberOfLines = 0 ;
}
self . Label_1 . text = [ NSString stringWithFormat : @" 恭喜,注册成功,用户名: %@ ,密码: %@ ,请牢记,谢谢合作。 " , user.name, user.pass];
self . Label_1 . numberOfLines = 0 ;
}
XIB2:
#import
"Xib_1.h"
@interface
Xib_2 :
UIViewController
@property ( nonatomic , weak ) Xib_1 *parentVC;
@end
@property ( nonatomic , weak ) Xib_1 *parentVC;
@end
- (
IBAction
)Button_submit:(
id
)sender {
UserModel *model = [[ UserModel alloc ] init ];
model. name = _nameLabel . text ;
model. pass = _passLabel . text ;
[ self . parentVC sentRegistMessage :model];
[ self dismissViewControllerAnimated : YES completion :^{
}];
}
UserModel *model = [[ UserModel alloc ] init ];
model. name = _nameLabel . text ;
model. pass = _passLabel . text ;
[ self . parentVC sentRegistMessage :model];
[ self dismissViewControllerAnimated : YES completion :^{
}];
}
UserModel:
@interface
UserModel :
NSObject
@property ( nonatomic , copy ) NSString *name;
@property ( nonatomic , copy ) NSString *pass;
@end
@property ( nonatomic , copy ) NSString *name;
@property ( nonatomic , copy ) NSString *pass;
@end
用协议可以限制权限:
小球移动的动画:
@implementation
QFAppDelegate{
UIView *redView;
}
- ( BOOL )application:( UIApplication *)application didFinishLaunchingWithOptions:( NSDictionary *)launchOptions
{
self . window = [[ UIWindow alloc ] initWithFrame :[[ UIScreen mainScreen ] bounds ]];
// 动画
redView =[[ UIView alloc ] initWithFrame : CGRectMake ( 100 , 100 , 100 , 100 )];
redView . backgroundColor =[ UIColor redColor ];
[ self . window addSubview : redView ];
UIButton *button=[ UIButton buttonWithType : UIButtonTypeCustom ];
[button setTitle : @" 开始动画 " forState: UIControlStateNormal ];
[button setTitleColor :[ UIColor blackColor ] forState : UIControlStateNormal ];
[button addTarget : self action : @selector (startAnim:) forControlEvents : UIControlEventTouchUpInside ];
button. frame = CGRectMake ( 100 , 400 , 100 , 44 );
[ self . window addSubview :button];
self . window . backgroundColor = [ UIColor whiteColor ];
[ self . window makeKeyAndVisible ];
return YES ;
}
-( void )startAnim:( id )sender{
[ UIView animateWithDuration : 1 animations :^{
redView . frame = CGRectMake ( 100 , 300 , 150 , 150 ); // 大小位置
redView . transform = CGAffineTransformMakeRotation ( M_PI_4 ); // 角度
} completion :^( BOOL finished) {
if (finished) {
[ UIView animateWithDuration : 2 animations :^{
redView . transform = CGAffineTransformIdentity ; // 把变形还原
redView . frame = CGRectMake ( 100 , 100 , 100 , 100 );
}];
}
}];
}
如图,做一个三本书旋转的动画例子:

通过
animateWithDuration
:
animations方法来实现动画旋转效果,方便,快捷!
代码如下:
- (
void
)viewDidLoad
{
[ super viewDidLoad ];
[ self begin ];
// Do any additional setup after loading the view from its nib.
}
-( void )begin
{
imageView_3 = [[ UIImageView alloc ] initWithFrame : CGRectMake ( 30 , 50 , 100 , 150 )];
imageView_2 = [[ UIImageView alloc ] initWithFrame : CGRectMake ( 200 , 50 , 100 , 150 )];
imageView_1 = [[ UIImageView alloc ] initWithFrame : CGRectMake ( 80 , 110 , 140 , 200 )];
imageView_1 . image = [ UIImage imageNamed :[ NSString stringWithFormat : @"1.jpg" ]];
imageView_2 . image = [ UIImage imageNamed :[ NSString stringWithFormat : @"2.jpg" ]];
imageView_3 . image = [ UIImage imageNamed :[ NSString stringWithFormat : @"3.jpg" ]];
[ _Subview addSubview : imageView_1 ];
[ _Subview addSubview : imageView_2 ];
[ _Subview addSubview : imageView_3 ];
[ _Subview bringSubviewToFront : imageView_1 ];
}
- ( IBAction )PrePress:( id )sender {
[ UIView animateWithDuration : 1 animations :^{
[ _Subview sendSubviewToBack : imageView_3 ];
imageView_1 . frame = CGRectMake ( 30 , 50 , 100 , 150 );
imageView_2 . frame = CGRectMake ( 80 , 110 , 140 , 200 );
imageView_3 . frame = CGRectMake ( 200 , 50 , 100 , 150 );
} completion :^( BOOL finished) {
//imageView_2.frame = CGRectMake(30, 50, 100, 150);
[ _Subview bringSubviewToFront : imageView_2 ];
UIImageView *tmp;
tmp = imageView_1 ;
imageView_1 = imageView_2 ;
imageView_2 = imageView_3 ;
imageView_3 = tmp;
}];
}
- ( IBAction )NextPress:( id )sender {
[ UIView animateWithDuration : 1 animations :^{
[ _Subview sendSubviewToBack : imageView_2 ];
imageView_1 . frame = CGRectMake ( 200 , 50 , 100 , 150 );
imageView_2 . frame = CGRectMake ( 30 , 50 , 100 , 150 );
imageView_3 . frame = CGRectMake ( 80 , 110 , 140 , 200 );
} completion :^( BOOL finished) {
imageView_2 . frame = CGRectMake ( 30 , 50 , 100 , 150 );
[ _Subview bringSubviewToFront : imageView_3 ];
UIImageView *tmp;
tmp = imageView_1 ;
imageView_1 = imageView_3 ;
imageView_3 = imageView_2 ;
imageView_2 = tmp;
}];
}
{
[ super viewDidLoad ];
[ self begin ];
// Do any additional setup after loading the view from its nib.
}
-( void )begin
{
imageView_3 = [[ UIImageView alloc ] initWithFrame : CGRectMake ( 30 , 50 , 100 , 150 )];
imageView_2 = [[ UIImageView alloc ] initWithFrame : CGRectMake ( 200 , 50 , 100 , 150 )];
imageView_1 = [[ UIImageView alloc ] initWithFrame : CGRectMake ( 80 , 110 , 140 , 200 )];
imageView_1 . image = [ UIImage imageNamed :[ NSString stringWithFormat : @"1.jpg" ]];
imageView_2 . image = [ UIImage imageNamed :[ NSString stringWithFormat : @"2.jpg" ]];
imageView_3 . image = [ UIImage imageNamed :[ NSString stringWithFormat : @"3.jpg" ]];
[ _Subview addSubview : imageView_1 ];
[ _Subview addSubview : imageView_2 ];
[ _Subview addSubview : imageView_3 ];
[ _Subview bringSubviewToFront : imageView_1 ];
}
- ( IBAction )PrePress:( id )sender {
[ UIView animateWithDuration : 1 animations :^{
[ _Subview sendSubviewToBack : imageView_3 ];
imageView_1 . frame = CGRectMake ( 30 , 50 , 100 , 150 );
imageView_2 . frame = CGRectMake ( 80 , 110 , 140 , 200 );
imageView_3 . frame = CGRectMake ( 200 , 50 , 100 , 150 );
} completion :^( BOOL finished) {
//imageView_2.frame = CGRectMake(30, 50, 100, 150);
[ _Subview bringSubviewToFront : imageView_2 ];
UIImageView *tmp;
tmp = imageView_1 ;
imageView_1 = imageView_2 ;
imageView_2 = imageView_3 ;
imageView_3 = tmp;
}];
}
- ( IBAction )NextPress:( id )sender {
[ UIView animateWithDuration : 1 animations :^{
[ _Subview sendSubviewToBack : imageView_2 ];
imageView_1 . frame = CGRectMake ( 200 , 50 , 100 , 150 );
imageView_2 . frame = CGRectMake ( 30 , 50 , 100 , 150 );
imageView_3 . frame = CGRectMake ( 80 , 110 , 140 , 200 );
} completion :^( BOOL finished) {
imageView_2 . frame = CGRectMake ( 30 , 50 , 100 , 150 );
[ _Subview bringSubviewToFront : imageView_3 ];
UIImageView *tmp;
tmp = imageView_1 ;
imageView_1 = imageView_3 ;
imageView_3 = imageView_2 ;
imageView_2 = tmp;
}];
}