nginx源码分析—数组结构ngx_array_t
本博客(http://blog.csdn.net/livelylittlefish )贴出作者(阿波)相关研究、学习内容所做的笔记,欢迎广大朋友指正!
0. 序
本文开始介绍nginx的容器,先从最简单的数组开始。
数组实现文件:文件:./src/core/ngx_array.h/.c。.表示nginx-1.0.4代码目录,本文为/usr/src/nginx-1.0.4。
1. 数组结构
1.1 ngx_array_t结构
nginx的数组结构为ngx_array_t,定义如下。
struct ngx_array_s {
    void        *elts;    //数组数据区起始位置
    ngx_uint_t   nelts;   //实际存放的元素个数
    size_t       size;    //每个元素大小
    ngx_uint_t   nalloc;  //数组所含空间个数,即实际分配的小空间的个数
    ngx_pool_t  *pool;    //该数组在此内存池中分配
};

typedef struct ngx_array_s  ngx_array_t;
sizeof(ngx_array_t)=20。由其定义可见,nginx的数组也要从内存池中分配。将分配nalloc个大小为size的小空间,实际分配的大小为(nalloc * size)。详见下文的分析。
1.2 ngx_array_t的逻辑结构
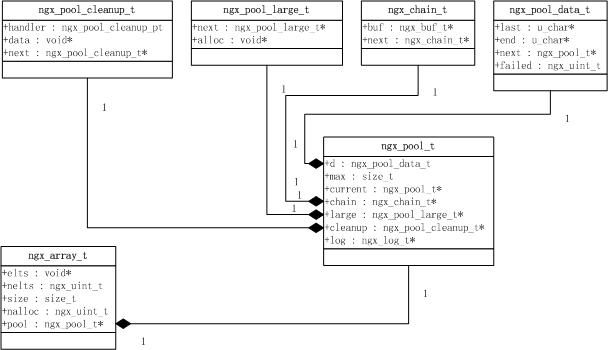
ngx_array_t结构引用了ngx_pool_t结构,因此本文参考nginx-1.0.4源码分析—内存池结构ngx_pool_t及内存管理一文画出相关结构的逻辑图,如下。注:本文采用UML的方式画出该图。
2. 数组操作
数组操作共有5个,如下。
[cpp]
//创建数组
ngx_array_t*ngx_array_create(ngx_pool_t *p, ngx_uint_t n, size_t size);

//销毁数组
voidngx_array_destroy(ngx_array_t *a);

//向数组中添加元素
void*ngx_array_push(ngx_array_t *a);
void*ngx_array_push_n(ngx_array_t *a, ngx_uint_t n);

//初始化数组
staticngx_inline ngx_int_t
ngx_array_init(ngx_array_t*array, ngx_pool_t *pool, ngx_uint_t n, size_t size)
因实现都很简单,本文简单分析前3个函数。
2.1 创建数组
创建数组的操作实现如下,首先分配数组头(20B),然后分配数组数据区,两次分配均在传入的内存池(pool指向的内存池)中进行。然后简单初始化数组头并返回数组头的起始位置。
[cpp]
ngx_array_t*
ngx_array_create(ngx_pool_t*p, ngx_uint_t n, size_t size)
{
    ngx_array_t *a;

    a = ngx_palloc(p,sizeof(ngx_array_t));  //从内存池中分配数组头
    if (a == NULL) {
        return NULL;
    }

    a->elts = ngx_palloc(p,n * size);  //接着分配n*size大小的区域作为数组数据区
    if (a->elts == NULL) {
        return NULL;
    }

    a->nelts = 0;    //初始化
    a->size = size;
    a->nalloc = n;
    a->pool = p;

    return a;  //返回数组头的起始位置
}
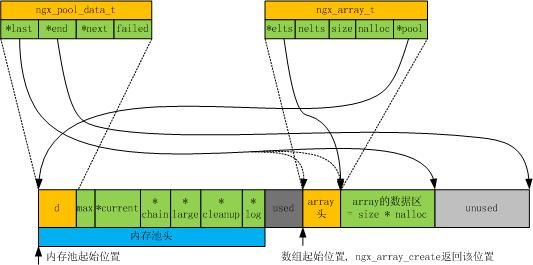
创建数组后内存池的物理结构图如下。
2.2 销毁数组
销毁数组的操作实现如下,包括销毁数组数据区和数组头。这里的销毁动作实际上就是修改内存池的last指针,并没有调用free等释放内存的操作,显然,这种维护效率是很高的。
[cpp]
void
ngx_array_destroy(ngx_array_t*a)
{
    ngx_pool_t *p;

    p = a->pool;

    if ((u_char *) a->elts+ a->size * a->nalloc == p->d.last) {  //先销毁数组数据区
        p->d.last -=a->size * a->nalloc;  //设置内存池的last指针
    }

    if ((u_char *) a +sizeof(ngx_array_t) == p->d.last) {  //接着销毁数组头
        p->d.last = (u_char*) a;          //设置内存池的last指针
    }
}
2.3 添加1个元素
向数组添加元素的操作有两个,ngx_array_push和ngx_array_push_n,分别添加一个和多个元素。
但实际的添加操作并不在这两个函数中完成,例如ngx_array_push返回可以在该数组数据区中添加这个元素的位置,ngx_array_push_n则返回可以在该数组数据区中添加n个元素的起始位置,而添加操作即在获得添加位置之后进行,如后文的例子。
[cpp]
void *
ngx_array_push(ngx_array_t*a)
{
    void       *elt, *new;
    size_t      size;
    ngx_pool_t *p;

    if (a->nelts ==a->nalloc) {  //数组数据区满

        /* the arrayis full */

        size = a->size *a->nalloc;  //计算数组数据区的大小

        p = a->pool;

        if ((u_char *)a->elts + size == p->d.last  //若内存池的last指针指向数组数据区的末尾
            &&p->d.last + a->size <= p->d.end) //且内存池未使用的区域可以再分配一个size大小的小空间
        {
            /*
             * the array allocation is the lastin the pool
             * and there is space for newallocation
             */

            p->d.last +=a->size;  //分配一个size大小的小空间(a->size为数组一个元素的大小)
            a->nalloc++;           //实际分配小空间的个数加1

        } else {
            /* allocate a new array */

            new =ngx_palloc(p, 2 * size);  //否则,扩展数组数据区为原来的2倍
            if (new == NULL) {
                return NULL;
            }

            ngx_memcpy(new,a->elts, size);//将原来数据区的内容拷贝到新的数据区
            a->elts = new;
            a->nalloc *= 2;             //注意:此处转移数据后,并未释放原来的数据区,内存池将统一释放
        }
    }

    elt = (u_char *)a->elts + a->size * a->nelts; //数据区中实际已经存放数据的子区的末尾
    a->nelts++;                                  //即最后一个数据末尾,该指针就是下一个元素开始的位置

    return elt;    //返回该末尾指针,即下一个元素应该存放的位置
}
由此可见,向数组中添加元素实际上也是在修该内存池的last指针(若数组数据区满)及数组头信息,即使数组满了,需要扩展数据区内容,也只需要内存拷贝完成,并不需要数据的移动操作,这个效率也是相当高的。
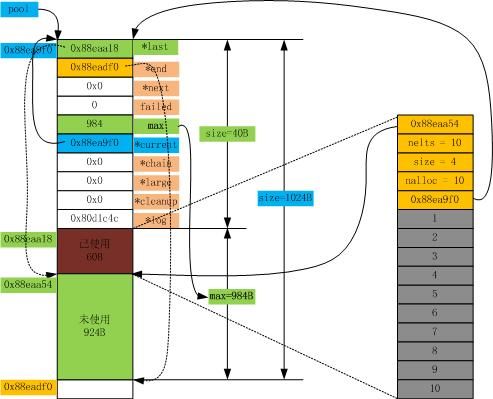
下图是向数组中添加10个整型元素后的一个例子。代码可参考下文的例子。当然,数组元素也不仅限于例子的整型数据,也可以是其他类型的数据,如结构体等。
3. 一个例子
理解并掌握开源软件的最好方式莫过于自己写一些测试代码,或者改写软件本身,并进行调试来进一步理解开源软件的原理和设计方法。本节给出一个创建内存池并从中分配一个数组的简单例子。
3.1代码
[cpp]
/**
 * ngx_array_t test, to test ngx_array_create, ngx_array_push
 */

#include <stdio.h>
#include "ngx_config.h"
#include "ngx_conf_file.h"
#include "nginx.h"
#include "ngx_core.h"
#include "ngx_string.h"
#include "ngx_palloc.h"
#include "ngx_array.h"

volatile ngx_cycle_t  *ngx_cycle;

void ngx_log_error_core(ngx_uint_t level, ngx_log_t *log, ngx_err_t err,
            const char *fmt, ...)
{
}

void dump_pool(ngx_pool_t* pool)
{
    while (pool)
    {
        printf("pool = 0x%x\n", pool);
        printf("  .d\n");
        printf("    .last = 0x%x\n", pool->d.last);
        printf("    .end = 0x%x\n", pool->d.end);
        printf("    .next = 0x%x\n", pool->d.next);
        printf("    .failed = %d\n", pool->d.failed);
        printf("  .max = %d\n", pool->max);
        printf("  .current = 0x%x\n", pool->current);
        printf("  .chain = 0x%x\n", pool->chain);
        printf("  .large = 0x%x\n", pool->large);
        printf("  .cleanup = 0x%x\n", pool->cleanup);
        printf("  .log = 0x%x\n", pool->log);
        printf("available pool memory = %d\n\n", pool->d.end - pool->d.last);
        pool = pool->d.next;
    }
}

void dump_array(ngx_array_t* a)
{
    if (a)
    {
        printf("array = 0x%x\n", a);
        printf("  .elts = 0x%x\n", a->elts);
        printf("  .nelts = %d\n", a->nelts);
        printf("  .size = %d\n", a->size);
        printf("  .nalloc = %d\n", a->nalloc);
        printf("  .pool = 0x%x\n", a->pool);

        printf("elements: ");
        int *ptr = (int*)(a->elts);
        for (; ptr < (int*)(a->elts + a->nalloc * a->size); )
        {
            printf("0x%x  ", *ptr++);
        }
        printf("\n");
    }
}

int main()
{
    ngx_pool_t *pool;
    int i;

    printf("--------------------------------\n");
    printf("create a new pool:\n");
    printf("--------------------------------\n");
    pool = ngx_create_pool(1024, NULL);
    dump_pool(pool);

    printf("--------------------------------\n");
    printf("alloc an array from the pool:\n");
    printf("--------------------------------\n");
    ngx_array_t *a = ngx_array_create(pool, 10, sizeof(int));
    dump_pool(pool);

    for (i = 0; i < 10; i++)
    {
        int *ptr = ngx_array_push(a);
        *ptr = i + 1;
    }

    dump_array(a);

    ngx_array_destroy(a);
    ngx_destroy_pool(pool);
    return 0;
}
3.2如何编译
请参考nginx-1.0.4源码分析—内存池结构ngx_pool_t及内存管理一文。本文编写的makefile文件如下。
CXX = gcc
CXXFLAGS +=-g -Wall -Wextra

NGX_ROOT =/usr/src/nginx-1.0.4

TARGETS =ngx_array_t_test
TARGETS_C_FILE= $(TARGETS).c

CLEANUP = rm-f $(TARGETS) *.o

all:$(TARGETS)

clean:
$(CLEANUP)

CORE_INCS =-I. \
-I$(NGX_ROOT)/src/core \
-I$(NGX_ROOT)/src/event \
-I$(NGX_ROOT)/src/event/modules \
-I$(NGX_ROOT)/src/os/unix \
-I$(NGX_ROOT)/objs \

NGX_PALLOC =$(NGX_ROOT)/objs/src/core/ngx_palloc.o
NGX_STRING =$(NGX_ROOT)/objs/src/core/ngx_string.o
NGX_ALLOC =$(NGX_ROOT)/objs/src/os/unix/ngx_alloc.o
NGX_ARRAY =$(NGX_ROOT)/objs/src/core/ngx_array.o

$(TARGETS):$(TARGETS_C_FILE)
$(CXX) $(CXXFLAGS) $(CORE_INCS) $(NGX_PALLOC) $(NGX_STRING)$(NGX_ALLOC) $(NGX_ARRAY) $^ -o $@
3.3运行结果
# ./ngx_array_t_test
-------------------------------- create a new pool:
-------------------------------- pool = 0x860b020 .d .last = 0x860b048
    .end = 0x860b420
    .next = 0x0
    .failed = 0 .max = 984
  .current = 0x860b020
  .chain = 0x0
  .large = 0x0
  .cleanup = 0x0
  .log = 0x0 available pool memory = 984
-------------------------------- alloc an array from the pool:
-------------------------------- pool = 0x860b020 .d .last = 0x860b084
    .end = 0x860b420
    .next = 0x0
    .failed = 0 .max = 984
  .current = 0x860b020
  .chain = 0x0
  .large = 0x0
  .cleanup = 0x0
  .log = 0x0 available pool memory = 924
array = 0x860b048 .elts = 0x860b05c
  .nelts = 10
  .size = 4
  .nalloc = 10
  .pool = 0x860b020 elements: 0x1  0x2  0x3  0x4  0x5  0x6  0x7  0x8  0x9  0xa
该例子中内存池和数组的(内存)物理结构可参考2.3节的图。
4. 小结
本文针对nginx-1.0.4的容器——数组结构进行了较为全面的分析,包括数组相关数据结构,数组的创建、销毁,以及向数组中添加元素等。最后通过一个简单例子向读者展示nginx数组的创建、添加元素和销毁操作,同时借此向读者展示编译测试代码的方法。
敬请关注后续的分析。谢谢!
Reference
Nginx代码研究计划 (RainX1982)
nginx-1.0.4源码分析—内存池结构ngx_pool_t及内存管理 (阿波)


