cacti配置与安装
环境必须是lamp环境 源码编译或者yum安装都可以
cacti版本cacti-0.8.8b.tar.gz
cacti-spine版本cacti-spine-0.8.8b.tar.gz
安装cacti
[root@kcw1 ~]# yum install net-snmp net-snmp-utils rrdtool
[root@kcw1 ~]# tar xf cacti-0.8.8b.tar.gz -C /usr/local/apache/htdocs/cacti
[root@kcw1 ~]# mysqladmin -uroot -predhat create cactidb
[root@kcw1 ~]# mysql -uroot -predhat -e "grant all on cactidb.* to cactiuser@localhost identified by 'redhat' "
[root@kcw1 ~]# cd /usr/local/apache/htdocs/cacti
[root@kcw1 cacti]# mysql -uroot -predhat cactidb < cacti.sql
[root@kcw1 cacti]# mysqladmin -uroot -predhat flush-privileges
[root@kcw1 cacti]# useradd cacti
[root@kcw1 cacti]# chown root.root ./*
[root@kcw1 cacti]# chown -R root.root ./*
[root@kcw1 cacti]# chown -R cacti.cacti rra log
[root@kcw1 cacti]# mysql -ucactiuser -predhat
Welcome to the MySQL monitor.  Commands end with ; or \g.
Your MySQL connection id is 448
Server version: 5.5.37-log MySQL Community Server (GPL)

Copyright (c) 2000, 2014, Oracle and/or its affiliates. All rights reserved.

Oracle is a registered trademark of Oracle Corporation and/or its
affiliates. Other names may be trademarks of their respective
owners.

Type 'help;' or '\h' for help. Type '\c' to clear the current input statement.

mysql> show databases;
+--------------------+
| Database           |
+--------------------+
| information_schema |
| cactidb            |
| test               |
+--------------------+
3 rows in set (0.09 sec)

mysql> \q
Bye
[root@kcw1 cacti]# cd include/
[root@kcw1 include]# vim config.php
$database_type = "mysql";
$database_default = "cactidb";
$database_hostname = "localhost";
$database_username = "cactiuser";
$database_password = "redhat";
$database_port = "3306";
$database_ssl = false;

这块注意自己数据库密码账号
[root@kcw1 include]# su - cacti
[cacti@kcw1 ~]$ crontab -e
* * * * * /usr/local/php/bin/php /usr/local/apache/htdocs/cacti/poller.php &>/dev/null
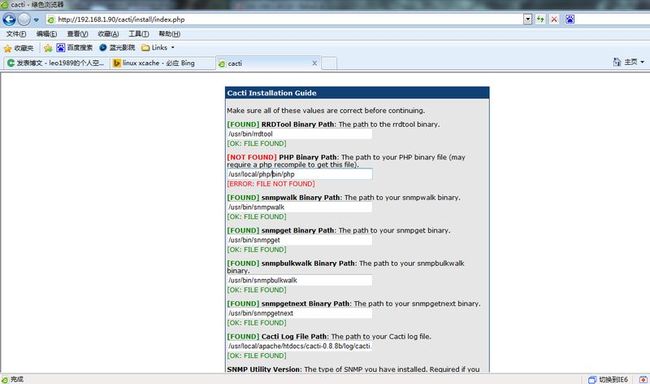
完了就可以访问了http://192.168.0.1/cacti
然后按着向导初始化特别注意这些路径 如果是源码编译的话最好查一下
初始账号密码默认为admin 第一次登陆会强制让你修改
注意看看你snmp启动了没有 配置对不对
然后重新启动httpd
安装spine
spine是一个基于C语言的,非常快速的轮询引擎。它是默认的cmd.php的可选替代,主要是为了加快SNMP轮训。如果你发现你的cmd.php 运行超过300 秒的话,推荐使用Spine。
[root@kcw1 ~]# tar xf cacti-spine-0.8.8b.tar.gz
[root@kcw1 ~]# cd cacti-spine-0.8.8b
[root@kcw1 cacti-spine-0.8.8b]# ./configure --prefix=/usr/local/spine
报错configure: error: MySQL libraries not found
[root@kcw1 cacti-spine-0.8.8b]# ./configure --prefix=/usr/local/spine --with-mysql=/usr/local/mysql
执行又报错
configure: error: Cannot find SNMP headers.  Use --with-snmp= to specify non-default path.
[root@kcw1 cacti-spine-0.8.8b]# yum install net-snmp-devel
OK
[root@kcw1 cacti-spine-0.8.8b]# make && make install
[root@kcw1 cacti-spine-0.8.8b]# cd /usr/local/spine/
[root@kcw1 spine]# cd etc/
[root@kcw1 etc]# cp spine.conf.dist spine.conf
[root@kcw1 etc]# vim spine.conf
修改数据库信息
[root@kcw1 bin]# /usr/local/spine/bin/spine
SPINE: Using spine config file [../etc/spine.conf]
SPINE: Version 0.8.8b starting
SPINE: Time: 0.1308 s, Threads: 1, Hosts: 2
a)以admin用户登录到Cacti。
b)从目录菜单中选择设置”Settings”,选择”Paths”选项卡。
c)在”Spine Poller File Path”中输入Spine可执行程序的完整路径,我的是/usr/local/spine/bin/spine,保存设置。
d)选择”Poller”选项卡。
e)在”Poller Type”下拉框设置中,选择”spine”。
查看下Cacti日志:
之前的
08/14/2014 05:00:01 AM - SYSTEM STATS: Time:0.2084 Method:cmd.php Processes:1 Threads:N/A Hosts:2 HostsPerProcess:2 DataSources:5 RRDsProcessed:5
现在的
08/14/2014 05:13:02 AM - SYSTEM STATS: Time:0.2284 Method:spine Processes:120 Threads:1 Hosts:2 HostsPerProcess:1 DataSources:0 RRDsProcessed:0
可以看出已经支持了又cmd.php改为spine
如果重启出现
11/02/2007 04:02:51 PM - SPINE: Poller[0]
 FATAL: Connection Failed: Can't connect to local MySQL server through socket '/var/lib/mysql/mysql.sock' (2) (Spine init)
google问题,最后
在/var/lib/ 下建立mysql文件夹
[root@monitor mysql]# pwd
/var/lib/mysql
[root@monitor mysql]#
[root@monitor mysql]# ln -s /tmp/mysql.sock /var/lib/mysql/mysql.sock