从零开始建站-1
这两天看了w3school上的html、css、ajax、少量php和asp例子,主要的理解如下:
html用来构建网页的各个元素,包括文字、图片、音视频等等,一个原则是“一切皆为框”,每个元素都是一个框。
css用来给网页元素重新“化妆”,把她们变得更好看一些,当然还有可能“整容”,也就是较大的“化妆动作”。
ajax给前台和后台拉了一根电话线,让两者可以进行沟通。沟通的内容不是语音而是字符串。ajax是写在前台的代码,利用XMLHttpRequest这个对象来使前台可以发送用户在前台输入的数据、或接收来自后台的响应数据。有了电话线,我们还需要一个电话号码才可以,那么运行在后台的程序就是这个电话号码。后台程序的路径是写在发起拨号的前台的。
php和asp就是写后台程序的语言,也就是那个“电话号码”,两者各有千秋,至于用哪个,自己搜下~。后台程序当然也可能用java或其他语言写,现在还不太清楚是怎样运作的。
上面就是我目前了解到的前后台的知识,现在准备开始动手了。
1、交代下环境
vmware:7.1.4 build-385536
redhat:
[root@localhost ~]# cat /proc/version
Linux version 2.6.18-194.el5 ([email protected]) (gcc version 4.1.2 20080704 (Red Hat 4.1.2-48)) #1 SMP Tue Mar 16 21:52:43 EDT 2010
(版本低了点,凑合用吧:D)
navicat:8.2.12
2、部署数据库
从 mysql 官网上下载到下面两个安装文件:
[root@localhost tmp]# ll MySQL-*
-rwxrwxrwx 1 root root 16923959 12-26 15:17 MySQL-client-5.5.29-1.linux2.6.i386.rpm
-rwxrwxrwx 1 root root 51875776 12-26 14:48 MySQL-server-5.5.29-1.linux2.6.i386.rpm
开始安装:
[root@localhost tmp]# rpm -ivh MySQL-*
Preparing... ########################################### [100%]
1:MySQL-server ########################################### [ 50%]
2:MySQL-client ########################################### [100%]
出现错误:
[root@localhost tmp]# mysql
ERROR 2002 (HY000): Can't connect to local MySQL server through socket '/var/lib/mysql/mysql.sock' (2)
[root@localhost tmp]# service mysql start
Starting MySQL...........The server quit without updating PID file (/var/lib/mysql/localhost.localdomain.pid). [失败]
……在历经各种查找错误之后,发现是版本下错了,没有下rhel4的,而下成了Linux2.6的,各位引以为鉴啊。
好吧,下面正式开始:
假定已经从mysql官网下载了两个安装文件,下面进行安装:
[root@localhost tmp]# ls /mnt/hgfs/desktop/MySQL-*
MySQL-client-community-5.0.96-1.rhel4.i386.rpm
MySQL-server-community-5.0.96-1.rhel5.i386.rpm
[root@localhost tmp]# mv /mnt/hgfs/desktop/MySQL-* .
[root@localhost tmp]# rpm -ivh MySQL-*
Preparing... ########################################### [100%]
1:MySQL-server-community ########################################### [ 50%]
PLEASE REMEMBER TO SET A PASSWORD FOR THE MySQL root USER !
To do so, start the server, then issue the following commands:
/usr/bin/mysqladmin -u root password 'new-password'
/usr/bin/mysqladmin -u root -h localhost.localdomain password 'new-password'
Alternatively you can run:
/usr/bin/mysql_secure_installation
which will also give you the option of removing the test
databases and anonymous user created by default. This is
strongly recommended for production servers.
See the manual for more instructions.
Please report any problems with the /usr/bin/mysqlbug script!
The latest information about MySQL is available on the web at
http://www.mysql.com
Support MySQL by buying support/licenses at http://shop.mysql.com
Starting MySQL..[确定]
Giving mysqld 2 seconds to start
2:MySQL-client-community ########################################### [100%]
[root@localhost tmp]# service mysql status
MySQL running (4761) [确定]
好了,安装完成了,也启动完成了,现在开始给root来个密码:
[root@localhost tmp]# /usr/bin/mysqladmin -u root password 123456
[root@localhost tmp]# mysql
ERROR 1045 (28000): Access denied for user 'root'@'localhost' (using password: NO)
look,登录不了了吧,再试一次:
[root@localhost tmp]# mysql -uroot -p123456
Welcome to the MySQL monitor. Commands end with ; or \g.
Your MySQL connection id is 5
Server version: 5.0.96-community MySQL Community Edition (GPL)
Copyright (c) 2000, 2011, Oracle and/or its affiliates. All rights reserved.
Oracle is a registered trademark of Oracle Corporation and/or its
affiliates. Other names may be trademarks of their respective
owners.
Type 'help;' or '\h' for help. Type '\c' to clear the current input statement.
mysql>
现在在windows下用navicat使用root账户是登录不了Linux下的mysql的,需要增加一个root远程访问权限:(依然在Linux的mysql操作符下)
mysql> GRANT ALL PRIVILEGES ON *.* TO 'root'@'%' IDENTIFIED BY '123456' WITH GRANT OPTION;
Query OK, 0 rows affected (0.00 sec)
好啦,接下来可以用navicat建数据库了:)
3、建立库表
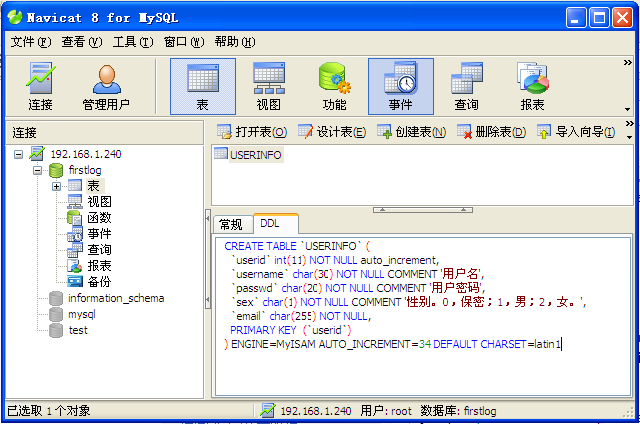
在windows下,使用navicat新建了一个名为firstlog的库,又新建了一个名为USERINFO的表,用来存储用户信息。如下:

好了,数据库已经建好了,下面开始后台的搭建。
4、安装Apache服务
Apache连接了诸如php写的后端脚本和前端浏览器,是必不可少滴。
下载apr-1.4.6.tar.gz apr-util-1.5.1.tar.gz httpd-2.4.3.tar.gz,依次解压并进入各个解压后的文件夹,分别输入下面的命令以安装三个程序:
./configure --prefix=/usr/local/apr && make && make install
./configure --prefix=/usr/local/apr-util --with-apr=/usr/local/apr && make && make install
./configure --prefix=/usr/local/apache --with-mpm=worker --enable-mods-shared=all --enable-so --with-apr=/usr/local/apr --with-apr-util=/usr/local/apr-util/ && make && make install
启动试试:
/usr/local/apache/bin/apachectl start
添加自启动:(虽然我的虚拟机从来不重启:D)
echo "/usr/local/apache/bin/apachectl start" >>/etc/rc.d/rc.local
5、安装php服务
在编译php的时候出现 Cannot find MySQL header files under /usr/share/mysql. 的错误,也就是说没有安装mysql-devel
下载MySQL-devel-community-5.0.96-1.rhel4.i386.rpm
rpm -ivh MySQL-devel-community-5.0.96-1.rhel4.i386.rpm
下载php-5.4.10.tar.gz,解压并输入下列命令
./configure --prefix=/usr/local/php --with-apxs2=/usr/local/apache/bin/apxs --with-mysql=/usr --enable-gd-native-ttf --enable-gd-jis-conv --enable-xml --enable-mbstring --enable-sockets && make && make install
经过漫长的编译安装,终于可以玩php了~~
遇到的错误-1:
# /etc/init.d/httpd restart
Starting httpd: (98)Address already in use: make_sock: could not bind to address [::]:80
(98)Address already in use: make_sock: could not bind to address 0.0.0.0:80
no listening sockets available, shutting down
Unable to open logs [FAILED]
解决方法:# ps -aux | grep apache 然后kill掉相应的进程即可。
遇到的错误-2:
#/etc/init.d/httpd start
Starting httpd: httpd: Syntax error on line 161 of /etc/httpd/conf/httpd.conf: Cannot load /etc/httpd/modules/mod_ldap.so into server: /etc/httpd/modules/mod_ldap.so: undefined symbol: apr_ldap_ssl_init
解决方法:
#httpd -V
Server version: Apache/2.2.3
Server built: Sep 3 2009 17:37:31
Server's Module Magic Number: 20051115:3
Server loaded: APR 1.4.6, APR-Util 1.5.1 #版本不对
Compiled using: APR 1.2.7, APR-Util 1.2.7
……
所幸我的redhat可以上网,并且yum也可以用,使用
# yum install apr
和
# yum install apr-util
安装了1.2.7版本的apr和apr-util。
这里有个疑问:为什么我编译的时候指定的是1.4.6版本的apr和1.5.1版本的apr-util,可是上面却说
Compiled using: APR 1.2.7, APR-Util 1.2.7。不了解~日后明白了再补充。
6、来个栗子
还得来点动作:
cp php.ini-development /usr/local/php/lib/
vi /usr/local/apache/conf/httpd.conf修改如下几项
205行 ServerName 192.168.9.240:80231行 DocumentRoot "/var/www/html"
259行 DirectoryIndex index.html index.php index.htm
260行 AddType application/x-httpd-php .php
261行 AddType application/x-httpd-php-source .phps
在/var/www/html/下新建一个index.php,输入如下内容:
<?php
phpinfo()
?>
保存退出。
好了,现在在windows下输入 http://192.168.9.240:80/index.php 可以看到php的信息了。