PureMVC源码分析
PureMVC 是在基于模型、视图和控制器 MVC 模式建立的一个轻量级的开源应用框架,具有跨平台语言无关性。最初被应用于adobe flex,actionScript开发中,现已被移植到包括c++,java,c#,php等主要语言平台上,在各平台上的实现方式也几乎一样,降低了用户学习成本。
本文从PureMVC actionScript版源码角度分析PureMVC如何工作及它如何有效降低各模块间耦合度。了解PureMVC如何工作需要对其源代码进行分析,源代码可在http://trac.puremvc.org/PureMVC_AS3下载。
一,PureMVC如何工作:
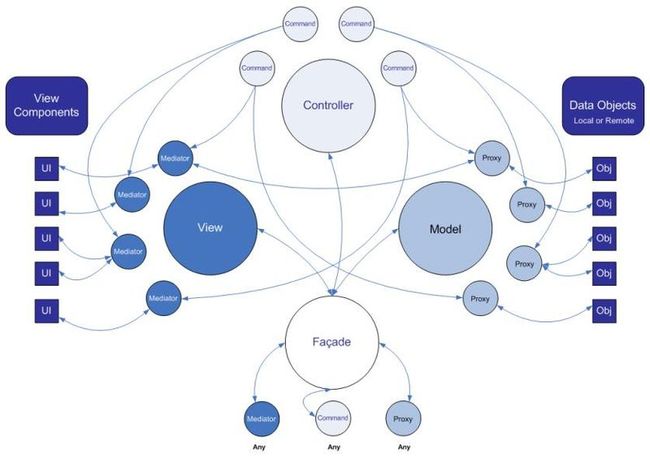
首先来看一张类图:
从图中可以看到在PureMvc中最主要的类仅仅只有Model,View,Controller,Proxy,Mediator,Command,Facade而已。学习PureMVC之初,需要了解如下一些基本事实:
Model->Proxy,Model保存了所有Proxy对象的引用,Proxy负责数据的读取与存储,具体到actionScript可以是Loader加载的数据,Socket收取的数据等。
View->Mediator,View保存了所有Mediator对象的引用,Mediator对象操作具体的视图组件,例如flex中的DataGrid,Input等,它负责在视图组件上监听特定事件和更新视图组件。
Controller->Command,Controller保存了所有Command对象的引用,Command又分为SimpleCommand(简单)和MacroCommand(复杂),应用程序的业务逻辑都是在Command中实现。
在as3中,上述三种映射关系是通过Array实现的,其中Proxy,Mediator及Command又分别通过Dictionary键值对形式保存了各自名称和实例的映射关系。具体来看个Controller->Command的例子。
在Controller类中,有这一句
protected var commandMap : Array;
那么,注册command后,必定是保存commandMap数组中了。代码果然是这样的,注意方法体中最后一句:
public function registerCommand( notificationName : String, commandClassRef : Class ) : void
        {
            if ( commandMap[ notificationName ] == null ) {
                view.registerObserver( notificationName, new Observer( executeCommand, this ) );
            }
            commandMap[ notificationName ] = commandClassRef;
        }
从方法的两个参数我们还可以猜到特定notification和command是通过通知名和命令类引用方式一一对应的。那么自然可以进一步联想到PureMVC事件机制中所谓的事件通知只不过是通过特定notificationName检索到相应command,然后执行command中的某个方法,那么registerCommand方法就如同observer/publiser模式中订阅事件的过程。
下面就遵循PureMVC的设计思路,来追踪一遍“observer订阅事件->publiser发送事件->observer执行监听方法”的过程。订阅事件已经讲过了,现在从事件发送讲起。
通过调用Facade中的sendNotification方法,就可以通知之前注册的command去执行了:-)
public function sendNotification( notificationName:String, body:Object=null, type:String=null ):void
        {
            notifyObservers( new Notification( notificationName, body, type ) );
        }
public function notifyObservers ( notification:INotification ):void
        {
            if ( view != null ) view.notifyObservers( notification );
        }
可以看到,实际上执行的是View的notifyObservers方法,该方法体如下:
public function notifyObservers( notification:INotification ) : void
    {
            if( observerMap[ notification.getName() ] != null ) {

                // Get a reference to the observers list for this notification name
                var observers_ref:Array = observerMap[ notification.getName() ] as Array;

                // Copy observers from reference array to working array,
                // since the reference array may change during the notification loop
                   var observers:Array = new Array();
                   var observer:IObserver;
                for (var i:Number = 0; i < observers_ref.length; i++) {
                    observer = observers_ref[ i ] as IObserver;
                    observers.push( observer );
                }

                // Notify Observers from the working array
                for (i = 0; i < observers.length; i++) {
                    observer = observers[ i ] as IObserver;
                    observer.notifyObserver( notification );
                }
            }
    }
可以看到每一个notification都相应的在View中的observerMap数组中保存了一份观察者列表。由于同一个nofication是可以被多个observer监听的,因此触发时必须通知到每一个观察者,这是通过调用observer的notifyObserver方法做到的。在Observer类中可以找到该方法,定义如下:
public function notifyObserver( notification:INotification ):void
        {
            this.getNotifyMethod().apply(this.getNotifyContext(),[notification]);
        }
这里只是简单调用了一个函数,先来看看Observer类构造函数结构:
public function Observer( notifyMethod:Function, notifyContext:Object )
        {
            setNotifyMethod( notifyMethod );
            setNotifyContext( notifyContext );
        }
public function setNotifyMethod( notifyMethod:Function ):void
        {
            notify = notifyMethod;
        }

public function setNotifyContext( notifyContext:Object ):void
        {
            context = notifyContext;
        }
notifyMethod和notifyContext在构造函数中被传入,再来回顾下前面已提过的注册命令的registerCommand方法:
public function registerCommand( notificationName : String, commandClassRef : Class ) : void
        {
            if ( commandMap[ notificationName ] == null ) {
                view.registerObserver( notificationName, new Observer( executeCommand, this ) );
            }
            commandMap[ notificationName ] = commandClassRef;
        }
所谓的注册命令不过就是针对某个特定的notification注册了一个observer,每个通知对应一个观察者,当该通知广播时就会执行相应观察者的notifyMethod方法。这里要注意的是构造Observer实例的过程中将this对象传入是为了在调用Observer实例的notifyMethod方法时获得正确的函数运行时上下文。再来深究下executeCommand方法,
public function executeCommand( note : INotification ) : void
        {
            var commandClassRef : Class = commandMap[ note.getName() ];
            if ( commandClassRef == null ) return;

            var commandInstance : ICommand = new commandClassRef();
            commandInstance.execute( note );
        }
容易看出只是从Controller的commandMap关联数组中检索出key为notificationName的相应command,然后执行该command的execute方法。
在PureMVC中,Command的实现有两种,分别是SimpleCommand和MacroCommand,两者都有一个execute实例方法,无本质区别。本文以SimpleCommand为例讲解,该类定义如下:
public class SimpleCommand extends Notifier implements ICommand, INotifier
    {
        public function execute( notification:INotification ) : void
        {

        }
    }
可以看到该类只是简单声明了execute方法,方法体则留待派生类去实现。由此可以看出利用PureMVC工作时,无非就是监听事件和广播事件的过程。PureMVC已经搭起了程序运转架构,我们自己要做的工作只是在execute方法中实现程序的业务逻辑。事件监听->触发->反应的过程归纳起来无非就是:
1.定义派生自SimpleCommand或MacroCommand的Command类并实现其execute方法;
2.调用registerCommand方法为某个特定的notification指定一个监听其广播事件的Command类;
3.调用sendNotification通知相应Command执行
当然,如果你认为针对每个notification都实现一个command会导致类过多的话,也可以通过调用Facade类registerMediator方法来达到同样的监听目的。流程是这样的:
public function registerMediator( mediator:IMediator ):void
        {
            if ( view != null ) view.registerMediator( mediator );
        }
public function registerMediator( mediator:IMediator ) : void
        {
            // do not allow re-registration (you must to removeMediator fist)
            if ( mediatorMap[ mediator.getMediatorName() ] != null ) return;

            // Register the Mediator for retrieval by name
            mediatorMap[ mediator.getMediatorName() ] = mediator;

            // Get Notification interests, if any.
            var interests:Array = mediator.listNotificationInterests();

            // Register Mediator as an observer for each of its notification interests
            if ( interests.length > 0 )
            {
                // Create Observer referencing this mediator's handlNotification method
                var observer:Observer = new Observer( mediator.handleNotification, mediator );

                // Register Mediator as Observer for its list of Notification interests
                for ( var i:Number=0;  i<interests.length; i++ ) {
                    registerObserver( interests[i],  observer );
                }
            }

            // alert the mediator that it has been registered
            mediator.onRegister();
        }
简而言之,就是:
1. 在Mediator的listNotificationInterests方法中列出其感兴趣的notification;
2.调用Facade类的registerMediator方法中会注册以Mediator的handleNotification方法为notifyMethod的Observer监听特定notification;
3.在Mediator的handleNotification方法中实现业务逻辑
以registerMediator的方式注册和派发事件固然能减少Command类的个数,但也存在一个弊端。即当一个Mediator监听多个Notification时,不得不在handleNotification逐个判断Notification,然后调用相应的实现。这样会造成if...else if...else或switch...case分支过多。
邮箱: [email protected]
出处: http://www.cnblogs.com/tudas
本文版权归作者和博客园共有,欢迎转载,未经作者同意须保留此段声明,且在文章页面明显位置给出原文连接,否则保留追究法律责任的权利。
