【实践】WCF传输安全4:基于SSL的WCF对客户端采用证书验证
前一篇我们演示了基于SSL的WCF 对客户端进行用户名和密码方式的认证,本篇我们演示一下服务器端对客户端采用X.509证书的认证方式是如何实现的。
项目结构及服务代码和前两篇代码是基本一样的,为了大家看着方便,再从头到尾进行一下演示。
一、制作证书:
本次制作证书和第一篇略有不一样,主要为了演示证书的信任链关系,我们首先创建一个证书作为证书认证中心(CA)的根证书,我们还是利用MakeCert命令创建。在“开始”菜单中打开—>Microsoft Visual Studio 2010->Visual Studio 命令提示。
输入:makecert -n "CN=LXCA" -r -sv D:\LXCA.pvk D:\LXCA.cer
这时候会弹出 “创建私钥密码”对话框 和 “输入私钥密码”对话框,我们都输入密码“123456”。(这个密码的作用就是今后对证书进行导入,导出等操作的时候,输入的密码),命令提示成功后,这时候会在我的计算机D盘生成两个文件 LXCA.pvk 和 LXCA.cer。
这里说明一下,证书中三种常用的文件格式:.pvk 文件:私钥文件;.cer 公钥文件;还用一种扩展名为.pfx 文件是包含公钥和私钥的密钥交换文件。
然后我们输入命令:makecert -n "CN=Lx-PC" -ic D:\LXCA.cer -iv D:\LXCA.pvk -sr LocalMachine -ss My -pe -sky exchange
在弹出的 “输入私钥密码” 对话框中输入"123456"之后,提示创建成功。这就是我们的服务器端的证书(至于为什么输入我本机的计算机名CN=Lx-PC,我们前文有讲解),我们可以在运行MMC,在证书管理单元中看到该证书:
我们双击我们创建的这个证书,打开 “详细信息” 标签可以查看到证书的指纹,我们记录下来,我的这个证书的指纹是:f5ccc32b77d5d12922e162a289c80c7e95d615ea
下面和原来一样,将证书与计算机的端口进行绑定,在win7 下,依然使用 netsh 命令(netsh命令位于C:\Windows\System32 下),我们运行该命令,并输入:
http add sslcert ipport=0.0.0.0:9000 certhash=f5ccc32b77d5d12922e162a289c80c7e95d615ea appid={BFC5621F-EF33-4009-AD7E-51EDDAEC4321}
这样我们的证书就和9000端口绑定好了,如何对这两个命令有疑问,请点击这里,对这两个命令和用法有详细的介绍。
到这里,服务器端证书就创建好了,我们还需要将证书的颁发者 LXCA 纳入到 “受信任的根证书颁发结构” 中(这一步主要是为了解决客户端调用的时候产生的信任关系的问题,前文已有介绍)。我们 在MMC 证书管理单元中,在 ”受信任的根证书颁发机构” 节点右击,选择 “所有任务” -->“导入证书”,文件选择D盘的 LXCA.cer 即可,如下图:
之后,我们需要创建两个客户端用到的证书,命令同制作服务器端证书一样:
Makecert -n "CN=Client1-PC" -ic D:\LXCA.cer -iv D:\LXCA.pvk -sr CurrentUser -ss My -pe -sky exchange
Makecert -n "CN=Client2-PC" -ic D:\LXCA.cer -iv D:\LXCA.pvk -sr CurrentUser -ss My -pe -sky exchange
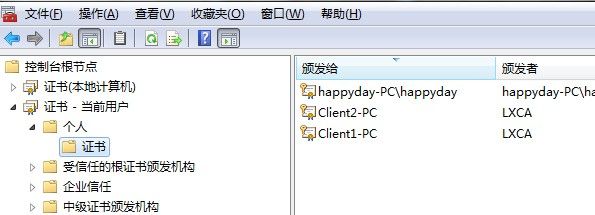
我们创建两个客户端证书Client1-PC 和Client2-PC ,并放到 “当前用户” 的存储区,因为在实际项目中,客户端的证书一般都存储在当前用户下,我们可以在MMC 证书管理单元中看到:
并记录下两个证书的指纹(后面要用到):
Client1-PC 指纹:4df6765861ca5b393127e4aea2d9dffc02ef7346
Client2-PC 指纹:5cd0b75bd54092f022e9c48eb971879dcbdc29c2
二、程序演示
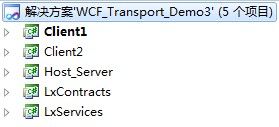
同样看一下项目结构,结构和服务代码和前面几篇用到的一样:
1、 程序集 LxContracts(包括服务的数据契约Books.cs和操作契约IBookContract.cs)需要添加引用System.Runtime.Serialization 和System.ServiceModel:
using System.Runtime.Serialization;

namespace LxContracts
{
    [DataContract]
    public class Books
    {
        [DataMember]
        public int BookId { get; set; }

        [DataMember]
        public string BookName { get; set; }

        [DataMember]
        public float Price { get; set; }
    }
}
using System.ServiceModel;
using System.Collections.Generic;

namespace LxContracts
{
    [ServiceContract]
    public interface IBookContract
    {
        [OperationContract]
        List<Books> GetAllBooks();
    }
}
2、 程序集LxServices(包括服务类BookService.cs),需要引用项目中的程序集LxContracts:
using System;
using System.Collections.Generic;
using System.Linq;
using System.Text;
using LxContracts;

namespace LxServices
{
    public class BookService:IBookContract
    {
        public List<Books> GetAllBooks()
        {
            List<Books> listBooks = new List<Books>();
            listBooks.Add(new Books() { BookId = 1, BookName = "读者", Price = 4.8f });
            listBooks.Add(new Books() { BookId = 2, BookName = "青年文摘", Price = 4.5f });
            return listBooks;
        }
    }
}
3、 程序集 Host_Server 是WCF服务的控制台宿主程序,需要引用 System.ServiceModel 和项目中LxContracts 程序集与 LxServices程序集:
using System;
using System.Collections.Generic;
using System.Linq;
using System.Text;
using System.ServiceModel;
using LxServices;

namespace Host_Server
{
    class Program
    {
        static void Main(string[] args)
        {
            using (ServiceHost host = new ServiceHost(typeof(BookService)))
            {
                host.Opened += delegate
                {
                    Console.WriteLine("服务已经启动,按任意键终止服务!");
                };
                host.Open();
                Console.ReadKey();
                host.Close();
            }
        }
    }
}
<?xml version="1.0"?>
<configuration>
  <system.serviceModel>
    <behaviors>
      <serviceBehaviors>
        <behavior name="LxBehavior">
          <!--不提供通过浏览器输入https访问元数据的方式-->
          <serviceMetadata httpsGetEnabled="false"/>
          <serviceDebug includeExceptionDetailInFaults="false"/>
          <!--服务器端提供证书-->
          <serviceCredentials>
            <serviceCertificate storeName="My" x509FindType="FindBySubjectName" findValue="Lx-PC" storeLocation="LocalMachine"/>
          </serviceCredentials>
        </behavior>
      </serviceBehaviors>
    </behaviors>

    <bindings>
      <wsHttpBinding>
        <binding name="LxWsHttpBinding">
          <security mode="Transport">
            <!--采用传输安全,客户端凭证=Certificate-->
            <transport clientCredentialType="Certificate"/>
            <message clientCredentialType="None"/>
          </security>
        </binding>
      </wsHttpBinding>
    </bindings>

    <services>
      <service name="LxServices.BookService" behaviorConfiguration="LxBehavior">
        <endpoint address="BookService" binding="wsHttpBinding" bindingConfiguration="LxWsHttpBinding" contract="LxContracts.IBookContract"/>
        <endpoint address="mex" binding="mexHttpsBinding" contract="IMetadataExchange"/>
        <host>
          <baseAddresses>
            <!--基地址是https-->
            <add baseAddress="https://Lx-PC:9000/"/>
          </baseAddresses>
        </host>
      </service>
    </services>
    <serviceHostingEnvironment aspNetCompatibilityEnabled="false"/>
  </system.serviceModel>
</configuration>
注意:<transport clientCredentialType="Certificate"/> 我们对客户端的认证方式修改成为了 Certificate
4、我们为项目添加一个Client1 控制台客户端程序,在启动 Host_Server 的情况下,我们添加服务引用:“https://lx-pc:9000/mex” ,服务引用命名为:“WCF.BookSrv”,并点击 “高级” 将集合类型选择为System.Collections.Generic.List。服务引用添加好之后,我们编写调用代码如下:
using System;
using System.Collections.Generic;
using System.ServiceModel;
using System.ServiceModel.Security;
using Client1.WCF.BookSrv;

namespace Client1
{
    class Program
    {
        static void Main(string[] args)
        {
            WCF.BookSrv.BookContractClient proxyClient = new WCF.BookSrv.BookContractClient();
            List<Books> listBook = new List<Books>();
            try
            {
                listBook = proxyClient.GetAllBooks();
                listBook.ForEach(b =>
                {
                    Console.WriteLine("客户端1服务调用成功:");
                    Console.WriteLine("---------------");
                    Console.WriteLine("图书编号:{0}", b.BookId);
                    Console.WriteLine("图书名称:《{0}》", b.BookName);
                    Console.WriteLine("图书价格:{0}¥", b.Price);
                    Console.WriteLine("---------------");
                });
            }
            catch (Exception ex)
            {
                Console.WriteLine("服务调用失败,原因如下:");
                Console.WriteLine(ex.Message);
            }
            Console.ReadKey();
        }
    }
}
生成之后,启动服务器端 Host_Server,我们运行一下客户端Client1,报错,如下图所示:
因为我们在服务器端对客户端的认证方式为 Certificate,因此我们的客户端必须要提供一个证书,才能正常访问我们的服务,我们需要修改一下客户端Client1的 app.config 配置文件,在终结点的行为中指定我们客户端的证书,如下:
<?xml version="1.0"?>
<configuration>
  <system.serviceModel>
    <!--在终结点行为中指定客户端使用的证书-->
    <behaviors>
      <endpointBehaviors>
        <behavior name="cnt1Behavior">
          <clientCredentials>
            <clientCertificate storeName="My" x509FindType="FindBySubjectName" findValue="Client1-PC" storeLocation="CurrentUser"/>
          </clientCredentials>
        </behavior>
      </endpointBehaviors>
    </behaviors>

    <bindings>
      <wsHttpBinding>
        <binding name="WSHttpBinding_IBookContract" closeTimeout="00:01:00"
          openTimeout="00:01:00" receiveTimeout="00:10:00" sendTimeout="00:01:00"
          bypassProxyOnLocal="false" transactionFlow="false" hostNameComparisonMode="StrongWildcard"
          maxBufferPoolSize="524288" maxReceivedMessageSize="65536" messageEncoding="Text"
          textEncoding="utf-8" useDefaultWebProxy="true" allowCookies="false">
          <readerQuotas maxDepth="32" maxStringContentLength="8192" maxArrayLength="16384"
            maxBytesPerRead="4096" maxNameTableCharCount="16384" />
          <reliableSession ordered="true" inactivityTimeout="00:10:00"
            enabled="false" />
          <security mode="Transport">
            <transport clientCredentialType="Certificate" proxyCredentialType="None"
              realm="" />
            <message clientCredentialType="Windows" negotiateServiceCredential="true" />
          </security>
        </binding>
      </wsHttpBinding>
    </bindings>

    <client>
      <endpoint address="https://lx-pc:9000/BookService" binding="wsHttpBinding"
        bindingConfiguration="WSHttpBinding_IBookContract" contract="WCF.BookSrv.IBookContract"
        behaviorConfiguration="cnt1Behavior"
        name="WSHttpBinding_IBookContract" />
    </client>
  </system.serviceModel>
</configuration>
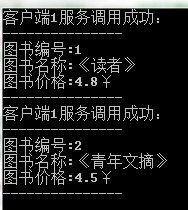
再次运行客户端Client1,发现服务调用成功:
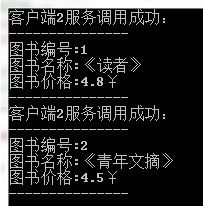
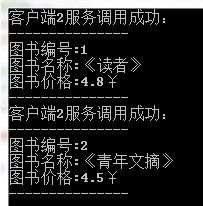
我们在解决方案中再添加一个Client2的控制台客户端,代码和Client1 一样,只不过配置文件中我们使用的是证书Client2-PC。我们运行Client2 发现服务也调用成功:
既然这样的话,我们能不能像自定义用户名和密码认证一样,对证书也进行检验呢。比如我们让服务对客户端证书进行认证的时候,让持有证书 Client1-PC 的客户端 不能访问,但可以让持有证书 Client2-PC 的客户端访问呢,是可以的,下面我们对服务进行一下改进
5、自定义客户端的认证:
我们依然需要对 LxService 程序集添加引用 System.IdentityModel 和System.IdentityModel.Selectors ,然后在该程序集中添加一个自定义证书的验证类 CustomCertificateVerification 并使其继承 X509CertificateValidator ,重写父类的 Validate 方法。在这个方法中,根据证书的指纹来对客户端提供的证书进行检验。
using System;
using System.IdentityModel;
using System.IdentityModel.Tokens;
using System.IdentityModel.Selectors;
using System.Security.Cryptography.X509Certificates;

namespace LxServices
{
    public class CustomCertificateVerification : X509CertificateValidator
    {
        //只允许Client2 调用服务,Client1 调用失败
        public override void Validate(X509Certificate2 certificate)
        {
            if (certificate.Thumbprint.ToUpper() != "5CD0B75BD54092F022E9C48EB971879DCBDC29C2")
            {
                throw new SecurityTokenException("无效的证书");
            }
        }
    }
}
之后,我们修改一下宿主程序Host_Server 的App.config 配置文件,将原来的
<serviceCredentials>
     <serviceCertificate storeName="My" x509FindType="FindBySubjectName" findValue="Lx-PC" storeLocation="LocalMachine"/>
</serviceCredentials>
修改为:
 <serviceCredentials>
       <serviceCertificate storeName="My" x509FindType="FindBySubjectName" findValue="Lx-PC" storeLocation="LocalMachine"/>
       <clientCertificate>
            <authentication certificateValidationMode="Custom" customCertificateValidatorType="LxServices.CustomCertificateVerification,LxServices"/>
       </clientCertificate>
</serviceCredentials>
使我们自定义的证书验证类生效。
我们重新生成一下代码,打开宿主程序Host_Server 的生成目录Bin/Debug,直接运行Host_Server.exe(不要调试运行,否则服务器端会抛出异常)。然后运行Client1 客户端,我们会发现 客户端 Client1 已经无法调用服务了:
我们运行一下客户端Client2,发现服务依然能够调用成功:
三、总结:
基于SSL的WCF传输安全实践,我们基本演示完成了,分别包括的匿名客户端访问,自定义用户名和密码客户端验证,使用X.509证书方式的客户端验证,在学习这方面知识的时候,自己查找了很多资料,再此将这些开发的步骤和关键点记录下来和大家分享,不足之处,希望大家多多指正。


