WebService学习之路一 :http://trylin.iteye.com/blog/1906819
WebService学习之路二 :http://trylin.iteye.com/blog/1907883
WebService学习之路三 :http://trylin.iteye.com/blog/1908269
SOAP 的理解使用
不论是以那种形式实现WS服务,axis也好,xfire,CXF也好 ,服务进行消息传替都是基于SOAP格式的。
这里简单理解一下SOAP信息,和实现使用SOAP格式的调用我们发布的WS.
1、SOAP消息格式。
打开之前的第一个简单示例的服务。
eclipse的视图模式改为javaee,并且打开wsdl浏览
选择一个WSDL MAIN,并输入我们发布的WSDL地址。
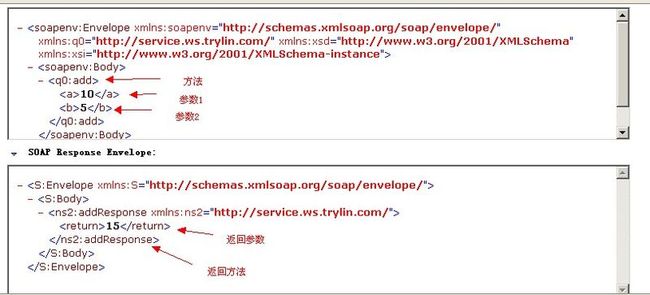
看到我们发布的两个方法了吧,选择add然后输入两个参数,点击go,然后点击下发status项的 Source,
这样就可以看到我们请求WS的请求和返回的SOAP消息,上面是请求,下面是返回 。请求的参数都是被包裹在一个Body的对象中,然后是方法,再是方法下的参数。
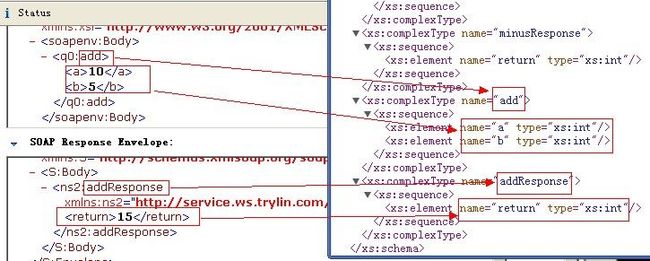
看到SOAP消息,有没有觉得和我们发布的WSDL的types的格式很像,下面截图做个简单的比较,一目了然。
2、使用SOAP消息访问WS
上面看到了我们请求返回的SOAP消息,那当然我们也可以根据SOAP的消息格式访问我们发布的WS服务,这就要使用到jdk扩展包下的 soap 包。
在我们客户端的项目中新建一个类 SOAPImpl(具体代码有注释,更多的可以看视频的中的解释哦)
学习视频地址:http://trylin.iteye.com/blog/1907289
WS服务端代码:(由于之前有测试过命名空间相关的东西,下面的测试都是基于默认命名空间,如果按照第一章的示例来直接用下面的客户端访问 可能会出现找不到方法的情况,或者你可以把我的测试代码的命名空间修改下,都是可以的,这里我把除去命名空间的服务端代码也贴上。。。)
@WebService()
public interface ITest {
	public int add(@WebParam(name="a")int a, @WebParam(name="b")int b);
	public int minus(@WebParam(name="a")int a, @WebParam(name="b")int b);
}
@WebService(endpointInterface="com.trylin.ws.service.ITest")
public class TestImpl implements ITest{
	public int add(int a, int b) {
		System.out.println(a+"+"+b+"="+(a+b));
		return a+b;
	}
	public int minus(int a, int b) {
		return a-b;
	}
}
客户端:
public class SOAPImpl {

	/** 服务地址 */
	public URL url = null;
	/** 服务命名空间 */
	public String ns = "http://impl.service.ws.trylin.com/";
	/** 命名空间变量 */
	public String xlns = "nn";

	public SOAPImpl(){
		try {
			url = new URL("http://localhost:8888/WS");
		} catch (MalformedURLException e) {
			// TODO Auto-generated catch block
			e.printStackTrace();
		}
	}

	/**
	 * 创建add方法的SOAP消息
	 * @return
	 * @throws Exception
	 */
	protected SOAPMessage add() throws Exception{
		MessageFactory factory = MessageFactory.newInstance();//创建消息工厂
		SOAPMessage message = factory.createMessage();//创建消息类型
		SOAPPart part = message.getSOAPPart();//创建Part元素
		SOAPEnvelope envelope = part.getEnvelope();//创建envelope元素   SOAP的根节点
		SOAPBody body = envelope.getBody();//body对象
		//指定body下节点 请求的方法add元素
		SOAPBodyElement bodyElement = body.addBodyElement(new QName("http://service.ws.trylin.com/","add",xlns));
		//设置add方法的参数
		bodyElement.addChildElement("a").setValue("1");
		bodyElement.addChildElement("b").setValue("2");
		message.writeTo(System.out);
		return message;
	}

	/**
	 * 通过Service将SOAP消息提交到WS服务端,并返回服务端的SOAPMessage
	 * @return
	 * @throws Exception
	 */
	public SOAPMessage getSOAPWS() throws Exception{
		//创建发送Service  设定Qname TestImplService  服务名
		Service service = Service.create(url, new QName(ns,"TestImplService"));
		//通过dispatch发送请求  设置请求格式为Service.Mode.MESSAGE
		Dispatch<SOAPMessage> dispath = service.createDispatch(new QName(ns,"TestImplPort"),
				SOAPMessage.class, Service.Mode.MESSAGE);
		SOAPMessage request = this.add();
		System.out.println("\n.......");
		SOAPMessage response = dispath.invoke(request);
		response.writeTo(System.out);
		return response;
	}

	/**
	 * 解析服务端的SOAPMessage
	 * @param message
	 * @throws Exception
	 */
	public void parseSOAPMessage(SOAPMessage message) throws Exception{
		System.out.println();
		Document document = message.getSOAPPart()
			.getEnvelope().getBody().extractContentAsDocument();//获取Body节点元素文本对象
		Element element = document.getDocumentElement();
		System.out.println((element.getElementsByTagName("return").item(0).getTextContent()));//打印返回值
	}
}
然后在写客户端测试用例:
public class TestSOAP {
	@Test
	public void test01() throws Exception{
		SOAPImpl soap = new SOAPImpl();
		soap.parseSOAPMessage(soap.getSOAPWS());
	}
}
运行后,查看我们定义的soap输出和服务的返回 soap 还有返回的计算结果
这个是简单的服务访问,我们添加一个自定义的User对象,在服务中再添加一个用户登录的方法,然后发布后,通过WSDL浏览器,请求login服务,看下这时的soap消息是啥样的。
首先创建一个User
public class User {
	private String userName; //名字
	private int age;//年龄
	private boolean isBoy;//
	private double money;//
……省略get set
}
服务类中 添加login方法
@WebService()
public interface ITest {
	public int add(@WebParam(name="a")int a, @WebParam(name="b")int b);
	public int minus(@WebParam(name="a")int a, @WebParam(name="b")int b);
	@WebMethod(operationName="login")
	public @WebResult(name="user")User login(@WebParam(name="user")User user);
}
@WebService(endpointInterface="com.trylin.ws.service.ITest")
public class TestImpl implements ITest{
	public int add(int a, int b) {
		System.out.println(a+"+"+b+"="+(a+b));
		return a+b;
	}
	public int minus(int a, int b) {
		return a-b;
	}
	public User login(User user){
		if("hiboy".equals(user.getUserName())){
			user.setAge(12);
			user.setBoy(true);
			user.setMoney(100);
			return user;
		}
		return null;
	}
}
这里用到了几个注释,简单说明一下:
@WebService() 标记创建WS服务,可以设置命名空间,实现接口,服务名称等。
@WebParam() 表示参数在wsdl中显示的名称,默认参数名是按照arg0.. argN,可以手动设定,如@WebParam(name="a")int a 这样a元素在wsdl中就显示成a而不是 arg0
@WebResult这个表示返回参数在wsdl显示的名称,默认返回参数名称为return,如@WebResult(name="user")User 这样在wsdl中login的返回参数名就是user了
@WebMethod 表示wsdl中显示的方法名,默认是按照原方法名显示,这里可以修改。
然后启动服务,通过WSDL浏览器访问我们的login方法,查看SOAP消息。仔细看下User的格式哦。
看到SOAP消息了,然后我们在用客户端去按照SOAP消息的格式访问WS。
这里的访问有两种方法,第一种就是前面说的,给body对像手动的添加节点,这样比较死,一个一个的添加,也比较累。第二种方法,可以通过JAXB 将一个User对象格式化成类似上面soap消息的xml。可以先试下第一种方法,我这里写第二种。
在客户端,我们也要生成XMl对应的user对象
@XmlRootElement//注意这个注解  不加下面使用jaxB的时候会报错
public class User {

	private String userName; //名字
	private int age;//年龄
	private boolean isBoy;//是否
	private double money;//
     //...get  set
}
在SOAPImpl类中新增加几个方法
/**
	 * 设置Login的 Source对象  Source简单理解为数据源
	 * @return
	 * @throws Exception
	 */
	protected Source login() throws Exception{
		User user = new User();
		user.setUserName("hiboy");//设置参数 User
		JAXBContext context = JAXBContext.newInstance(User.class);//创建JAXB文档对戏那个
		Marshaller mar = context.createMarshaller();
		mar.setProperty(Marshaller.JAXB_FRAGMENT, true);//设置生成的xml不包含xml头
		StringWriter writer = new StringWriter();
		mar.marshal(user, writer);//处理User
		//JAXBContext  只处理User对像 所以方法声明的部分 还是的自己手写
		String payLoad = "<"+xlns+":login xmlns:"+xlns+"=\""+"http://service.ws.trylin.com/"+"\">"+writer.toString()+"</nn:login>";
		System.out.println(payLoad);
		//穿件 Source流对象
		Source source = new StreamSource(new StringReader(payLoad));
		return source;
	}
	/**
	 * 通过Service将Source发送到服务端  并且返回服务端的Source
	 * @return
	 * @throws Exception
	 */
	public Source getSOAPLoginWS() throws Exception{
		Service service = Service.create(url, new QName(ns,"TestImplService"));
		Dispatch<Source> dispath = service.createDispatch(new QName(ns,"TestImplPort"),
				Source.class, Service.Mode.PAYLOAD);
		Source request = this.login();
		Source response = dispath.invoke(request);
		return response;
	}
	/**
	 * 解析Source
	 * @param source
	 * @throws Exception
	 */
	public void parseSOAPSource(Source source) throws Exception{
		System.out.println();
		//解析的时候 需要获得节点对象  所以此处用 Transformer转换
		Transformer transformer  = TransformerFactory.newInstance().newTransformer();
		DOMResult result = new DOMResult();
		transformer.transform(source, result);
		//第一层 获取response节点
		Node nl =  result.getNode().getFirstChild().getFirstChild();
		JAXBContext context = JAXBContext.newInstance(User.class);
		Unmarshaller umar = context.createUnmarshaller();
		User user = (User)umar.unmarshal(nl);
		System.out.println(user.getMoney());
	}
编写测试类:
@Test
public void test02() throws Exception{
	SOAPImpl soap = new SOAPImpl();
	soap.parseSOAPSource(soap.getSOAPLoginWS());
}
运行 输出 : 100.0就是我们在服务端 给User加的一个值,这样表示通过SOAP调用成功。
还是那句话,本人技术不牢靠,可能整理的这些有点乱,也没有按照视频上的原样规规矩矩的记录所有。也有一些内容都是自己的理解,肯定有理解有误的地方。这里解释不详细的,有错误的,还行看到博客的大神在回复中留下你们的间接,如果有幸有童鞋模仿上面的示例,有问题的也可以提出,我们一起解决。。。
测试代码在附件中,不嫌弃可以下载运行下![]() 。。。
。。。


