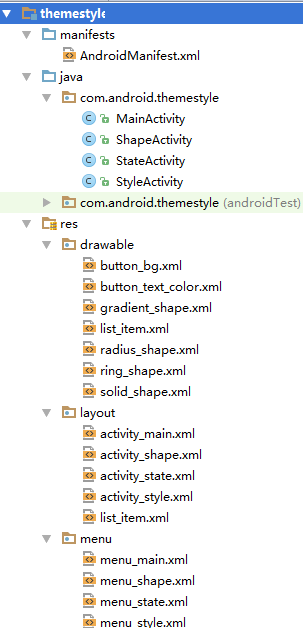
【攻克Android (20)】屏幕适配、主题、样式
本文围绕以下三个部分展开:
一、屏幕适配
案例:获取屏幕规格(宽度和高度,像素)
二、主题
三、样式
附 代码补充
一、屏幕适配
1. 屏幕尺寸(Screen size)
屏幕的对角线长度(英寸)。
2. 屏幕分辨率(Screen size)
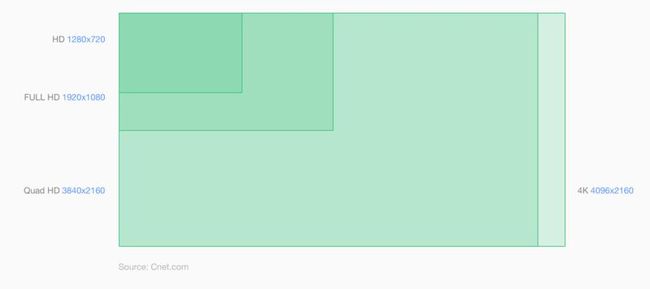
屏幕水平方向和垂直方向上像素数量(px)。
3. 像素密度(pixel density)
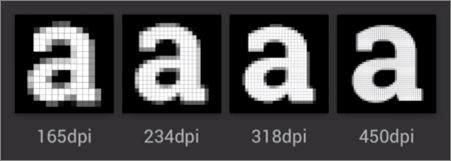
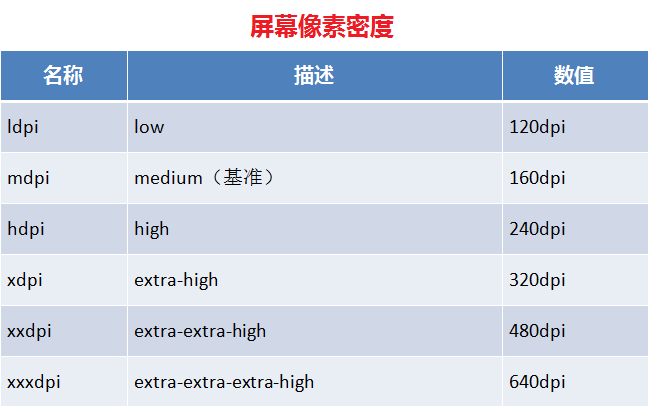
一英寸内像素的数量:DPI (Dots Per Inch)。
补充:PPI和DPI的区别:
(1)PPI (Pixels Per Inch):图像的采样率。表示的是每英寸所拥有的像素(Pixel)数目。PPI数值越高,即代表显示屏能够以越高的密度显示图像。当然,显示的密度越高,拟真度就越高。
(2)DPI (Dots Per Inch):输出分辨,针对于输出设备而言的。
4. 虚拟独立像素(Device Independent Pixels, DIP或dp)
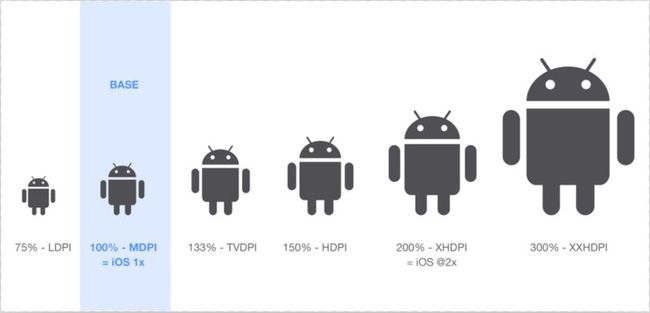
DIP 以 MDPI(160dpi)为基准,相同的 dp 在不同设备上看起来大小一致。
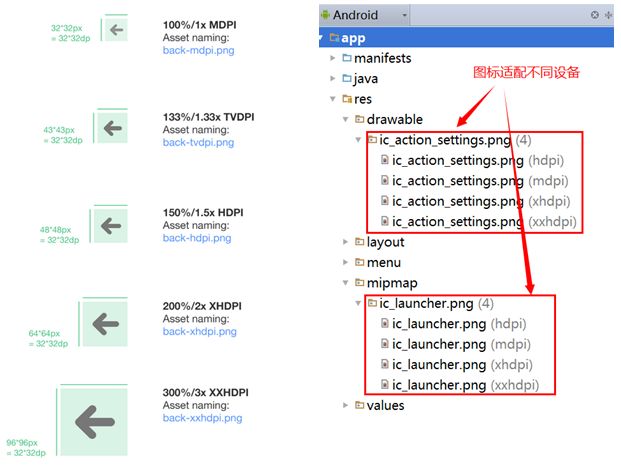
5. 图标适配设备
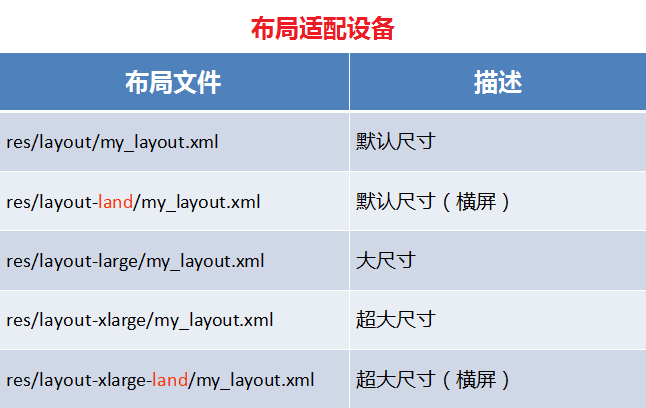
6. 布局适配设备
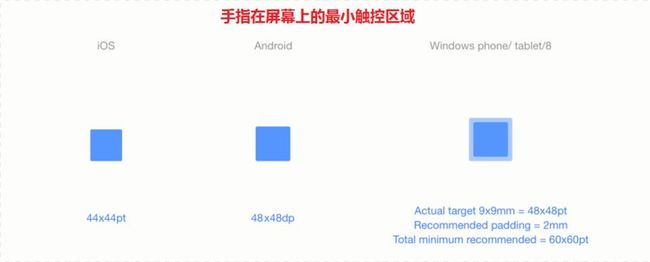
7. 手指在屏幕上的最小触控区域
8. 最佳实践
(1)使用 DIP(dp) 定义控件的尺寸。
(2)使用 SP(Scale-independent pixels) 定义字体的尺寸。
(3)需要制作多套图标使用于不同的像素密度。
(4)屏幕上最小的触控区域为 48 dp 。
案例:获取屏幕规格(宽度和高度,像素)
创建一个 Module ,在 MainActivity 的 onCreate() 方法中,获取屏幕规格:
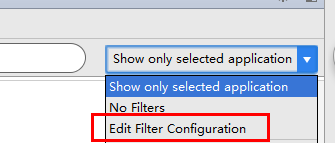
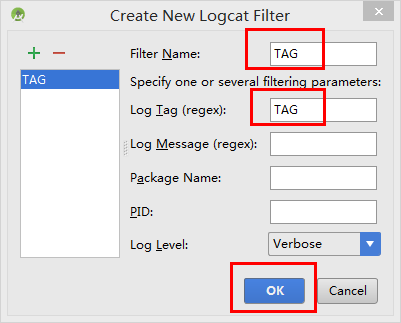
用日志输出后,查看屏幕规格的方法如下:
MainActivity 代码如下:
二、主题
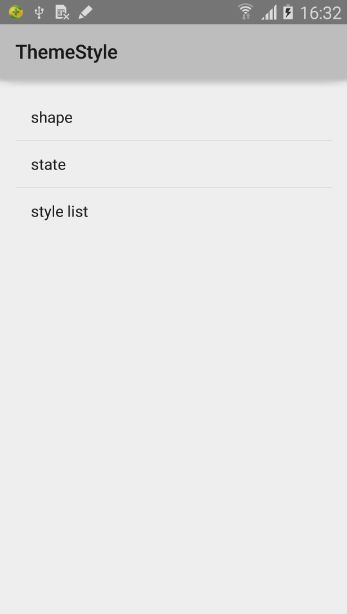
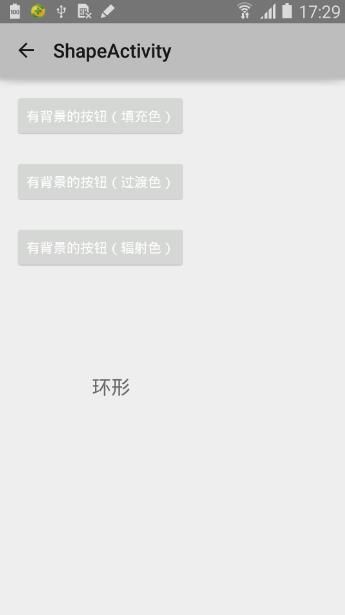
1. 默认的主题如下:
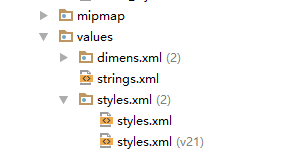
其中,功能清单文件 AndroidManifest.xml 中引用了如下默认主题:AppTheme ,该主题位于 styles.xml 中。
AndroidManifest.xml 代码如下:
styles.xml 中 默认主题的设置信息如下:
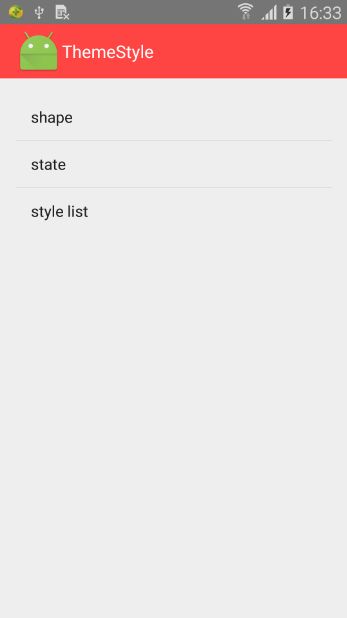
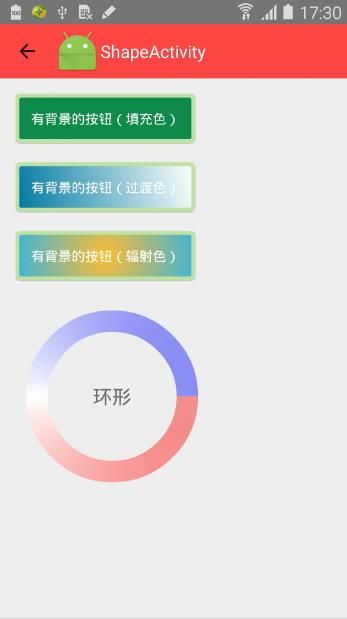
2. 修改后的主题如下:
(1)在 styles.xml 中,自定义一个应用栏样式:MyActionBar ,将应用栏的背景颜色改为:红色。
(2)在 styles.xml 中,自定义一个主题:CustomActionBarTheme ,其父类主题是 默认主题 AppTheme,其应用栏使用刚刚自定义的 MyActionBar。(除了应用栏使用自定义的 MyActionBar,其他部分都和父类主题一样)。
(3)在 功能清单文件 AndroidManifest.xml 中,将此App的主题改为:CustomActionBarTheme 。
这样,整个 App 的主题中,应用栏都变为了红色背景。
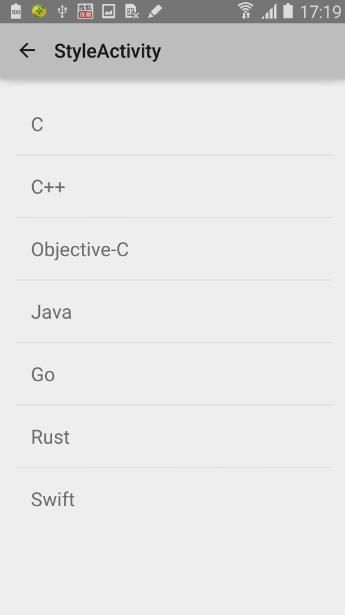
主题也可应用于 单个 Activity,如:在 StyleActivity 中,加入 默认样式:AppTheme,这样,StyleActivity 的应用栏变为了默认的背景,其他页面的应用栏均为红色背景。
AndroidManifest.xml 代码如下:
三、样式
1. 形状样式(Shape):
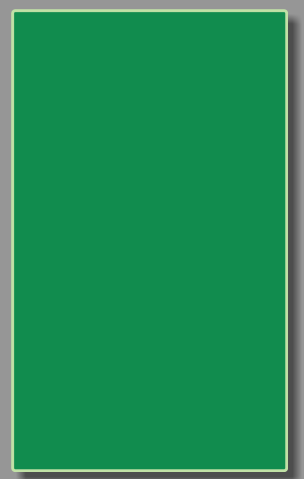
(1)“有背景的按钮(填充色)”:android:background:solid_shape 。
(A)在 res/drawable 下面,创建 solid_shape.xml 。里面写样式。
效果如下:
(B)将此样式作用于 activity_shape.xml 中的“有背景的按钮(填充色)”按钮:
“有背景的按钮(填充色)”按钮 代码如下:
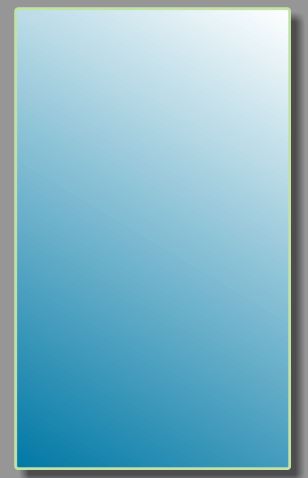
(2)“有背景的按钮(过滤色)”:android:background:gradient_shape 。
(A)在 res/drawable 下面,创建 gradient_shape.xml 。里面写样式。
效果如下:
(B)将此样式作用于 activity_shape.xml 中的“有背景的按钮(过滤色)”按钮:
“有背景的按钮(过滤色)”按钮 代码如下:
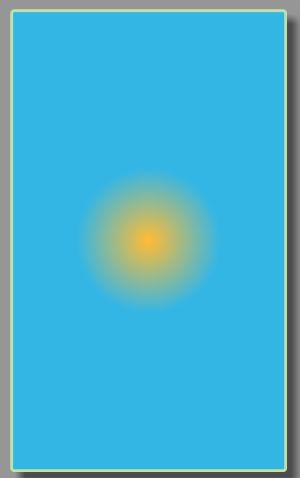
(3)“有背景的按钮(辐射色)”:android:background:radius_shape 。
(A)在 res/drawable 下面,创建 radius_shape.xml 。里面写样式。
效果如下:
(B)将此样式作用于 activity_shape.xml 中的“有背景的按钮(辐射色)”按钮:
“有背景的按钮(辐射色)”按钮 代码如下:
(4)“环形”文本:android:background:ring_shape 。
(A)在 res/drawable 下面,创建 ring_shape.xml 。里面写样式。
效果如下:
(B)将此样式作用于 activity_shape.xml 中的“环形”文本:
“环形”文本 代码如下:
注意:
以上四个样式,里面的节点都是“<shape></shape>”
附 代码补充
activity_shape.xml:
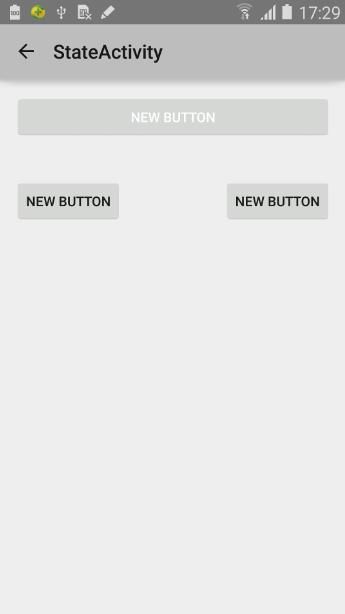
2. 按钮点击样式:
(1)Button 样式:使用 drawable 下面创建的样式文件。(使用这种方法,界面上的英文全部显示大写)
使用这种方法,需要直接在界面布局中,引用背景样式文件:button_bg.xml,样式较少,且较为固定。
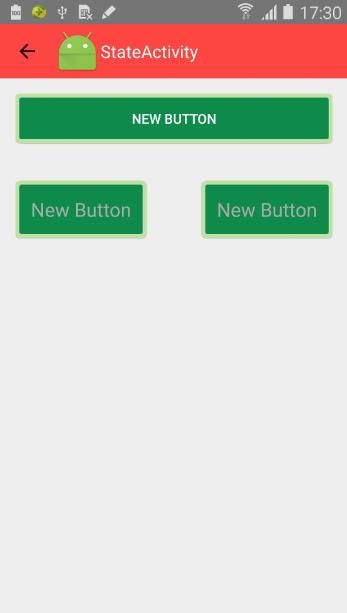
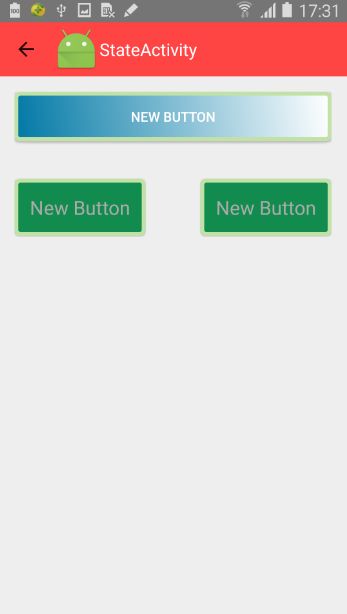
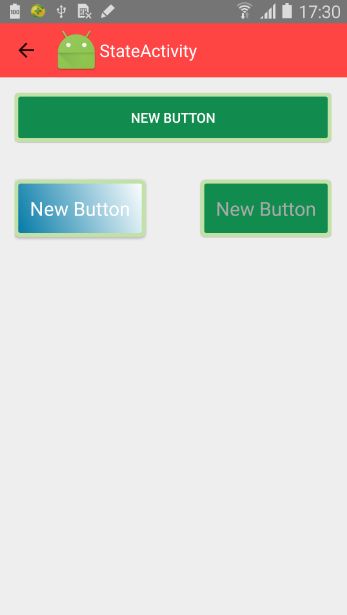
最上面的按钮,默认出现的样式是 solid_shape,当点击此按钮的时候,变为如下样式:gradient_shape 。
(A)在 res/drawable 下面,创建 button_bg.xml 。里面写样式。
注意:
里面的节点是“<selector></selector>”
(B)将此样式作用于 activity_state.xml 中的第一个按钮:
activity_state.xml 中的第一个按钮 代码如下:
(2)Button 样式:利用 styles.xml 样式文件。(使用这种样式,界面上的英文不再是全部显示大写,而是按照原样输出)
使用这种方法,只需要直接在界面布局中,引用样式文件:styles.xml 中定义的样式,样式较多,且比较自由、更新方便。
(A)在 styles.xml 中,自定义 Button 样式:
(B)这里面用到了 设置字体颜色 的一个样式,因此需要在 drawable 下面再创建 button_text_color.xml,并写入 字体颜色的设置样式:
(C)对 activity_state.xml 中下面的两个按钮,设置此样式:
其中,两个按钮 的代码如下:
附 代码补充
(1)activity_shape.xml:
(2)styles.xml:
3. 列表框中列表项点击样式(Shape):
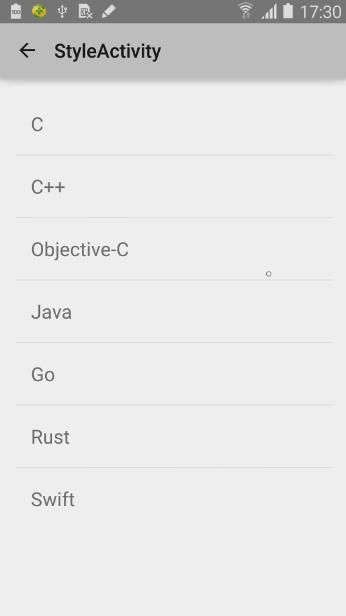
不点击的时候,背景颜色是:透明的(无背景颜色)。
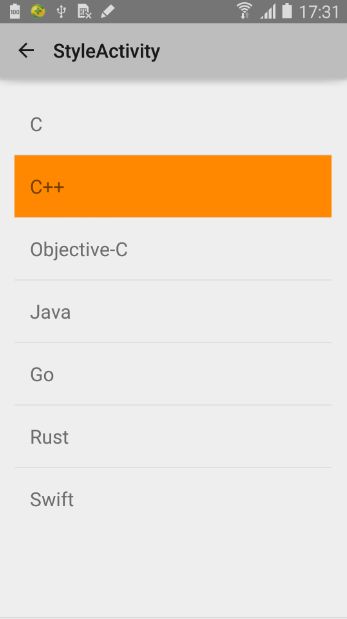
点击按住不离开的时候,背景颜色变为:holo_orange_dark。
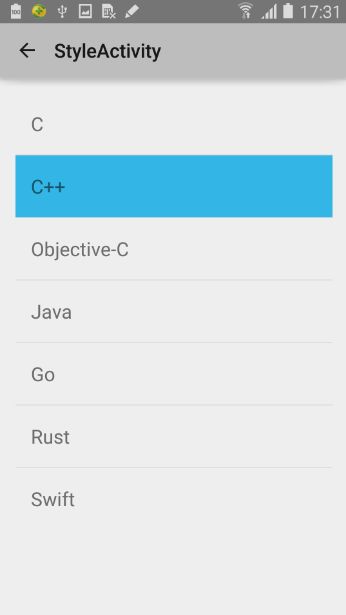
点击完成,离开后,激活项的背景颜色变为:holo_blue_light。
(1)StyleActivity 。
(2)activity_style.xml 。主页面 listView列表框
(3)layout\list_item.xml 。将来要与 listView 列表框的 列表项 一一绑定 的 TextView 布局。
(4)drawable\list_item.xml 。列表项点击时的样式
附 代码补充
1. menu_main.xml:
2. menu_shape.xml:
3. menu_state.xml:
4. menu_style.xml:
一、屏幕适配
案例:获取屏幕规格(宽度和高度,像素)
二、主题
三、样式
附 代码补充
一、屏幕适配
1. 屏幕尺寸(Screen size)
屏幕的对角线长度(英寸)。
2. 屏幕分辨率(Screen size)
屏幕水平方向和垂直方向上像素数量(px)。
3. 像素密度(pixel density)
一英寸内像素的数量:DPI (Dots Per Inch)。
补充:PPI和DPI的区别:
(1)PPI (Pixels Per Inch):图像的采样率。表示的是每英寸所拥有的像素(Pixel)数目。PPI数值越高,即代表显示屏能够以越高的密度显示图像。当然,显示的密度越高,拟真度就越高。
(2)DPI (Dots Per Inch):输出分辨,针对于输出设备而言的。
4. 虚拟独立像素(Device Independent Pixels, DIP或dp)
DIP 以 MDPI(160dpi)为基准,相同的 dp 在不同设备上看起来大小一致。
5. 图标适配设备
6. 布局适配设备
7. 手指在屏幕上的最小触控区域
8. 最佳实践
(1)使用 DIP(dp) 定义控件的尺寸。
(2)使用 SP(Scale-independent pixels) 定义字体的尺寸。
(3)需要制作多套图标使用于不同的像素密度。
(4)屏幕上最小的触控区域为 48 dp 。
案例:获取屏幕规格(宽度和高度,像素)
创建一个 Module ,在 MainActivity 的 onCreate() 方法中,获取屏幕规格:
// 1.获得屏幕的规格
        DisplayMetrics dm = this.getResources().getDisplayMetrics();
        // 1.1 获得屏幕的宽度 (像素,如 480px)
        int screenWidth = dm.widthPixels;
        // 1.2 获得屏幕的高度 (像素,如 800px):从通知栏下面开始,从屏幕底端
        int screenHeight = dm.heightPixels;
        // 1.3 格式化字符串,显示屏幕高度、宽度
        String text = String.format("Screen Width=%d, Screen Height=%d",
                screenWidth,screenHeight);
        // 1.4 用日志输出
        Log.v("TAG", text);
用日志输出后,查看屏幕规格的方法如下:
MainActivity 代码如下:
package com.android.themestyle;

import android.app.Activity;
import android.os.Bundle;
import android.util.DisplayMetrics;
import android.util.Log;
import android.view.Menu;
import android.view.MenuItem;


public class MainActivity extends Activity {

    @Override
    protected void onCreate(Bundle savedInstanceState) {
        super.onCreate(savedInstanceState);
        setContentView(R.layout.activity_main);

        // 1.获得屏幕的规格
        DisplayMetrics dm = this.getResources().getDisplayMetrics();
        // 1.1 获得屏幕的宽度 (像素,如 480px)
        int screenWidth = dm.widthPixels;
        // 1.2 获得屏幕的高度 (像素,如 800px):从通知栏下面开始,从屏幕底端
        int screenHeight = dm.heightPixels;
        // 1.3 格式化字符串,显示屏幕高度、宽度
        String text = String.format("Screen Width=%d, Screen Height=%d",
                screenWidth, screenHeight);
        // 1.4 用日志输出
        Log.v("TAG", text);
        // 06-17 09:18:08.856  15267-15267/com.android.themestyle V/TAG﹕ Screen Width=1080, Screen Height=1920
    }

    // ---------------------------------------------------------------------------
    @Override
    public boolean onCreateOptionsMenu(Menu menu) {
        // Inflate the menu; this adds items to the action bar if it is present.
        getMenuInflater().inflate(R.menu.menu_main, menu);
        return true;
    }

    @Override
    public boolean onOptionsItemSelected(MenuItem item) {
        // Handle action bar item clicks here. The action bar will
        // automatically handle clicks on the Home/Up button, so long
        // as you specify a parent activity in AndroidManifest.xml.
        int id = item.getItemId();

        //noinspection SimplifiableIfStatement
        if (id == R.id.action_settings) {
            return true;
        }

        return super.onOptionsItemSelected(item);
    }
}
二、主题
1. 默认的主题如下:
其中,功能清单文件 AndroidManifest.xml 中引用了如下默认主题:AppTheme ,该主题位于 styles.xml 中。
android:theme="@style/AppTheme"
AndroidManifest.xml 代码如下:
<?xml version="1.0" encoding="utf-8"?>
<manifest
    package="com.android.themestyle"
    xmlns:android="http://schemas.android.com/apk/res/android">

  <application
      android:allowBackup="true"
      android:icon="@mipmap/ic_launcher"
      android:label="@string/app_name"
      android:theme="@style/AppTheme">
    <activity
        android:name=".MainActivity"
        android:label="@string/app_name">
      <intent-filter>
        <action android:name="android.intent.action.MAIN"/>

        <category android:name="android.intent.category.LAUNCHER"/>
      </intent-filter>
    </activity>
    <activity
        android:name=".ShapeActivity"
        android:label="@string/title_activity_shape"
        android:parentActivityName=".MainActivity"/>
    <activity
        android:name=".StateActivity"
        android:label="@string/title_activity_state"
        android:parentActivityName=".MainActivity"/>
    <activity
        android:name=".StyleActivity"
        android:label="@string/title_activity_style"
        android:parentActivityName=".MainActivity"/>
  </application>

</manifest>
styles.xml 中 默认主题的设置信息如下:
<resources>

    <!-- Base application theme. -->
    <style name="AppTheme" parent="android:Theme.Material.Light.DarkActionBar">
        <!-- Customize your theme here. -->
    </style>

</resources>
2. 修改后的主题如下:
(1)在 styles.xml 中,自定义一个应用栏样式:MyActionBar ,将应用栏的背景颜色改为:红色。
<!--
    应用栏样式:
      继承了父类样式:@android:style/Widget.Holo.Light.ActionBar.Solid.Inverse
  -->
  <style name="MyActionBar" parent="@android:style/Widget.Holo.Light.ActionBar.Solid.Inverse">
    <item name="android:background">@android:color/holo_red_light</item>
  </style>
(2)在 styles.xml 中,自定义一个主题:CustomActionBarTheme ,其父类主题是 默认主题 AppTheme,其应用栏使用刚刚自定义的 MyActionBar。(除了应用栏使用自定义的 MyActionBar,其他部分都和父类主题一样)。
<!--
    此主题可应用到 整个 App,也可以应用到 单个 Activity
  -->
  <style name="CustomActionBarTheme" parent="@style/AppTheme">
    <item name="android:actionBarStyle">@style/MyActionBar</item>
  </style>
(3)在 功能清单文件 AndroidManifest.xml 中,将此App的主题改为:CustomActionBarTheme 。
android:theme="@style/CustomActionBarTheme"
这样,整个 App 的主题中,应用栏都变为了红色背景。
主题也可应用于 单个 Activity,如:在 StyleActivity 中,加入 默认样式:AppTheme,这样,StyleActivity 的应用栏变为了默认的背景,其他页面的应用栏均为红色背景。
android:theme="@style/AppTheme"
AndroidManifest.xml 代码如下:
<?xml version="1.0" encoding="utf-8"?>
<manifest
    package="com.android.themestyle"
    xmlns:android="http://schemas.android.com/apk/res/android">

  <application
      android:allowBackup="true"
      android:icon="@mipmap/ic_launcher"
      android:label="@string/app_name"
      android:theme="@style/CustomActionBarTheme">
    <activity
        android:name=".MainActivity"
        android:label="@string/app_name">
      <intent-filter>
        <action android:name="android.intent.action.MAIN"/>

        <category android:name="android.intent.category.LAUNCHER"/>
      </intent-filter>
    </activity>
    <activity
        android:name=".ShapeActivity"
        android:label="@string/title_activity_shape"
        android:parentActivityName=".MainActivity"/>
    <activity
        android:name=".StateActivity"
        android:label="@string/title_activity_state"
        android:parentActivityName=".MainActivity"/>
    <activity
        android:name=".StyleActivity"
        android:label="@string/title_activity_style"
        android:parentActivityName=".MainActivity"
        android:theme="@style/AppTheme"/>
  </application>

</manifest>
三、样式
1. 形状样式(Shape):
(1)“有背景的按钮(填充色)”:android:background:solid_shape 。
(A)在 res/drawable 下面,创建 solid_shape.xml 。里面写样式。
<?xml version="1.0" encoding="utf-8"?>
<shape xmlns:android="http://schemas.android.com/apk/res/android"
    android:shape="rectangle">
    <!--3.
    3.1 圆角矩形-->
    <corners android:radius="4dp"/>

    <!--3.2 边框-->
    <stroke android:width="4dp"
        android:color="#C1E1A6"/>

    <!--3.3 填充颜色-->
    <solid android:color="#118C4E"/>

    <!--3.4 内边距-->
    <padding
        android:bottom="16dp"
        android:left="16dp"
        android:right="16dp"
        android:top="16dp"/>
</shape>
效果如下:
(B)将此样式作用于 activity_shape.xml 中的“有背景的按钮(填充色)”按钮:
android:background="@drawable/solid_shape"
“有背景的按钮(填充色)”按钮 代码如下:
<!--
    3.5 android:background="@drawable/solid_shape"
    -->
  <Button
      android:id="@+id/button"
      android:layout_width="wrap_content"
      android:layout_height="wrap_content"
      android:layout_alignParentStart="true"
      android:layout_alignParentTop="true"
      android:layout_marginBottom="20dp"
      android:text="有背景的按钮(填充色)"
      android:background="@drawable/solid_shape"
      android:textColor="@android:color/white"/>
(2)“有背景的按钮(过滤色)”:android:background:gradient_shape 。
(A)在 res/drawable 下面,创建 gradient_shape.xml 。里面写样式。
<?xml version="1.0" encoding="utf-8"?>
<shape xmlns:android="http://schemas.android.com/apk/res/android"
    android:shape="rectangle">
    <!--3.
        3.1 圆角矩形-->
    <corners android:radius="4dp" />

    <!--3.2 边框-->
    <stroke
        android:width="4dp"
        android:color="#C1E1A6" />

    <!--3.3 填充颜色
    gradient 梯度,坡度,倾斜度
    angle 角度,角。 默认:0,从左到右渐变
        90:从下到上渐变
        180:从右到左渐变
        270:从上到下渐变
        最小角度:45度:从左下到右上
        度数:45度的倍数。逆时针旋转(共有8个方向)
    -->
    <gradient
        android:angle="45"
        android:endColor="@android:color/white"
        android:startColor="#0078a5" />

    <!--3.4 内边距-->
    <padding
        android:bottom="16dp"
        android:left="16dp"
        android:right="16dp"
        android:top="16dp" />
</shape>
效果如下:
(B)将此样式作用于 activity_shape.xml 中的“有背景的按钮(过滤色)”按钮:
android:background="@drawable/gradient_shape"
“有背景的按钮(过滤色)”按钮 代码如下:
<!--
    3.5 android:background="@drawable/gradient_shape"
    -->
  <Button
      android:id="@+id/button2"
      android:layout_width="wrap_content"
      android:layout_height="wrap_content"
      android:layout_alignParentStart="true"
      android:layout_below="@+id/button"
      android:layout_marginBottom="20dp"
      android:text="有背景的按钮(过渡色)"
      android:background="@drawable/gradient_shape"
      android:textColor="@android:color/white"/>
(3)“有背景的按钮(辐射色)”:android:background:radius_shape 。
(A)在 res/drawable 下面,创建 radius_shape.xml 。里面写样式。
<?xml version="1.0" encoding="utf-8"?>
<shape xmlns:android="http://schemas.android.com/apk/res/android"
    android:shape="rectangle">
    <!--3.
        3.1 圆角矩形-->
    <corners android:radius="4dp"/>

    <!--3.2 边框-->
    <stroke android:width="4dp"
        android:color="#C1E1A6"/>

    <!--3.3 填充颜色
    gradient 梯度,坡度,倾斜度
    -->
    <gradient
        android:endColor="@android:color/holo_blue_light"
        android:gradientRadius="100dp"
        android:startColor="@android:color/holo_orange_light"
        android:type="radial"/>

    <!--3.4 内边距-->
    <padding
        android:bottom="16dp"
        android:left="16dp"
        android:right="16dp"
        android:top="16dp"/>
</shape>
效果如下:
(B)将此样式作用于 activity_shape.xml 中的“有背景的按钮(辐射色)”按钮:
android:background="@drawable/radius_shape"
“有背景的按钮(辐射色)”按钮 代码如下:
<!--
    3.5 android:background="@drawable/radius_shape"
    -->
  <Button
      android:id="@+id/button3"
      android:layout_width="wrap_content"
      android:layout_height="wrap_content"
      android:layout_alignParentStart="true"
      android:layout_below="@+id/button2"
      android:layout_marginBottom="20dp"
      android:text="有背景的按钮(辐射色)"
      android:background="@drawable/radius_shape"
      android:textColor="@android:color/white"/>
(4)“环形”文本:android:background:ring_shape 。
(A)在 res/drawable 下面,创建 ring_shape.xml 。里面写样式。
<?xml version="1.0" encoding="utf-8"?>
<shape xmlns:android="http://schemas.android.com/apk/res/android"
    android:shape="ring"
    android:useLevel="false">
    <gradient
        android:centerColor="@android:color/white"
        android:endColor="#660000ff"
        android:startColor="#66ff0000"
        android:type="sweep"
        android:useLevel="false"/>
</shape>
效果如下:
(B)将此样式作用于 activity_shape.xml 中的“环形”文本:
android:background="@drawable/ring_shape"
“环形”文本 代码如下:
<!--
    3.5 android:background="@drawable/ring_shape"
    -->
  <TextView
      android:id="@+id/textView"
      android:layout_width="200dp"
      android:layout_height="200dp"
      android:layout_alignParentStart="true"
      android:layout_below="@+id/button3"
      android:gravity="center"
      android:text="环形"
      android:background="@drawable/ring_shape"
      android:textSize="20sp"/>
注意:
以上四个样式,里面的节点都是“<shape></shape>”
附 代码补充
activity_shape.xml:
<RelativeLayout xmlns:android="http://schemas.android.com/apk/res/android"
                xmlns:tools="http://schemas.android.com/tools"
                android:layout_width="match_parent"
                android:layout_height="match_parent"
                android:paddingBottom="@dimen/activity_vertical_margin"
                android:paddingLeft="@dimen/activity_horizontal_margin"
                android:paddingRight="@dimen/activity_horizontal_margin"
                android:paddingTop="@dimen/activity_vertical_margin"
                tools:context="com.android.themestyle.ShapeActivity">
  <!--
      android:background:solid_shape
      android:background:gradient_shape
      android:background:radius_shape
      android:background:ring_shape
  -->
    <!--
    3.5 android:background="@drawable/solid_shape"
    -->
  <Button
      android:id="@+id/button"
      android:layout_width="wrap_content"
      android:layout_height="wrap_content"
      android:layout_alignParentStart="true"
      android:layout_alignParentTop="true"
      android:layout_marginBottom="20dp"
      android:text="有背景的按钮(填充色)"
      android:background="@drawable/solid_shape"
      android:textColor="@android:color/white"/>

    <!--
    3.5 android:background="@drawable/gradient_shape"
    -->
  <Button
      android:id="@+id/button2"
      android:layout_width="wrap_content"
      android:layout_height="wrap_content"
      android:layout_alignParentStart="true"
      android:layout_below="@+id/button"
      android:layout_marginBottom="20dp"
      android:text="有背景的按钮(过渡色)"
      android:background="@drawable/gradient_shape"
      android:textColor="@android:color/white"/>

    <!--
    3.5 android:background="@drawable/radius_shape"
    -->
  <Button
      android:id="@+id/button3"
      android:layout_width="wrap_content"
      android:layout_height="wrap_content"
      android:layout_alignParentStart="true"
      android:layout_below="@+id/button2"
      android:layout_marginBottom="20dp"
      android:text="有背景的按钮(辐射色)"
      android:background="@drawable/radius_shape"
      android:textColor="@android:color/white"/>

    <!--
    3.5 android:background="@drawable/ring_shape"
    -->
  <TextView
      android:id="@+id/textView"
      android:layout_width="200dp"
      android:layout_height="200dp"
      android:layout_alignParentStart="true"
      android:layout_below="@+id/button3"
      android:gravity="center"
      android:text="环形"
      android:background="@drawable/ring_shape"
      android:textSize="20sp"/>

</RelativeLayout>
2. 按钮点击样式:
(1)Button 样式:使用 drawable 下面创建的样式文件。(使用这种方法,界面上的英文全部显示大写)
使用这种方法,需要直接在界面布局中,引用背景样式文件:button_bg.xml,样式较少,且较为固定。
android:background="@drawable/button_bg"
最上面的按钮,默认出现的样式是 solid_shape,当点击此按钮的时候,变为如下样式:gradient_shape 。
(A)在 res/drawable 下面,创建 button_bg.xml 。里面写样式。
<?xml version="1.0" encoding="utf-8"?>
<selector xmlns:android="http://schemas.android.com/apk/res/android">
    <!--4.1 -->
    <item
        android:drawable="@drawable/gradient_shape"
        android:state_pressed="true"/>
    <item android:drawable="@drawable/solid_shape"/>
</selector>
注意:
里面的节点是“<selector></selector>”
(B)将此样式作用于 activity_state.xml 中的第一个按钮:
android:background="@drawable/button_bg"
activity_state.xml 中的第一个按钮 代码如下:
<!--
    4.2 android:background="@drawable/button_bg"
    -->
  <Button
      android:id="@+id/button4"
      android:layout_width="match_parent"
      android:layout_height="wrap_content"
      android:layout_alignParentStart="true"
      android:layout_alignParentTop="true"
      android:text="New Button"
      android:background="@drawable/button_bg"
      android:textColor="@android:color/white"/>
(2)Button 样式:利用 styles.xml 样式文件。(使用这种样式,界面上的英文不再是全部显示大写,而是按照原样输出)
使用这种方法,只需要直接在界面布局中,引用样式文件:styles.xml 中定义的样式,样式较多,且比较自由、更新方便。
(A)在 styles.xml 中,自定义 Button 样式:
<!--
  4.3 Button 样式:
        这儿,背景使用了 button_bg,
        此外,还可以设置 字体颜色、字体大小、字体位置等属性。
        其父类样式是 Widget.Button 。
  -->
  <style name="myButton" parent="@android:style/Widget.Button">
    <item name="android:textColor">@drawable/button_text_color</item>
    <item name="android:background">@drawable/button_bg</item>
    <item name="android:textSize">20sp</item>
    <item name="android:gravity">center</item>
  </style>
(B)这里面用到了 设置字体颜色 的一个样式,因此需要在 drawable 下面再创建 button_text_color.xml,并写入 字体颜色的设置样式:
<?xml version="1.0" encoding="utf-8"?>
<!--4.4 -->
<selector xmlns:android="http://schemas.android.com/apk/res/android">
    <item android:color="@android:color/white"
        android:state_pressed="true"/>
    <item android:color="@android:color/darker_gray"/>
</selector>
(C)对 activity_state.xml 中下面的两个按钮,设置此样式:
style="@style/myButton"
其中,两个按钮 的代码如下:
<!--
    4.5 style="@style/myButton"
    -->
  <Button
      android:id="@+id/button5"
      android:layout_width="wrap_content"
      android:layout_height="wrap_content"
      android:layout_alignParentStart="true"
      android:layout_below="@+id/button4"
      android:layout_marginTop="39dp"
      style="@style/myButton"
      android:text="New Button"/>

    <!--
    4.5 style="@style/myButton"
    -->
  <Button
      android:id="@+id/button6"
      android:layout_width="wrap_content"
      android:layout_height="wrap_content"
      android:layout_alignParentEnd="true"
      android:layout_alignTop="@+id/button5"
      style="@style/myButton"
      android:text="New Button"/>
附 代码补充
(1)activity_shape.xml:
<RelativeLayout xmlns:android="http://schemas.android.com/apk/res/android"
                xmlns:tools="http://schemas.android.com/tools"
                android:layout_width="match_parent"
                android:layout_height="match_parent"
                android:paddingBottom="@dimen/activity_vertical_margin"
                android:paddingLeft="@dimen/activity_horizontal_margin"
                android:paddingRight="@dimen/activity_horizontal_margin"
                android:paddingTop="@dimen/activity_vertical_margin"
                tools:context="com.android.themestyle.StateActivity">

    <!--4.-->
  <!-- background:button_bg
       style:myButton
       style:myButton
  -->

    <!--
    4.2 android:background="@drawable/button_bg"
    -->
  <Button
      android:id="@+id/button4"
      android:layout_width="match_parent"
      android:layout_height="wrap_content"
      android:layout_alignParentStart="true"
      android:layout_alignParentTop="true"
      android:text="New Button"
      android:background="@drawable/button_bg"
      android:textColor="@android:color/white"/>

    <!--
    4.5 style="@style/myButton"
    -->
  <Button
      android:id="@+id/button5"
      android:layout_width="wrap_content"
      android:layout_height="wrap_content"
      android:layout_alignParentStart="true"
      android:layout_below="@+id/button4"
      android:layout_marginTop="39dp"
      style="@style/myButton"
      android:text="New Button"/>

    <!--
    4.5 style="@style/myButton"
    -->
  <Button
      android:id="@+id/button6"
      android:layout_width="wrap_content"
      android:layout_height="wrap_content"
      android:layout_alignParentEnd="true"
      android:layout_alignTop="@+id/button5"
      style="@style/myButton"
      android:text="New Button"/>

</RelativeLayout>
(2)styles.xml:
<resources>

  <!-- Base application theme. -->
  <style name="AppTheme" parent="android:Theme.Holo.Light.DarkActionBar">
    <!-- Customize your theme here. -->
  </style>

  <!--
  2.2 此主题可应用到 整个 App,也可以应用到 单个 Activity
  -->
  <style name="CustomActionBarTheme" parent="@style/AppTheme">
    <item name="android:actionBarStyle">@style/MyActionBar</item>
  </style>

  <!--
  2. 样式
  2.1 应用栏样式
  -->
  <style name="MyActionBar" parent="@android:style/Widget.Holo.Light.ActionBar.Solid.Inverse">
    <item name="android:background">@android:color/holo_red_light</item>
  </style>

  <!--
  4.3 Button 样式:
        这儿,背景使用了 button_bg,
        此外,还可以设置 字体颜色、字体大小、字体位置等属性。
        其父类样式是 Widget.Button 。
  -->
  <style name="myButton" parent="@android:style/Widget.Button">
    <item name="android:textColor">@drawable/button_text_color</item>
    <item name="android:background">@drawable/button_bg</item>
    <item name="android:textSize">20sp</item>
    <item name="android:gravity">center</item>
  </style>
</resources>
3. 列表框中列表项点击样式(Shape):
不点击的时候,背景颜色是:透明的(无背景颜色)。
点击按住不离开的时候,背景颜色变为:holo_orange_dark。
点击完成,离开后,激活项的背景颜色变为:holo_blue_light。
(1)StyleActivity 。
package com.android.themestyle;

import android.app.Activity;
import android.os.Bundle;
import android.view.Menu;
import android.view.MenuItem;
import android.widget.ArrayAdapter;
import android.widget.ListView;

/**
 * 5.1
 */
public class StyleActivity extends Activity {
    /*
        5.1.1 声明变量
     */
    private ListView listView;
    // 数据(数组)
    private String[] data = {"C", "C++", "Objective-C", "Java", "Go", "Rust", "Swift"};
    // 数组适配器
    private ArrayAdapter<String> adapter;

    @Override
    protected void onCreate(Bundle savedInstanceState) {
        super.onCreate(savedInstanceState);
        // 此活动与界面进行绑定
        setContentView(R.layout.activity_style);
        /*
            5.1.2 初始化变量
         */
        // 找到 listView列表框
        listView = (ListView) findViewById(R.id.listView2);
        /*
            5.1.3 将 layout\activity_style 中的列表项
            与 layout\list_item 下面的 TextView 对应绑定
         */
        // 将 数组中的每一个数据,绑定对应于 layout\list_item 下面的 每一个 TextView (id:text)
        adapter = new ArrayAdapter<String>(this, R.layout.list_item, R.id.text, data);
        // 将适配器与 listView列表框绑定。
        // (即:layout\list_item 下面的 每一个 TextView,与 listView列表框中的列表项 对应)
        listView.setAdapter(adapter);
    }


    @Override
    public boolean onCreateOptionsMenu(Menu menu) {
        // Inflate the menu; this adds items to the action bar if it is present.
        getMenuInflater().inflate(R.menu.menu_style, menu);
        return true;
    }

    @Override
    public boolean onOptionsItemSelected(MenuItem item) {
        // Handle action bar item clicks here. The action bar will
        // automatically handle clicks on the Home/Up button, so long
        // as you specify a parent activity in AndroidManifest.xml.
        int id = item.getItemId();

        //noinspection SimplifiableIfStatement
        if (id == R.id.action_settings) {
            return true;
        }

        return super.onOptionsItemSelected(item);
    }
}
(2)activity_style.xml 。主页面 listView列表框
<RelativeLayout xmlns:android="http://schemas.android.com/apk/res/android"
                xmlns:tools="http://schemas.android.com/tools"
                android:layout_width="match_parent"
                android:layout_height="match_parent"
                android:paddingBottom="@dimen/activity_vertical_margin"
                android:paddingLeft="@dimen/activity_horizontal_margin"
                android:paddingRight="@dimen/activity_horizontal_margin"
                android:paddingTop="@dimen/activity_vertical_margin"
                tools:context="com.android.themestyle.StyleActivity">
<!--
    5.2 主页面 listView列表框
-->
  <ListView
      android:id="@+id/listView2"
      android:layout_width="wrap_content"
      android:layout_height="wrap_content"
      android:layout_alignParentStart="true"
      android:layout_alignParentTop="true"
      android:choiceMode="singleChoice"/>

</RelativeLayout>
(3)layout\list_item.xml 。将来要与 listView 列表框的 列表项 一一绑定 的 TextView 布局。
<?xml version="1.0" encoding="utf-8"?>

<!--
    5.3 每个 TextView文本 都 使用了 drawable 下面的背景样式:
        background:list_item
-->
<LinearLayout xmlns:android="http://schemas.android.com/apk/res/android"
    android:layout_width="match_parent"
    android:layout_height="64dp"
    android:background="@drawable/list_item"
    android:gravity="center_vertical"
    android:orientation="vertical"
    android:padding="8dp">

    <TextView
        android:id="@+id/text"
        android:layout_width="wrap_content"
        android:layout_height="wrap_content"
        android:layout_marginLeft="8dp"
        android:text="New Text"
        android:textSize="20sp" />
</LinearLayout>
(4)drawable\list_item.xml 。列表项点击时的样式
<?xml version="1.0" encoding="utf-8"?>

<!--
    5.4 不点击的时候,背景颜色是:透明的(无背景颜色)。
        点击按住不离开的时候,背景颜色变为:holo_orange_dark。
        点击完成,离开后,激活项的背景颜色变为:holo_blue_light。
-->
<selector xmlns:android="http://schemas.android.com/apk/res/android">
    <item android:drawable="@android:color/holo_orange_dark"
        android:state_pressed="true"/>
    <item android:drawable="@android:color/holo_blue_light"
        android:state_activated="true"/>
    <item android:drawable="@android:color/transparent"/>
</selector>
附 代码补充
1. menu_main.xml:
<menu xmlns:android="http://schemas.android.com/apk/res/android"
      xmlns:tools="http://schemas.android.com/tools"
      tools:context=".MainActivity">
  <item
      android:id="@+id/action_settings"
      android:orderInCategory="100"
      android:showAsAction="never"
      android:title="@string/action_settings"/>
</menu>
2. menu_shape.xml:
<menu xmlns:android="http://schemas.android.com/apk/res/android"
      xmlns:tools="http://schemas.android.com/tools"
      tools:context="com.android.themestyle.ShapeActivity">
  <item
      android:id="@+id/action_settings"
      android:orderInCategory="100"
      android:showAsAction="never"
      android:title="@string/action_settings"/>
</menu>
3. menu_state.xml:
<menu xmlns:android="http://schemas.android.com/apk/res/android"
      xmlns:tools="http://schemas.android.com/tools"
      tools:context="com.android.themestyle.StateActivity">
  <item
      android:id="@+id/action_settings"
      android:orderInCategory="100"
      android:showAsAction="never"
      android:title="@string/action_settings"/>
</menu>
4. menu_style.xml:
<menu xmlns:android="http://schemas.android.com/apk/res/android"
      xmlns:tools="http://schemas.android.com/tools"
      tools:context="com.android.themestyle.StyleActivity">
  <item
      android:id="@+id/action_settings"
      android:orderInCategory="100"
      android:showAsAction="never"
      android:title="@string/action_settings"/>
</menu>

