用cargo插件部署war包,并支持debug
在eclipse里创建的web工程,可以简单地发布到eclipse管理的容器里,开发很方便

不过对于多maven工程聚合的项目,就没有办法这样简单地“一键发布”了,为了达到同样的目的,可以使用cargo插件
一、配置pluginGroup,以支持前缀调用
首先cargo插件不是官方的,所以需要在settings.xml里配置pluginGroup
二、为什么提示启动成功,但是实际上无法访问
我一开始是按照《Maven实战》中的例子来配的,但是这本书版本比较老,用的是cargo-maven2-plugin1.0.0,所以没有cargo:run这个goal,只有cargo:start
但是cargo:start需要额外配置一个<wait>的参数,否则的话虽然cargo:start可以把容器启动,但是在maven生命周期跑完之后,容器也就立刻关闭了
见官方说明:
Note: A container that's started with cargo:start will automatically shut down as soon as the parent Maven instance quits (i.e., you see a BUILD SUCCESSFUL or BUILD FAILED message). If you want to start a container and perform manual testing, see our next goal cargo:run.
所以昨天我试了半天,提示说容器启动成功,但是实际上根本看不见容器的进程,十分蛋疼。
增加<wait>true</wait>的参数,可以解决这个问题,容器启动之后,会等待用户按下Ctrl + C,不会立刻自动关闭。但是这个方法也不好,因为在新版本的cargo插件中,<wait>是一个deprecated的参数,即将被删除
见官方说明:
Important: This parameter has been deprecated and will be removed soon. If you want to do manual testing, please use the cargo:run MOJO.
三、正确的做法
以下是pom的配置
这里关键是cargo的版本是1.2.3,这个版本有了cargo:run的goal
<container> --> <containerId>是目标容器的标识,这里不允许自定义,必须是cargo规定的几个值,比如tomcat6x、tomcat7x、jboss71x等,完整的列表见:http://cargo.codehaus.org
<container> --> <home>是本地容器的安装路径
<configuration> --> <type>可以选择standalone和existing两种模式,我感觉standalone比较好一点
<configuration> --> <home>是容器引入工程后保存的路径,和上面的<home>是不同的
如上配置之后,输入mvn clean package cargo:run,则以debug模式启动了容器
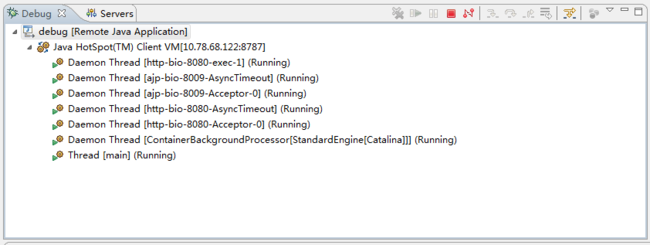
四、在eclipse中调试
直接上图:

要结束调试时,在Perspective-->Debug中,点一下红色方块即可


不过对于多maven工程聚合的项目,就没有办法这样简单地“一键发布”了,为了达到同样的目的,可以使用cargo插件
一、配置pluginGroup,以支持前缀调用
首先cargo插件不是官方的,所以需要在settings.xml里配置pluginGroup
<pluginGroups>
  	<pluginGroup>org.codehaus.cargo</pluginGroup>
</pluginGroups>
二、为什么提示启动成功,但是实际上无法访问
我一开始是按照《Maven实战》中的例子来配的,但是这本书版本比较老,用的是cargo-maven2-plugin1.0.0,所以没有cargo:run这个goal,只有cargo:start
但是cargo:start需要额外配置一个<wait>的参数,否则的话虽然cargo:start可以把容器启动,但是在maven生命周期跑完之后,容器也就立刻关闭了
见官方说明:
Note: A container that's started with cargo:start will automatically shut down as soon as the parent Maven instance quits (i.e., you see a BUILD SUCCESSFUL or BUILD FAILED message). If you want to start a container and perform manual testing, see our next goal cargo:run.
所以昨天我试了半天,提示说容器启动成功,但是实际上根本看不见容器的进程,十分蛋疼。
增加<wait>true</wait>的参数,可以解决这个问题,容器启动之后,会等待用户按下Ctrl + C,不会立刻自动关闭。但是这个方法也不好,因为在新版本的cargo插件中,<wait>是一个deprecated的参数,即将被删除
见官方说明:
Important: This parameter has been deprecated and will be removed soon. If you want to do manual testing, please use the cargo:run MOJO.
三、正确的做法
以下是pom的配置
<plugin>
				<groupId>org.codehaus.cargo</groupId>
				<artifactId>cargo-maven2-plugin</artifactId>
				<version>1.2.3</version>
				<configuration>
					<container>
						<containerId>tomcat7x</containerId>
						<home>D:\apache-tomcat-7.0.29</home>
					</container>
					<configuration>
						<type>standalone</type>
						<home>${project.build.directory}/tomcat7.0.29</home>
						<properties>
							<cargo.jvmargs>
								-Xdebug
								-Xrunjdwp:transport=dt_socket,server=y,suspend=n,address=8787
        					</cargo.jvmargs>
						</properties>
					</configuration>
				</configuration>
			</plugin>
这里关键是cargo的版本是1.2.3,这个版本有了cargo:run的goal
<container> --> <containerId>是目标容器的标识,这里不允许自定义,必须是cargo规定的几个值,比如tomcat6x、tomcat7x、jboss71x等,完整的列表见:http://cargo.codehaus.org
<container> --> <home>是本地容器的安装路径
<configuration> --> <type>可以选择standalone和existing两种模式,我感觉standalone比较好一点
<configuration> --> <home>是容器引入工程后保存的路径,和上面的<home>是不同的
如上配置之后,输入mvn clean package cargo:run,则以debug模式启动了容器
四、在eclipse中调试
直接上图:

要结束调试时,在Perspective-->Debug中,点一下红色方块即可
