Linux + OS RedHat AS 5 SSH / FTP / Telnet / VNC
Redhat SSH Tools
windows和linux间使用scp互拷文件
http://zhuaxia.spaces.live.com/Blog/cns!71787D3A37FFC48A!255.entry?wa=wsignin1.0&sa=35729990
redhat下scp命令详解
http://www.kaifasheji.com/?p=6
scp -rp /path/filename username@remoteIP:/path #将本地文件拷贝到服务器 上
scp -rp username@remoteIP:/path/filename /path #将远程文件从服务器下载到本地
登录某台服务器,使用如下命令拷贝文件
http://syq871206.iteye.com/blog/932289
scp -r [email protected]:/opt/EMALL.ear/example.war/ * /opt/EMALL.ear/example.war/
使用Linux的SSH端口转发实现代理上网
http://video.sina.com.cn/v/b/57678384-1671250735.html
公司上网有很多限制,很多网站都给封了,连QQ都上不了
这时如果你在外网有一台可以提供ssh连接(Linux或者Unix)的服务器,这样你就可以通过ssh端口转发实现代理上网,突破公司的访问限制,尝试一下吧。
Windows下常用的ssh客户端是putty和SecureCRT,使用任意一个都可以。
具体配置过程:
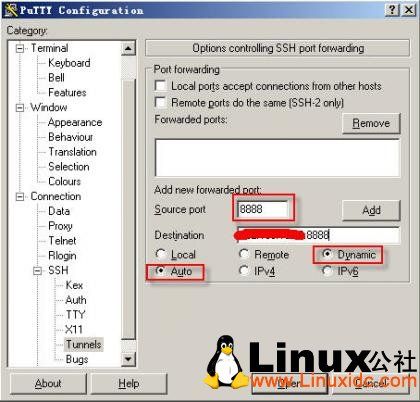
1、putty的设置
在putty的登录设置中配置tunnel,目标设置为Dynamic,添加一个端口8888(普通用户需要1024以上端口),再按Add,一个动态转发端口就实现了;
2、SecureCRT的设置
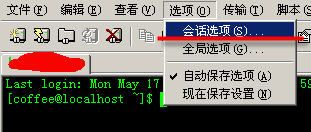
(1)使用ssh账号登陆
(2)点击"选项"----"会话选项"
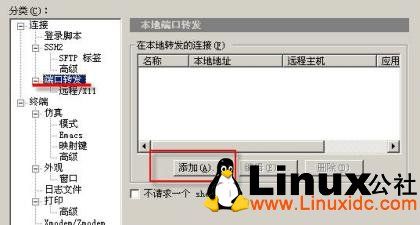
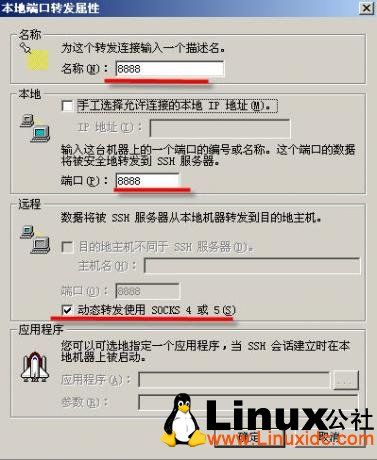
(3)选择"端口转发"
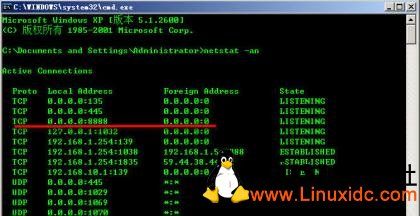
通过上面的任意一个软件连接后,在本地windows系统中查看一下,本地是否开启了8888端口:
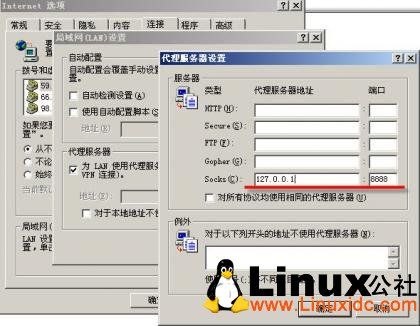
下面就可以试用ssh端口转发实现代理上网了,在IE或者其他浏览器中设置代理(注意:ip为127.0.0.1,端口为8888)
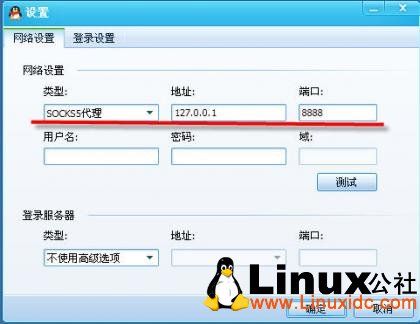
设置qq代理
这样,只要保持putty或者SecureCRT连接不断开,我们就可以通过ssh端口转发代理上网了
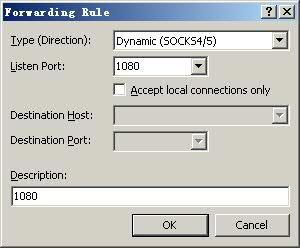
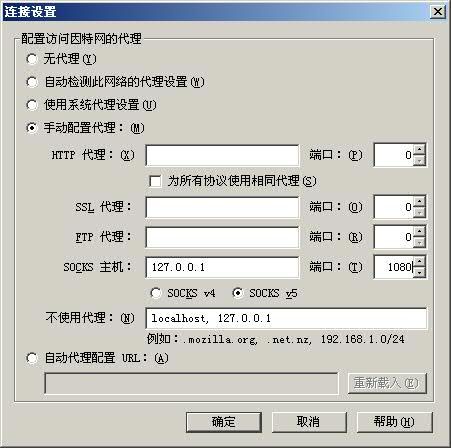
3. 使用Xmanager 实现代理上网
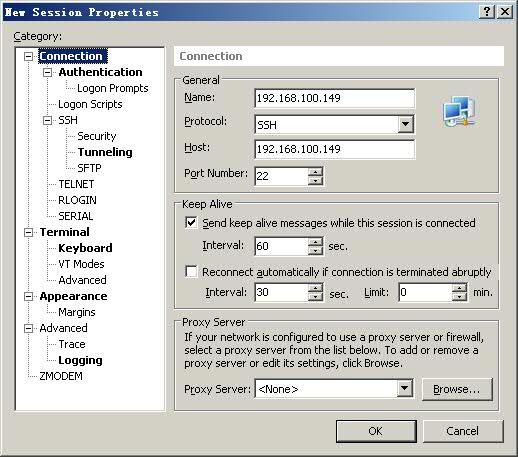
Xmanager XShell----New Session Properties----
点击----Tunneling----add----TCP/IP Forwading rules----
----FireFox socket 4/5代理上网设置----ok
ssh远程文件传输命令scp
http://wenson.iteye.com/blog/135571
scp 就是 secure copy, 是用来进行远程文件拷贝的 . 数据传输使用 ssh1, 并且和 ssh1 使用相同的认证方式 , 提供相同的安全保证 . 与 rcp 不同的是 ,scp 会要求你输入密码如果需要的话 .
最简单的应用如下 :
scp 本地用户名 @IP 地址 : 文件名 1 远程用户名 @IP 地址 : 文件名 2
[ 本地用户名 @IP 地址 :] 可以不输入 , 可能需要输入远程用户名所对应的密码 .
可能有用的几个参数 :
-v 和大多数 linux 命令中的 -v 意思一样 , 用来显示进度 . 可以用来查看连接 , 认证 , 或是配置错误 .
-C 使能压缩选项 .
-P 选择端口 . 注意 -p 已经被 rcp 使用 .
-4 强行使用 IPV4 地址 .
-6 强行使用 IPV6 地址 .
-r Recursively copy entire directories.
copy 本地的档案到远程的机器上
scp /etc/lilo.conf [email protected]:/home/my
会将本地的 /etc/lilo.conf 这个档案 copy 到 www.upsdn.net,使用者my 的家目录下。
=====================================================
copy远程机器上的档案到本地来
scp [email protected]:/etc/lilo.conf /etc
会将 http://www.upsdn.net 中 /etc/lilo.conf 档案 copy 到本地的 /etc 目录下。
RedHat VSFTP / gssftp / proftp
http://viong.blog.51cto.com/844766/261342
(3) 利用 ftp 用户策略允许登录 ftp 的系统用户
为 vsftpd 启动 vsftpd : [ 确定 ]
Using binary mode to transfer files.
RedHat service
[root@B2CSITbank ~]# LANG=C
[root@B2CSITbank ~]# setup
-- System Services
-- Run Tool
-- [ * ]
[root@B2CSITbank ~]# rpm -qa | grep
-server-0.17-39.el5
-0.17-39.el5
[root@B2CSITbank ~]# chkconfig --list | grep
: on
[root@B2CSITbank ~]# rpm -qa | grep xinet
xinetd-2.3.14-10.el5
[root@B2CSITbank xinetd.d]# more
# default: on
# description: The server serves sessions; it uses \
# unencrypted username/password pairs for authentication.
service
{
disable = no
flags = REUSE
socket_type = stream
wait = no
user = root
server = /usr/sbin/in. d
log_on_failure += USERID
}
[root@B2CSITbank xinetd.d]# pwd
/etc/xinetd.d
RedHat Linux系统Telnet服务的开启
http://soft.zdnet.com.cn/software_zone/2007/1010/545287.shtml
找到 disable = yes 将 yes 改成 no 。
service xinetd restart
默认的情况之下不允许 root 以 进入 Linux 主机 。若要允许root用户登入,可用下列方法:
vi /etc/pam.d/login
#auth required pam_securetty.so #将这一行加上注释!
rhel5/centos5下 配置
http://snakeskin.iteye.com/blog/147410
默认情况下, 是关闭的,这主要是为了安全考虑,而SSH现在基本上取代了 ,所以一般用SSH即可,而SSH功能默认情况下是开放的。 不过笔者是个老鸟,更熟悉用 ,下面是 的安装步骤。
步骤1、修改 配置文件
#vi /etc/xinet.d/krb5- 把disable = yes 改成 no;
步骤2、重启network
#service network restart 或者 #/etc/init.d/network restart
redhat linux 5上 的开启过程
http://hi.baidu.com/%CF%FE%D2%D4/blog/item/c6b3edd4c2c26ece50da4b64.html
1、确定你的 服务打开没有:
[root@111 ~]# chkconfig --list|grep
ekrb5- : off
krb5- : off
[root@111 ~]#
注意检查结果这里是关闭状态
2、打开 服务:
[root@111 ~]# chkconfig krb5- on
[root@111 ~]# chkconfig --list|grep
ekrb5- : offv
krb5- : on
[root@111 ~]#
检查已经被打开了
3、修改登陆文件securetty,主要增加要登陆的终端点
[root@111 ~]# vi /etc/securetty
增加如下几行:
pts/1
pts/2
pts/3
pts/4
pts/5
……
保存退出即可。
如果是chkconfig krb5- on
会提示Unencrypted connection refused. Goodbye.Connection closed by foreign host.看错误信息好像是说的为加密的连接被拒绝,查看了他的配置文件也没发现有什么关于加密的选项,而且配置文件也很正确,于是到google上去搜 索了一大圈,最后终于找到一个老外写的一个解决方法:
I really needed a bit of guidance and you provided it
./sbin/chkconfig --list |grep
The above command told me I had both krb5-
and ekrb5-
andalso the installed
all on.
Initially I did not know what theywere all for.
After turning them on and off and testing my
connection from
another box I realised that "ekrb5-
" was theencrypted
server that I needed to turn off to run "krb-
"which allowed
non-encrypted
connections.eg
/sbin/chkconfig ekrb5-
off
|
原来ekrb5- 是一个需要加密的 服务,把这个服务启动上 当然就需要加密了。解决方法:将/etc/xinetd.d/ekrb5- 里面的disable改成=yes,再重启xinetd服务 service xinetd restart就OK了!
RedHat VNC
老鸟rhel5/centos5服务器架设笔记:VNC的安装配置
http://snakeskin.iteye.com/blog/147620
VNC(Virtual Network Computing)虚拟网络计算工具,本质上来说是一个远程显示系统,管理员通过它不仅仅可以在运行程序的本地机上察看桌面环境,而且可以从 Internet上的任何地方察看远程机器的运行情况,而且它具有跨平台的特性。 Linux 要使用远程桌面需要安装VNC,好在rhel5/centos5 已经自带了VNC,默认也已经安装了,只要配置一下就可以了。但是Windows客户端还是要安装的。
步骤1、启动VNCServer
打开终端,执行以下命令
#vncserver
第一次运行vncserver会提示输入密码,如果再次修改密码,请用vncpasswd
#vncpasswd
每次运行vncserver后都会给我们开放一个新的X-display号,通常会有your-server:3(your-server是你服务器的名 称或者IP地址)之类的提示信息,意思是给我们开放新的X-display号3;通常上我们只运行一次vncserver就可以了,也就是开放X- display号1给我们使用,如果需要多个X-display号,再次运行vncserver即可。
你也可以在系统启动的时候运行vncserver,执行如下的命令让系统每次启动的时候自动运行vncserver
#chkconfig --level 35 vncserver on
删除某个X-display号,执行vncserver -kill X-display,如
#vncserver -kill :3
步骤2、启动Linux桌面
默认情况下VNC Viewer只能看到 VNC Server的命令行。 要VNC Viewer上可以看到Linux桌面需要做如下设置: 打开/root/.vnc/xstartup文件,取消下面两行的注释即可
unset SESSION_MANAGER
exec /etc/X11/xinit/xinitrc
把最后一行的"twm &"替换成"gnome-session &",把twm窗口管理器换成gome,这一步不是必须的,设置完成后好像要重启机器,建议不要做这步操作,而实际上这步好像没什么效果。
步骤3、修改配置文件
打开vncserver
#vi /etc/sysconfig/vncservers
去掉下面这两行的注释
VNCSERVERS="1:root"
VNCSERVERARGS[1]="-geometry 800x600"(这里注意一下,默认系统配置里有 –nolisten tcp 和 –nohttpd ,这两个是阻止Xwindows登陆和HTTP方式VNC登陆的,如果需要图形界面,那就删除这部分)
上面表示X-display号1的运行特性,你可以配置多个X-display号的运行特性,如果X-display号没有配置的话,将以缺省配置的方式运行,比如分辨率为1024×768等。
步骤4、VNC端口配置
如果需要从外网控制内网的某台Linux,则需要打开防火墙相应的端口,VNC给浏览器的端口是5800+N,给vncviewer的端口是 5900+N,N是你设置的X-display号,图形化开放端口更直观,进入gnome桌面,菜单选择:系统->管理->安全级别和防火墙
在弹出页面的"防火墙"选项卡的"其他端口"区域中,增加5900+X-display号,比如开放5901端口等。
步骤5、VNC客户端
Windows 客户端 VNC Viewer 的配置:
1.从 http://www.realvnc.com/download.html下载VNC Free Edition for Windows Version
2.打开 VNCViewer,输入your-server:X-display号,如192.168.1.19:1即可
RedHat Enterprise Server 5.3 x64 vncserver
vnc安装包及其配置.zip
http://dl.iteye.com/topics/download/753021c3-7a3c-33ee-b18c-c55d2a828e4d
RedHat Linux 6企业版开启VNC Server远程桌面
http://jsx112.iteye.com/blog/1032842
redhat 5 的FTP、TELNET、VNC服务开启方法
http://28680360-qq-com.iteye.com/blog/767761
远程登陆vncserver在redhat下详细配置
http://sunshineyao.iteye.com/blog/807909
查找 vnc 服务
[root@B2Cmonitor ~]# whereis vnc
vnc: /usr/share/vnc
查找 vncserver 服务
[root@B2Cmonitor ~]# which vncserver
/usr/bin/vncserver
[root@B2Cmonitor Packages]# whereis vncserver
vncserver: /usr/bin/vncserver /usr/share/man/man1/vncserver.1.gz
[root@B2Cmonitor ~]# whereis vncserver
[root@B2Cmonitor !]# ls -l /usr/bin/vnc*
-rwxr-xr-x 1 root root 98528 Oct 21 2008 /usr/bin/vncconfig
-rwxr-xr-x 1 root root 21424 Oct 21 2008 /usr/bin/vncpasswd
-rwxr-xr-x 1 root root 14229 Oct 21 2008 /usr/bin/vncserver
查看 vncserver 服务状态
[root@B2Cmonitor ~]# service vncserver status
Xvnc is stopped
[root@B2Cmonitor ~]# chkconfig --list | grep vnc
vncserver 0:off 1:off 2:off 3:off 4:off 5:on 6:off
启动 vncserver 服务 , 并配置密码
[root@B2Cmonitor .vnc]# /usr/bin/vncserver --help
usage: vncserver [:<number>] [-nohttpd] [-name <desktop-name>] [-depth <depth>]
[-geometry <width>x<height>]
[-pixelformat rgbNNN|bgrNNN]
<Xvnc-options>...
vncserver -kill <X-display>
[root@B2Cmonitor ~]# vncserver :1
You will require a password to access your desktops.
Password:
Password must be at least 6 characters - try again
Password:
Password must be at least 6 characters - try again
Password:
Verify:
New 'B2Cmonitor:1 (root)' desktop is B2Cmonitor:1
Creating default startup script /root/.vnc/xstartup
Starting applications specified in /root/.vnc/xstartup
Log file is /root/.vnc/B2Cmonitor:1.log
查看 vncserver 服务进程
[root@B2Cmonitor ~]# ps -ef | grep vnc
root 12818 1 0 15:25 pts/1 00:00:00 Xvnc :1 -desktop B2Cmonitor:1 (root) -httpd /usr/share/vnc/classes -auth /root/.Xauthority -geometry 1024x768 -depth 16 -rfbwait 30000 -rfbauth /root/.vnc/passwd -rfbport 5901 -pn
root 12825 1 0 15:25 pts/1 00:00:00 vncconfig -iconic
root 12889 9667 0 15:26 pts/1 00:00:00 grep vnc
修改 vncserver 启动服务
[root@B2Cmonitor ~]# vim /root/.vnc/xstartup
    #!/bin/sh
    # Uncomment the following two lines for normal desktop:
    # lidows.iteye.com
    unset SESSION_MANAGER
    # exec /etc/X11/xinit/xinitrc
    [ -x /etc/vnc/xstartup ] && exec /etc/vnc/xstartup
    [ -r $HOME/.Xresources ] && xrdb $HOME/.Xresources
    xsetroot -solid grey
    vncconfig -iconic &
    xterm -geometry 80x24+10+10 -ls -title "$VNCDESKTOP Desktop" &
    # lindows.iteye.com
    gnome-session  gnome &
    twm &
查看 iptables策略
[root@B2Cmonitor .vnc]# iptables -L
Chain INPUT (policy ACCEPT)
target prot opt source destination
DROP all -- 192.168.134.153 anywhere
Chain FORWARD (policy ACCEPT)
target prot opt source destination
Chain OUTPUT (policy ACCEPT)
target prot opt source destination
清空 iptables策略
[root@B2Cmonitor .vnc]# iptables -F
[root@B2Cmonitor .vnc]# iptables -L
Chain INPUT (policy ACCEPT)
target prot opt source destination
Chain FORWARD (policy ACCEPT)
target prot opt source destination
Chain OUTPUT (policy ACCEPT)
target prot opt source destination
[root@B2Cmonitor .vnc]# ps -ef | grep vnc
root 12818 1 0 15:25 pts/1 00:00:00 Xvnc :1 -desktop B2Cmonitor:1 (root) -httpd /usr/share/vnc/classes -auth /root/.Xauthority -geometry 1024x768 -depth 16 -rfbwait 30000 -rfbauth /root/.vnc/passwd -rfbport 5901 -pn
root 12825 1 0 15:25 pts/1 00:00:00 vncconfig -iconic
root 13107 9667 0 15:32 pts/1 00:00:00 grep vnc
停止 vncserver 服务
[root@B2Cmonitor .vnc]# vncserver -kill :1
Killing Xvnc process ID 12818
启动 vncserver 服务
[root@B2Cmonitor .vnc]# vncserver :1
New 'B2Cmonitor:1 (root)' desktop is B2Cmonitor:1
Starting applications specified in /root/.vnc/xstartup
Log file is /root/.vnc/B2Cmonitor:1.log
查看 vncserver 服务端口
[root@B2Cmonitor .vnc]# netstat -atpln | grep 5901
tcp 0 0 0.0.0.0:5901 0.0.0.0:* LISTEN 13157/Xvnc
vnc viewer连接 vncserver服务
"C:\Program Files\RealVNC\VNC4\vncviewer.exe"
Server:192.168.100.149:1
Encryption: Let Server Choose(Default)
end
