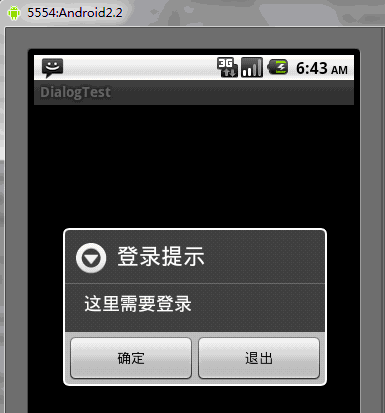
对话框是Android中不可或缺的,在使用对话框的时候,需要使用AlertDialog.Builder类。当然处理系统默认的对话框外,还可以自定义对话框,如果对话框设置了按钮,那么要对其进行事件监听OnClickListener。
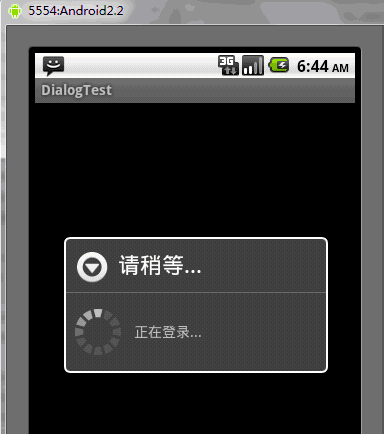
下面的是一个用AlertDialog.Builder类和自定义的对话框的实例,当点击确定时,转移到登陆对话框,当输入用户名和密码后,转移到登陆进度对话框
这里的自定义对话框是由两个TextView和两个EditText组成,也就是那个登录对话框,自定义对话框的布局文件是dialog.xml文件,见下面
另外呢,使用AlertDialog来创建对话框,需要了解一下几个方法
setTitle();给对话框设置标题
setIcon();给对话框设置图标
setMessage();设置对话框的提示信息
setItems();设置对话框要显示的一个list,一般用于显示几个命令时
setSingleChoiceItems();设置对话框显示一个单选的List
setMultiChoiceItems();设置对话框显示一系列的复选框
setPositiveButton();给对话框添加"yes"按钮
setNegativeButton();给对话框添加"no"按钮
DialogTest.java
- package org.hualang.dialog;
- import android.app.Activity;
- import android.app.AlertDialog;
- import android.app.Dialog;
- import android.app.ProgressDialog;
- import android.content.DialogInterface;
- import android.os.Bundle;
- import android.view.LayoutInflater;
- import android.view.View;
- public class DialogTest extends Activity {
- /** Called when the activity is first created. */
- ProgressDialog mydialog;
- @Override
- public void onCreate(Bundle savedInstanceState) {
- super.onCreate(savedInstanceState);
- setContentView(R.layout.main);
- Dialog dialog=new AlertDialog.Builder(DialogTest.this)
- .setTitle("登录提示")//设置标题
- .setMessage("这里需要登录")//设置对话框显示内容
- .setPositiveButton("确定", //设置确定按钮
- new DialogInterface.OnClickListener() {
- @Override
- public void onClick(DialogInterface dialog, int which) {
- //点击确定转向登录对话框
- LayoutInflater factory=LayoutInflater.from(DialogTest.this);
- //得到自定义对话框
- final View DialogView=factory.inflate(R.layout.dialog, null);
- //创建对话框
- AlertDialog dlg=new AlertDialog.Builder(DialogTest.this)
- .setTitle("登录框")
- .setView(DialogView)//设置自定义对话框样式
- .setPositiveButton("确定",
- new DialogInterface.OnClickListener() {//设置监听事件
- @Override
- public void onClick(DialogInterface dialog, int which) {
- // 输入完成后点击“确定”开始登录
- mydialog=ProgressDialog.show(DialogTest.this, "请稍等...", "正在登录...",true);
- new Thread()
- {
- public void run()
- {
- try
- {
- sleep(3000);
- }catch(Exception e)
- {
- e.printStackTrace();
- }finally
- {
- //登录结束,取消mydialog对话框
- mydialog.dismiss();
- }
- }
- }.start();
- }
- }).setNegativeButton("取消",//设置取消按钮
- new DialogInterface.OnClickListener() {
- @Override
- public void onClick(DialogInterface dialog, int which) {
- //点击取消后退出程序
- DialogTest.this.finish();
- }
- }).create();//创建对话框
- dlg.show();//显示对话框
- }
- }).setNeutralButton("退出",
- new DialogInterface.OnClickListener() {
- @Override
- public void onClick(DialogInterface dialog, int which) {
- // 点击退出后退出程序
- DialogTest.this.finish();
- }
- }).create();//创建按钮
- //显示对话框
- dialog.show();
- }
- }
dialog.xml
- <?xml version="1.0" encoding="utf-8"?>
- <LinearLayout xmlns:android="http://schemas.android.com/apk/res/android"
- android:orientation="vertical"
- android:layout_width="fill_parent"
- android:layout_height="fill_parent"
- >
- <TextView
- android:id="@+id/username"
- android:layout_width="wrap_content"
- android:layout_height="wrap_content"
- android:layout_marginLeft="20dip"
- android:layout_marginRight="20dip"
- android:text="用户名"
- android:gravity="left"
- android:textAppearance="?android:attr/textAppearanceMedium"
- />
- <EditText
- android:id="@+id/username"
- android:layout_width="fill_parent"
- android:layout_height="wrap_content"
- android:layout_marginLeft="20dip"
- android:layout_marginRight="20dip"
- android:scrollHorizontally="true"
- android:autoText="false"
- android:capitalize="none"
- android:gravity="fill_horizontal"
- android:textAppearance="?android:attr/textAppearanceMedium"
- />
- <TextView
- android:id="@+id/password"
- android:layout_width="wrap_content"
- android:layout_height="wrap_content"
- android:layout_marginLeft="20dip"
- android:layout_marginRight="20dip"
- android:text="密码"
- android:gravity="left"
- android:textAppearance="?android:attr/textAppearanceMedium"
- />
- <EditText
- android:id="@+id/password"
- android:layout_width="fill_parent"
- android:layout_height="wrap_content"
- android:layout_marginLeft="20dip"
- android:layout_marginRight="20dip"
- android:scrollHorizontally="true"
- android:autoText="false"
- android:capitalize="none"
- android:gravity="fill_horizontal"
- android:password="true"
- android:textAppearance="?android:attr/textAppearanceMedium"
- />
- </LinearLayout>
运行结果如下:

点击确定后,会跳转到登陆对话框,这个登录对话框是自定义的对话框

输入用户名和密码后,点击确定后,进入带进度条的对话框中,这里的带进度条的对话框是系统默认的,并且用现成控制,3秒后就结束该对话框,并跳转到相应的Activity中
补充内容:
1、Inflater英文意思是膨胀,在android中是扩展的意思。
LayoutInflater的作用类似于 findViewById(),不同点是LayoutInflater是用来
找layout文件夹下的xml布局文件,并且实例化!而 findViewById()是找具体某
一个xml下的具体 widget控件(如:Button,TextView等)。 它可以有很多地方可
以使用,如BaseAdapter的getView中,自定义Dialog中取得view中的组件widget
等等。
2、AlertDialog.Builder是警告对话框的意思
3、单位
px:是屏幕的像素点
in:英寸
mm:毫米
pt:磅,1/72 英寸
dp:一个基于density的抽象单位,如果一个160dpi的屏幕,1dp=1px
dip:等同于dp
sp:同dp相似,但还会根据用户的字体大小偏好来缩放。
建议使用sp作为文本的单位,其它用dip
4、dialog.xml说明
①android:layout_marginLeft="20dip"
margin是边的意思,上面这句话是说该控件距离左边20个dip。同样
android:layout_marginRight="20dip"就是该控件距离父控件右边20dip
②android:gravity="left":表示该控件的text文本显示在左边
③android:layout_gravity="center":表示该控件位于父控件的中间
④android:textAppearance的使用
对于能够显示文字的控件(如TextView EditText RadioButton Button
CheckBox等),你有时需要控制字体的大小。Android平台定义了三种字体大小
。
"?android:attr/textAppearanceLarge"
"?android:attr/textAppearanceMedium"
"?android:attr/textAppearanceSmall"
使用方法为:
android:textAppearance="?android:attr/textAppearanceLarge"
android:textAppearance="?android:attr/textAppearanceMedium"
android:textAppearance="?android:attr/textAppearanceSmall"
或
style="?android:attr/textAppearanceLarge"
style="?android:attr/textAppearanceMedium"
style="?android:attr/textAppearanceSmall"
⑤ android:scrollHorizontally="true":设置文本超出TextView的宽度的情况下,是否出现横拉条
⑥android:autoText="false":如果设置,将自动执行输入值的拼写纠正。此处无效果,在显示输入法并输入的时候起作用。此处设置为false,则为关闭子动能
⑦android:capitalize="none":设置英文字母大写类型。此处无效果,需要弹出输入法才能看得到
⑧android:password="true":以小点”.”显示文本,用于输入密码时
