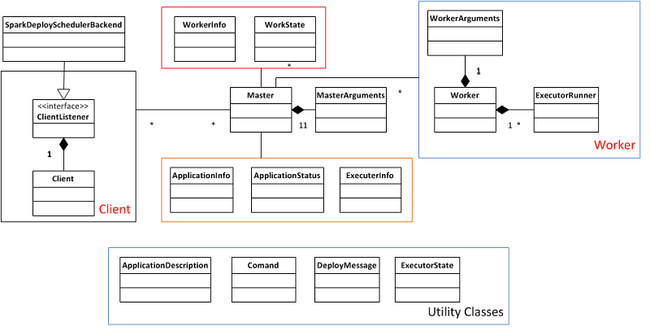
Deploy模块整体架构
deploy模块主要包含3个子模块:master, worker, client。他们继承于Actor,通过actor实现互相之间的通信。
- Master:master的主要功能是接收worker的注册并管理所有的worker,接收client提交的application,(FIFO)调度等待的application并向worker提交。
- Worker:worker的主要功能是向master注册自己,根据master发送的application配置进程环境,并启动
StandaloneExecutorBackend。 - Client:client的主要功能是向master注册并监控application。当用户创建
SparkContext时会实例化SparkDeploySchedulerBackend,而实例化SparkDeploySchedulerBackend的同时就会启动client,通过向client传递启动参数和application有关信息,client向master发送请求注册application并且在slave node上启动StandaloneExecutorBackend。
下面来看一下deploy模块的类图:
Deploy模块通信消息
Deploy模块并不复杂,代码也不多,主要集中在各个子模块之间的消息传递和处理上,因此在这里列出了各个模块之间传递的主要消息:
-
client to master
-
RegisterApplication(向master注册application)
-
-
master to client
-
RegisteredApplication(作为注册application的reply,回复给client) -
ExecutorAdded(通知client worker已经启动了Executor环境,当向worker发送LaunchExecutor后通知client) -
ExecutorUpdated(通知client Executor状态已经发生变化了,包括结束、异常退出等,当worker向master发送ExecutorStateChanged后通知client)
-
-
master to worker
-
LaunchExecutor(发送消息启动Executor环境) -
RegisteredWorker(作为worker向master注册的reply) -
RegisterWorkerFailed(作为worker向master注册失败的reply) -
KillExecutor(发送给worker请求停止executor环境)
-
-
worker to master
-
RegisterWorker(向master注册自己) -
Heartbeat(定期向master发送心跳信息) -
ExecutorStateChanged(向master发送Executor状态改变信息)
-
Deploy模块代码详解
Deploy模块相比于scheduler模块简单,因此对于deploy模块的代码并不做十分细节的分析,只针对application的提交和结束过程做一定的分析。
Client提交application
Client是由SparkDeploySchedulerBackend创建被启动的,因此client是被嵌入在每一个application中,只为这个applicator所服务,在client启动时首先会先master注册application:
def start(){// Just launch an actor; it will call back into the listener.actor = actorSystem.actorOf(Props(newClientActor))}overridedef preStart(){logInfo("Connecting to master "+ masterUrl)try{master = context.actorFor(Master.toAkkaUrl(masterUrl))masterAddress = master.path.addressmaster !RegisterApplication(appDescription)//向master注册applicationcontext.system.eventStream.subscribe(self, classOf[RemoteClientLifeCycleEvent])context.watch(master)// Doesn't work with remote actors, but useful for testing}catch{case e:Exception=>logError("Failed to connect to master", e)markDisconnected()context.stop(self)}}
Master在收到RegisterApplication请求后会把application加到等待队列中,等待调度:
caseRegisterApplication(description)=>{logInfo("Registering app "+ description.name)val app = addApplication(description, sender)logInfo("Registered app "+ description.name +" with ID "+ app.id)waitingApps += appcontext.watch(sender)// This doesn't work with remote actors but helps for testingsender !RegisteredApplication(app.id)schedule()}
Master会在每次操作后调用schedule()函数,以确保等待的application能够被及时调度。
在前面提到deploy模块是资源管理模块,那么Spark的deploy管理的是什么资源,资源以什么单位进行调度的呢?在当前版本的Spark中,集群的cpu数量是Spark资源管理的一个标准,每个提交的application都会标明自己所需要的资源数(也就是cpu的core数),Master以FIFO的方式管理所有的application请求,当资源数量满足当前任务执行需求的时候该任务就会被调度,否则就继续等待,当然如果master能给予当前任务部分资源则也会启动该application。schedule()函数实现的就是此功能。
def schedule(){if(spreadOutApps){for(app <- waitingApps if app.coresLeft >0){val usableWorkers = workers.toArray.filter(_.state ==WorkerState.ALIVE).filter(canUse(app, _)).sortBy(_.coresFree).reverseval numUsable = usableWorkers.lengthval assigned =newArray[Int](numUsable)// Number of cores to give on each nodevar toAssign = math.min(app.coresLeft, usableWorkers.map(_.coresFree).sum)var pos =0while(toAssign >0){if(usableWorkers(pos).coresFree - assigned(pos)>0){toAssign -=1assigned(pos)+=1}pos =(pos +1)% numUsable}// Now that we've decided how many cores to give on each node, let's actually give themfor(pos <-0until numUsable){if(assigned(pos)>0){val exec= app.addExecutor(usableWorkers(pos), assigned(pos))launchExecutor(usableWorkers(pos),exec, app.desc.sparkHome)app.state =ApplicationState.RUNNING}}}}else{// Pack each app into as few nodes as possible until we've assigned all its coresfor(worker <- workers if worker.coresFree >0&& worker.state ==WorkerState.ALIVE){for(app <- waitingApps if app.coresLeft >0){if(canUse(app, worker)){val coresToUse = math.min(worker.coresFree, app.coresLeft)if(coresToUse >0){val exec= app.addExecutor(worker, coresToUse)launchExecutor(worker,exec, app.desc.sparkHome)app.state =ApplicationState.RUNNING}}}}}}
当application得到调度后就会调用launchExecutor()向worker发送请求,同时向client汇报状态:
def launchExecutor(worker:WorkerInfo,exec:ExecutorInfo, sparkHome:String){worker.addExecutor(exec)worker.actor !LaunchExecutor(exec.application.id,exec.id,exec.application.desc,exec.cores,exec.memory, sparkHome)exec.application.driver !ExecutorAdded(exec.id, worker.id, worker.host,exec.cores,exec.memory)}
至此client与master的交互已经转向了master与worker的交互,worker需要配置application启动环境
caseLaunchExecutor(appId, execId, appDesc, cores_, memory_, execSparkHome_)=>val manager =newExecutorRunner(appId, execId, appDesc, cores_, memory_,self, workerId, ip,newFile(execSparkHome_), workDir)executors(appId +"/"+ execId)= managermanager.start()coresUsed += cores_memoryUsed += memory_master !ExecutorStateChanged(appId, execId,ExecutorState.RUNNING,None,None)
Worker在接收到LaunchExecutor消息后创建ExecutorRunner实例,同时汇报master executor环境启动。
ExecutorRunner在启动的过程中会创建线程,配置环境,启动新进程:
def start(){workerThread =newThread("ExecutorRunner for "+ fullId){overridedef run(){ fetchAndRunExecutor()}}workerThread.start()// Shutdown hook that kills actors on shutdown....}def fetchAndRunExecutor(){try{// Create the executor's working directoryval executorDir =newFile(workDir, appId +"/"+ execId)if(!executorDir.mkdirs()){thrownewIOException("Failed to create directory "+ executorDir)}// Launch the processval command = buildCommandSeq()val builder =newProcessBuilder(command: _*).directory(executorDir)val env = builder.environment()for((key, value)<- appDesc.command.environment){env.put(key, value)}env.put("SPARK_MEM", memory.toString +"m")// In case we are running this from within the Spark Shell, avoid creating a "scala"// parent process for the executor commandenv.put("SPARK_LAUNCH_WITH_SCALA","0")process = builder.start()// Redirect its stdout and stderr to filesredirectStream(process.getInputStream,newFile(executorDir,"stdout"))redirectStream(process.getErrorStream,newFile(executorDir,"stderr"))// Wait for it to exit; this is actually a bad thing if it happens, because we expect to run// long-lived processes only. However, in the future, we might restart the executor a few// times on the same machine.val exitCode = process.waitFor()val message ="Command exited with code "+ exitCodeworker !ExecutorStateChanged(appId, execId,ExecutorState.FAILED,Some(message),Some(exitCode))}catch{case interrupted:InterruptedException=>logInfo("Runner thread for executor "+ fullId +" interrupted")case e:Exception=>{logError("Error running executor", e)if(process !=null){process.destroy()}val message = e.getClass +": "+ e.getMessageworker !ExecutorStateChanged(appId, execId,ExecutorState.FAILED,Some(message),None)}}}
在ExecutorRunner启动后worker向master汇报ExecutorStateChanged,而master则将消息重新pack成为ExecutorUpdated发送给client。
至此整个application提交过程基本结束,提交的过程并不复杂,主要涉及到的消息的传递。
Application的结束
由于各种原因(包括正常结束,异常返回等)会造成application的结束,我们现在就来看看applicatoin结束的整个流程。
application的结束往往会造成client的结束,而client的结束会被master通过Actor检测到,master检测到后会调用removeApplication()函数进行操作:
def removeApplication(app:ApplicationInfo){if(apps.contains(app)){logInfo("Removing app "+ app.id)apps -= appidToApp -= app.idactorToApp -= app.driveraddressToWorker -= app.driver.path.addresscompletedApps += app // Remember it in our historywaitingApps -= appfor(exec<- app.executors.values){exec.worker.removeExecutor(exec)exec.worker.actor !KillExecutor(exec.application.id,exec.id)}app.markFinished(ApplicationState.FINISHED)// TODO: Mark it as FAILED if it failedschedule()}}
removeApplicatoin()首先会将application从master自身所管理的数据结构中删除,其次它会通知每一个work,请求其KillExecutor。worker在收到KillExecutor后调用ExecutorRunner的kill()函数:
caseKillExecutor(appId, execId)=>val fullId = appId +"/"+ execIdexecutors.get(fullId) match {caseSome(executor)=>logInfo("Asked to kill executor "+ fullId)executor.kill()caseNone=>logInfo("Asked to kill unknown executor "+ fullId)}
在ExecutorRunner内部,它会结束监控线程,同时结束监控线程所启动的进程,并且向worker汇报ExecutorStateChanged:
def kill(){if(workerThread !=null){workerThread.interrupt()workerThread =nullif(process !=null){logInfo("Killing process!")process.destroy()process.waitFor()}worker !ExecutorStateChanged(appId, execId,ExecutorState.KILLED,None,None)Runtime.getRuntime.removeShutdownHook(shutdownHook)}}
Application结束的同时清理了master和worker上的关于该application的所有信息,这样关于application结束的整个流程就介绍完了,当然在这里我们对于许多异常处理分支没有细究,但这并不影响我们对主线的把握。
