想出这个教程很久了,由于种种“不想要”的忙,一直也没腾出来时间写,现在写也是在百忙之中抽出的一点点时间啊。不也非常的想休息,可是心中还是想写这部教程的。可能有写的不好的地方,请大家见谅勿喷。我这里主要讲解Web Flash,AIR的话,以后再发。
现在介绍开发工具:
1.Flash builder 或者Eclipse Flash plugin。
这个比较好,开发起来也比较容易上手,缺点是要付费的哦。
2.OpenLaszlo
利用flex sdk来编译,也是不错的,免费。
3.Tofino
Visual Studio的plugin,用起来还行,不过还是没eclipse plugin 顺手啊
其他的工具没用过,不过好像大同小异,差不多了。
开发必备工具
- 1.Flash player
- 2.Flash player debuger(和上面不一样啊,在网上或者官网下载)
- 3.browser(我用的是firfox,还行)
好了,利器准备好了,那么开始操作吧。
flex sdk 分为2个重要的版本,第一就是Flex SDK 3系列。第二是Flex SDK 4系列。主要是区别在于标签不一样。实现方式不一样(网上有很多很好的讲解以上版本的区别的文章,大家看看吧,我这里就不讲解Copy了)。
小试牛刀:
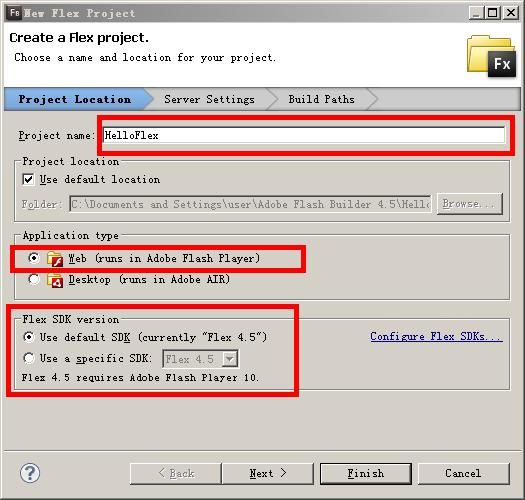
我用的是Flash builder,创建Flex工程
在HelloFlex中输入
<?xml version="1.0" encoding="utf-8"?>
<s:Application xmlns:fx="http://ns.adobe.com/mxml/2009"
			   xmlns:s="library://ns.adobe.com/flex/spark"
			   xmlns:mx="library://ns.adobe.com/flex/mx" minWidth="955" minHeight="600">
	<fx:Declarations>
		<!-- Place non-visual elements (e.g., services, value objects) here -->
	</fx:Declarations>

	<s:Label text="Hello Flex">

	</s:Label>
</s:Application>
然后点项目右键,运行就能在browser上看到结果了 。。。简单吧。
-------------------------------------------------------------------------------------------------------------------------------------------------------------------------------------
Flex UI介绍
1.Accordion
<?xml version="1.0" encoding="utf-8"?>
<s:Application xmlns:fx="http://ns.adobe.com/mxml/2009"
			   xmlns:s="library://ns.adobe.com/flex/spark"
			   xmlns:mx="library://ns.adobe.com/flex/mx" minWidth="955" minHeight="600">
	<fx:Declarations>
		<!-- Place non-visual elements (e.g., services, value objects) here -->
	</fx:Declarations>
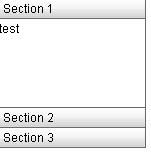
	<mx:Accordion id="testAccordion" width="150" height="150">
		<mx:Canvas label="Section 1">
			<mx:Label text="test">

			</mx:Label>
		</mx:Canvas>
		<mx:VBox label="Section 2">
			<mx:Button label="test">

			</mx:Button>
		</mx:VBox>
		<mx:HBox label="Section 3"/>
	</mx:Accordion>
</s:Application>
有图有真相:
好了,UI画好了,不过好像少了点什么,对了没事件。那现在给Accordion添加事件,添加是用ActionScript。在flex中事件处理基本上都用ActionScript的。
如果对ActionScript不熟悉的话,可以模仿我下面的方法写法,或者有Java基础的,对下面的方法也不会太陌生
<?xml version="1.0" encoding="utf-8"?>
<s:Application xmlns:fx="http://ns.adobe.com/mxml/2009"
			   xmlns:s="library://ns.adobe.com/flex/spark"
			   xmlns:mx="library://ns.adobe.com/flex/mx" minWidth="955" minHeight="600">
	<fx:Script>
		<![CDATA[
			import mx.events.IndexChangedEvent;
			import mx.controls.Alert;

			protected function testAccordion_changeHandler(event:IndexChangedEvent):void
			{
				Alert.show("The testAccordion is changing","Title");
			}

		]]>
	</fx:Script>
	<fx:Declarations>
		<!-- Place non-visual elements (e.g., services, value objects) here -->
	</fx:Declarations>
	<mx:Accordion id="testAccordion" width="150" height="150" change="testAccordion_changeHandler(event)">
		<mx:Canvas label="Section 1">
			<mx:Label text="test">

			</mx:Label>
		</mx:Canvas>
		<mx:VBox label="Section 2">
			<mx:Button label="test">

			</mx:Button>
		</mx:VBox>
		<mx:HBox label="Section 3"/>
	</mx:Accordion>
</s:Application>
现在在Actionscript中,添加下面的话
Alert.show("The testAccordion is changing,New index is "+event.newIndex,"Title");
下面主要是获得改变的index参数。
当标签初始化的时候,可以像下面这样监听它初始化的方法。
<?xml version="1.0" encoding="utf-8"?>
<s:Application xmlns:fx="http://ns.adobe.com/mxml/2009"
			   xmlns:s="library://ns.adobe.com/flex/spark"
			   xmlns:mx="library://ns.adobe.com/flex/mx" minWidth="955" minHeight="600">
	<fx:Script>
		<![CDATA[
			import mx.events.IndexChangedEvent;
			import mx.controls.Alert;

			protected function testAccordion_changeHandler(event:IndexChangedEvent):void
			{
				Alert.show("The testAccordion is changing,New index is "+event.newIndex,"Title");
			}

			public function pane2_initialize():void {
				Alert.show("Section 2");
			}

		]]>
	</fx:Script>
	<fx:Declarations>
		<!-- Place non-visual elements (e.g., services, value objects) here -->
	</fx:Declarations>
	<mx:Accordion id="testAccordion" width="150" height="150" change="testAccordion_changeHandler(event)">
		<mx:Canvas label="Section 1">
			<mx:Label text="test">

			</mx:Label>
		</mx:Canvas>
		<mx:VBox label="Section 2" initialize="pane2_initialize();">
			<mx:Button label="test">

			</mx:Button>
		</mx:VBox>
		<mx:HBox label="Section 3"/>
	</mx:Accordion>
</s:Application>
通过上面的代码,可以知道一点:当Accordion初始化的时候,只初始化显示的Pane,也就是“Section 1”,当切换到第二个Pane的时候,就是调用Pane2_initialize()
下面我们简单实践一下
动态追加和删除Pane
<?xml version="1.0" encoding="utf-8"?>
<s:Application xmlns:fx="http://ns.adobe.com/mxml/2009"
			   xmlns:s="library://ns.adobe.com/flex/spark"
			   xmlns:mx="library://ns.adobe.com/flex/mx"
			   minWidth="955" minHeight="600">
	<fx:Script>
		<![CDATA[

			private var hBoxes:Array = [];
			public function addControlButton():void {
				var newHB:HBox = new HBox();
				newHB.label = "my label: " + String(hBoxes.length);
				hBoxes.push(myAcc.addChild(newHB));
			}
			public function deleteControlButton():void {
				if (hBoxes.length>= 1) {
					myAcc.removeChild(hBoxes.pop());
				}
			}

		]]>
	</fx:Script>
	<fx:Declarations>
		<!-- Place non-visual elements (e.g., services, value objects) here -->
	</fx:Declarations>
	<mx:Accordion id="myAcc" height="150" width="169">
		<mx:HBox label="Initial HBox">

		</mx:HBox>
	</mx:Accordion>
	<mx:Button label="Add HBox"  click="addControlButton();" />
	<mx:Button x="73" y="0" label="Remove HBox" click="deleteControlButton();" />
</s:Application>
大家点击button就行了
