Android模拟键盘和键盘监听的一些调研
[欢迎访问我的独立博客:Java爱好者阅读更多内容]
1 键盘监控分析
Android的按键产生的是一个KeyEvent,这个KeyEvent只能被最上层focus窗口的activity和view得到。
所有的按键事件都会首先触发public boolean dispatchKeyEvent(KeyEvent event)这个函数,这个函数在SDK里的英文说明如下:
| boolean zy.keytest.keytest.dispatchKeyEvent(KeyEvent event)
Overrides: dispatchKeyEvent(...) in Activity public boolean dispatchKeyEvent (KeyEvent event) Since: API Level 1 Called to process key events. You can override this to intercept all key events before they are dispatched to the window. Be sure to call this implementation for key events that should be handled normally.
Parameters event The key event.
Returns boolean Return true if this event was consumed. |
然后还会触发public void onUserInteraction()这个函数,这个函数的说明如下:
| void zy.keytest.keytest.onUserInteraction()
Overrides: onUserInteraction() in Activity public void onUserInteraction () Since: API Level 3 Called whenever a key, touch, or trackball event is dispatched to the activity. Implement this method if you wish to know that the user has interacted with the device in some way while your activity is running. This callback and onUserLeaveHint() are intended to help activities manage status bar notifications intelligently; specifically, for helping activities determine the proper time to cancel a notfication.
All calls to your activity's onUserLeaveHint() callback will be accompanied by calls to onUserInteraction(). This ensures that your activity will be told of relevant user activity such as pulling down the notification pane and touching an item there.
Note that this callback will be invoked for the touch down action that begins a touch gesture, but may not be invoked for the touch-moved and touch-up actions that follow.
See Also onUserLeaveHint() |
按下接下来触发public boolean onKeyDown(int keyCode, KeyEvent event)这个函数,一般相应按下都是重载这个函数。
详细的流程如下:
当鼠标键按下时(即触摸):
首先触发dispatchTouchEvent,然后触发onUserInteraction,再次onTouchEvent。如果是点击的话,紧跟着下列事件(点击分俩步,ACTION_DOWN,ACTION_up),触发dispatchTouchEvent,再次onTouchEvent,当ACTION_up事件时不会触发onUserInteraction(可查看源代码)
当键盘按下时:
首先触发dispatchKeyEvent,然后触发onUserInteraction,再次onKeyDown,如果按下紧接着松开,则是俩步,紧跟着触发dispatchKeyEvent,然后触发onUserInteraction, 再次onKeyUp,注意与触摸不同,当松开按键时onUserInteraction也会触发。
而通过继承InputMethodService类重写这个类里面的public boolean onKeyDown(int keyCode, KeyEvent event)函数,则可以监听键盘按键,SDK里对这个函数有详细的描述。
| boolean com.example.android.softkeyboard.SoftKeyboard.onKeyDown(int keyCode, KeyEvent event) Use this to monitor key events being delivered to the application. We get first crack at them, and can either resume them or let them continue to the app.
Overrides: onKeyDown(...) in InputMethodService Parameters: keyCode event |
这个函数能够在应用程序得到按键之前,输入法先得到这个按键,并且可以释放他们或者继续传递给应用程序。
结论:Android的按键产生的是一个KeyEvent,这个KeyEvent只能被最上层获得焦点窗口的activity和view得到,无法被其他进程获得,进程间的键盘监听是无法实现的。
2 键盘模拟分析
键盘模拟这一块在调研中,在SDK1.6版本以前有一种方法,使用android.view.IWindowManager,其实现的源代码如下:
| package org.anddev.android.simualtekeys;
import android.app.Activity; import android.os.Bundle; import android.os.DeadObjectException; import android.os.ServiceManager; import android.view.IWindowManager; import android.view.KeyEvent; import android.view.Menu; import android.view.View; import android.view.View.OnClickListener;
public class SimualteKeyInput extends Activity {
/* The WindowManager capable of injecting keyStrokes. */ final IWindowManager windowManager = IWindowManager.Stub .asInterface(ServiceManager.getService("window"));
/** Called when the activity is first created. */ @Override public void onCreate(Bundle icicle) { super.onCreate(icicle); setContentView(R.layout.main);
/* Make the button do the menu-popup. */ this.findViewById(R.id.cmd_simulate_key).setOnClickListener( new OnClickListener() { @Override public void onClick(View arg0) { /* Start the key-simulation in a thread * so we do not block the GUI. */ new Thread(new Runnable() { public void run() { /* Simulate a KeyStroke to the menu-button. */ simulateKeystroke(KeyEvent.KEYCODE_SOFT_LEFT); } }).start(); /* And start the Thread. */ } }); }
/** Create a dummy-menu. */ @Override public boolean onCreateOptionsMenu(Menu menu) { boolean supRetVal = super.onCreateOptionsMenu(menu); menu.add(0, 0, "Awesome it works =)"); return supRetVal; }
/** Wrapper-function taking a KeyCode. * A complete KeyStroke is DOWN and UP Action on a key! */ private void simulateKeystroke(int KeyCode) { doInjectKeyEvent(new KeyEvent(KeyEvent.ACTION_DOWN, KeyCode)); doInjectKeyEvent(new KeyEvent(KeyEvent.ACTION_UP, KeyCode)); }
/** This function actually handles the KeyStroke-Injection. */ private void doInjectKeyEvent(KeyEvent kEvent) { try { /* Inject the KeyEvent to the Window-Manager. */ windowManager.injectKeyEvent(kEvent.isDown(), kEvent.getKeyCode(), kEvent.getRepeatCount(), kEvent.getDownTime(), kEvent .getEventTime(), true); } catch (DeadObjectException e) { e.printStackTrace(); } } } |
Main.xml文件如下
| <?xml version="1.0" encoding="utf-8"?> |
这个方法在1.6版本以上的sdk里没法实行,因为没有android.os.ServiceManager和
android.view.IWindowManager这两个package。在framework调用IWindowManager就是在Android的全部源码的环境下利用Android.mk文件写程序,这样的好处是可以调用sdk里没有的库包,比如IWindowManager,编译生成的是一个jar文件,你可以给他运行的附加参数,比如autotest -touch 123.0 123.0 来实现点击(123,123),因为Android系统不能直接运行jar文件,所以你需要利用aporcess来调用jar。
第二种方法也是利用输入法的按键模拟来实现。输入法里实现按键模拟的具体源代码如下:
| getCurrentInputConnection().sendKeyEvent( new KeyEvent(KeyEvent.ACTION_DOWN, keyEventCode)); getCurrentInputConnection().sendKeyEvent( new KeyEvent(KeyEvent.ACTION_UP, keyEventCode)); |
这样就模拟了一个按键的按下和弹起。
结论:输入法可以做到按键模拟,在使用模拟键盘的函数需要继承输入法的相关类,需要用户手动设置输入法(输入法程序本身不能设置自己为默认输入法),才能在自己的输入法程序里实现监听键盘,这种应用性不能广泛。普通的应用程序没法做到按键模拟。设置输入法的api需要android.uid.system,这种uid需要系统级签名才能使用,经过测试,可以通过自己的程序进行设置输入法,但也需要重新签名。
3 使用Test Instrument模拟按键
做了一个测试工程模拟按键的demo
测试过程
首先 创建一个项目TestApp
参数如下
| Package Name: com.android.testapp Activity Name: MainActivity Application Name: TestApp |
MainActivity源码如下
| package com.android.testapp; import android.app.Activity; import android.os.Bundle;
public class MainActivity extends Activity { /** Called when the activity is first created. */ @Override public void onCreate(Bundle savedInstanceState) { super.onCreate(savedInstanceState); setContentView(R.layout.main); } public int sum(int a,int b) { return a+b; } public int substract(int a,int b) { return a-b; } } |
其实这个只是一个被测试程序,跟模拟按键没有太大关系
然后 新建一个Source Folder,名为test,并在里面新建了包com.android.testapp.test。并定义了一个TestCase,名为TestMainActivity,源代码如下:
| package com.android.testapp.test; import com.android.testapp.MainActivity;
import android.app.Instrumentation; import android.content.ContentResolver; import android.test.ActivityInstrumentationTestCase;
import android.test.suitebuilder.annotation.MediumTest; import android.util.Log; import android.view.KeyEvent;
public class TestMainActivity extends ActivityInstrumentationTestCase<MainActivity> { private Instrumentation mInst = null; private ContentResolver mContentResolver = null; public TestMainActivity() {
super("com.android.testapp", MainActivity.class);
}
public TestMainActivity(String pkg, Class<MainActivity> activityClass) {
super(pkg, activityClass);
} @Override protected void setUp() throws Exception { super.setUp(); mInst = getInstrumentation(); mContentResolver = mInst.getContext().getContentResolver(); Log.i("test", "setup");
} public void testStartActivity() throws Exception { //launch activity /* Intent intent = new Intent(Intent.ACTION_MAIN); intent.addFlags(Intent.FLAG_ACTIVITY_NEW_TASK); String activityPackagePath = "com.android."; intent.setClassName(activityPackagePath, TargetActivity.getClass().getName()); Activity mActivity = (TargetActivity) getInstrumentation().startActivitySync(intent); mInst.waitForIdleSync();*/ //send keyevent to press button mInst.sendCharacterSync(KeyEvent.KEYCODE_1); Log.i("test", "send key 8");
mInst.waitForIdleSync();
}
@MediumTest
public void testSum() {
assertEquals(3, getActivity().sum(1, 2)); mInst.sendCharacterSync(KeyEvent.KEYCODE_0); Log.i("test", "send key 7");
mInst.waitForIdleSync(); }
@MediumTest
public void testSubstract() {
assertEquals(-1, getActivity().substract(1, 2));
}
} |
测试的时候将会执行几个测试函数,我在里面加上了模拟按键的代码,并通过日志打印,并且通过输入法程序的日志来捕获
Manifest文件源代码
| <?xml version="1.0"encoding="utf-8"?> <manifest xmlns:android="http://schemas.android.com/apk/res/android" package="com.android.testapp" android:versionCode="1" android:versionName="1.0.0"> <application android:icon="@drawable/icon"android:label="@string/app_name"> <activity android:name=".MainActivity" android:label="@string/app_name"> <intent-filter> <action android:name="android.intent.action.MAIN"/> <category android:name="android.intent.category.LAUNCHER"/> </intent-filter> </activity> <uses-library android:name="android.test.runner"/> </application> <instrumentation android:targetPackage="com.android.testapp"android:name="android.test.InstrumentationTestRunner"android:label="Test Unit Tests"></instrumentation> </manifest>
|
运行测试过程:
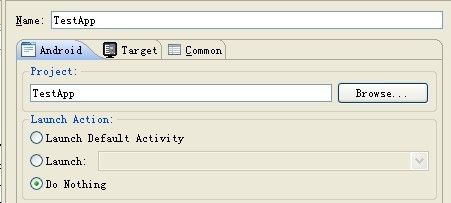
首先设置TestApp的Run configueration
设置为do nothing 不然我们运行就会启动我们的主程序
然后运行我们的工程,将工程安装到模拟器上
然后打开命令行,运行命令
adb shell pm list packages
可以看到我们的工程已经安装在模拟器上
然后运行命令
adb shell am instrument -e class com.android.testapp.test.TestMainActivity –w com.android.testapp/android.test.InstrumentationTestRunner
复制粘贴会多有问题 直接用键盘敲入 如图
测试执行完毕,查看logcat 可以看到结果
通过日志可以看到输入法截获到了我们测试程序发出的按键
查看了系统test Instrumentation源码
Instrumentation类里面关于" sendKeySync "一类函数的实现
| public void sendKeySync(KeyEvent event) { validateNotAppThread(); try { (IWindowManager.Stub.asInterface(ServiceManager.getService("window"))) .injectKeyEvent(event, true); } catch (RemoteException e) { } } |
采用的IWindowManager类里的injectKeyEvent函数,之前已经调研了IWindowManager类在1.6以后的版本之后被隐藏掉了
injectKeyEvent函数网上有人说得在源码环境下编译可以使用。
http://blog.csdn.net/zcpangzi/archive/2010/03/15/5383306.aspx
所以,我们考虑利用程序在命令行下进行键盘模拟
我们新建一个工程runcmd
源代码为
| package zy.runcmd;
import java.io.IOException;
import android.app.Activity; import android.os.Bundle; import android.util.Log;
public class runcmd extends Activity { /** Called when the activity is first created. */ @Override public void onCreate(Bundle savedInstanceState) { super.onCreate(savedInstanceState); setContentView(R.layout.main); try { Runtime.getRuntime().exec("am instrument -e class com.android.testapp.test.TestMainActivity -w com.android.testapp/android.test.InstrumentationTestRunner"); Log.i("run","success!!!!!!!!!"); } catch (IOException e) { // TODO Auto-generated catch block e.printStackTrace(); Log.i("run",e.toString()); } } } |
执行成功之后log里会打印success!!!!
并且可以在log里看到相应的效果
我们运行此程序之后
查看logcat
可以看到test 程序被执行了。
并且发出的按键 7 8 都被我们的输入法程序得到了。
4 injectKeyEvent跨进程传递
injectKeyEvent函数跨进程进行按键模拟会出现错误:07-25 09:39:31.901: WARN/WindowManager(55): Permission denied: injecting key event from pid 460 uid 10037 to window Window{43e0fe80 com.android.contacts/com.android.contacts.DialtactsActivity paused=false} owned by uid 10001
权限不够。即使再加上
| <uses-permission android:name="android.permission.INJECT_EVENTS" /> |
也依然不行。
结论:Test Instruments 底层调用的injectKeyEvent函数,Test Instruments环境下,injectKeyEvent函数只能给被测试的activity传递模拟的按键,而Test Instruments的工程在测试时,会调出被测试的activity,传递模拟按键,在跨进程传递时则会出现Permission denied,即使加上权限声明也依然不行。推测可能是系统级进程和同一进程下才能使用这个API进行按键传递。
5 把自己的APK放到目标程序的进程中运行,使用injectKeyEvent函数
我们测试使用的android.uid.phone,也就是拨号程序,希望模拟一个按键到拨号程序里。于是在我们的Manifest.xml文件里添加android:sharedUserId="android.uid.phone",这时候我们在模拟器或者手机上再次安装,会提示安装错误,签名不对。于是我们可以用系统签名的文件对我们的APK程序进行重新签名。
首先用Eclipse编译出我们的apk,这个apk是不能安装的。
用winrar打开我们的apk。
删掉META-INF下面的两个签名文件。
![]()
然后用signapk.jar工具重新签名
首先找到密钥文件,在我的Android源码目录中的位置
是"android2.0\build\target\product\security",下面的platform.pk8和platform.x509.pem两个文件。
然后用Android提供的Signapk工具来签名,我写了一个bat文件
|
@ECHO OFF Echo Auto-sign Created By Dave Da illest 1 Echo Update.apk is now being signed and will be renamed to updated.apk
java -jar signapk.jar platform.x509.pem platform.pk8 update.apk updated.apk
Echo Signing Complete
Pause EXIT |
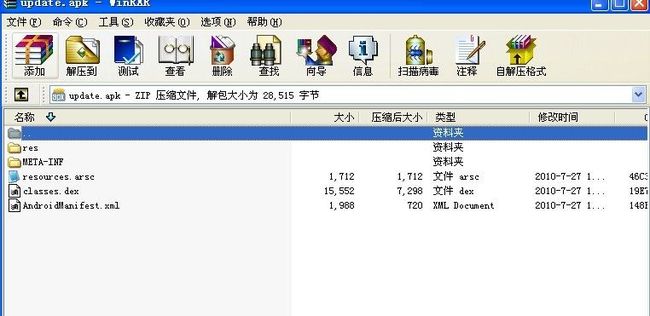
然后将我们删掉两个签名文件的apk拷贝到签名工具目录下,修改名字为update.apk,然后使用这个bat文件。会生成updated.apk。我们用winrar打开这个updated.apk文件。
可以看到已经重新签名完成。
将updated.apk安装到手机上。
然后经过我们测试,能够在打电话的界面上模拟按键。在模拟器和G2手机上都可以实现。
这也有一个问题,就是这样生成的程序只有在原始的Android系统或者是自己编译的系统中才可以用,因为这样的系统才可以拿到 platform.pk8和platform.x509.pem两个文件。要是别家公司做的Android上连安装都安装不了。
我们测试的环境是HTC G2手机,然后在MOTO的MILESTONE手机上不能安装,应该是签名的key不一致。
结论: 由于采用injectKeyEvent不能跨进程,只能放到被模拟按键进程中使用被模拟按键密钥签名后才可以使用。由此可见,要实现在别人程序中发送模拟键盘按键,需要我们的程序跟别人用相同的签名,然后使用同一个shareduserid即可。如果要在系统的程序中模拟按键,我们只需要获得系统的签名的key进行签名。不同的厂商的Android系统有不同的key。只要获得这个key就能够在相对应的程序里进行按键模拟。


