Activity与Intent
其实Activity就是一个窗口容器,创建好了Activity后,咱们就可以向其中放入各种各样的控件,这样一个最简单的Android应用程序就完成了。但是,对于绝大多数Android程序来说都不会只有一个Activity,新的问题就来了。怎么从一个Activity跳转到另一个Activity,并且将一些信息传递给它呢?这就用到了下面咱们要学习的对象——Intent。
Intent对象的作用是协助应用间的交互与通讯,Intent负责对Activity中一次操作的动作、动作涉及数据、附加数据进行描述,Android则根据此Intent的描述,负责找到对应的组件,将Intent传递给调用的组件,并完成组件的调用。Intent不仅可用于应用程序之间,也可用于应用程序内部的Activity/Service之间的交互。因此,Intent在这里起着一个媒体中介的作用,专门提供组件互相调用的相关信息,实现调用者与被调用者之间的解耦。
Intent对象的属性:
(1)Action,也就是要执行的动作,SDk中定义了一些标准的动作,包括 ACTION_CALL (启动打电话的Acvivity)、ACTION_SENDTO(启动发短信的Activity)等。当然,也可以自定义动作,并可定义相应的Activity来处理我们的自定义动作。
(2)Data,也就是执行动作要操作的数据Android中采用指向数据的一个URI来表示,如在联系人应用中,一个指向某联系人的URI可能为:content://contacts/1。对于不同的动作,其URI数据的类型是不同的(可以设置type属性指定特定类型数据),如ACTION_EDIT指定Data为文件URI,打电话为tel:URI,访问网络为http:URI,而由content provider提供的数据则为content: URIs。
(3)type(数据类型),显式指定Intent的数据类型(MIME)。一般Intent的数据类型能够根据数据本身进行判定,但是通过设置这个属性,可以强制采用显式指定的类型而不再进行推导。
(4)category(类别),被执行动作的附加信息。例如 LAUNCHER_CATEGORY 表示Intent 的接受者应该在Launcher中作为顶级应用出现;而ALTERNATIVE_CATEGORY表示当前的Intent是一系列的可选动作中的一个,这些动作可以在同一块数据上执行。
(5)component(组件),指定Intent的的目标组件的类名称。通常 Android会根据Intent 中包含的其它属性的信息,比如action、data/type、category进行查找,最终找到一个与之匹配的目标组件。但是,如果 component这个属性有指定的话,将直接使用它指定的组件,而不再执行上述查找过程。指定了这个属性以后,Intent的其它所有属性都是可选的。
(6)extras(附加信息),是其它所有附加信息的集合。使用extras可以为组件提供扩展信息,比如,如果要执行"发送电子邮件"这个动作,可以将电子邮件的标题、正文等保存在extras里,传给电子邮件发送组件。
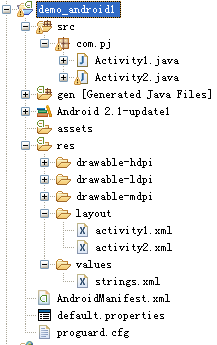
下面是一个简单的使用Intent对象实现一个Activity跳转到另一个Activity的例子:
首先看一下工程文件列表
第一个Activity文件代码
package com.pj;

import android.app.Activity;
import android.content.Intent;
import android.os.Bundle;
import android.view.View;
import android.view.View.OnClickListener;
import android.widget.Button;
import android.widget.EditText;
/**
* @file : Activity1.java
* @author : duanpj
* @date : Jan 18, 2011 11:11:52 PM
* @version : 1.0
* @descriptions :
*/
public class Activity1 extends Activity {

private EditText text1=null;
private EditText text2=null;
private Button button1=null;
@Override
public void onCreate(Bundle savedInstanceState) {
super.onCreate(savedInstanceState);
setContentView(R.layout.activity1);
text1=(EditText)findViewById(R.id.act1_text1);
text2=(EditText)findViewById(R.id.act1_text2);
button1=(Button)findViewById(R.id.act1_button1);
button1.setOnClickListener(new MyButtonListener() );
}

class MyButtonListener implements OnClickListener{
public void onClick(View v) {
int num1=Integer.parseInt(text1.getText().toString());
int num2=Integer.parseInt(text2.getText().toString());
Intent intent=new Intent();
intent.putExtra("value", (num1+num2)+"");
intent.setClass(Activity1.this,Activity2.class);
Activity1.this.startActivity(intent);

}
}
}
第二个Activity文件代码
package com.pj;
import android.app.Activity;
import android.content.Intent;
import android.os.Bundle;
import android.util.Log;
import android.widget.TextView;
/**
* @file          : Activity2.java
* @author        : duanpj
* @date          : Jan 18, 2011  11:12:44 PM
* @version       : 1.0
* @descriptions  :
*/
public class Activity2 extends Activity {

private TextView text1=null;
@Override
    public void onCreate(Bundle savedInstanceState) {
        super.onCreate(savedInstanceState);
        setContentView(R.layout.activity2);
        Intent intent=getIntent();
        String value=intent.getStringExtra("value");
        text1=(TextView)findViewById(R.id.act2_textview1);
        text1.setText(value);
    }
}
activity1.xml
<?xml version="1.0" encoding="utf-8"?>
<LinearLayout xmlns:android="http://schemas.android.com/apk/res/android"
    android:orientation="vertical"
    android:layout_width="fill_parent"
    android:layout_height="fill_parent"
    >
<EditText
android:id="@+id/act1_text1"
    android:layout_width="fill_parent"
    android:layout_height="wrap_content"
    />
<EditText
android:id="@+id/act1_text2"
    android:layout_width="fill_parent"
    android:layout_height="wrap_content"
    />
<Button
android:id="@+id/act1_button1"
android:layout_width="wrap_content"
android:layout_height="wrap_content"
android:text="@string/button1"
/>
</LinearLayout>
activity2.xml
<?xml version="1.0" encoding="utf-8"?>
<LinearLayout xmlns:android="http://schemas.android.com/apk/res/android"
android:orientation="vertical"
android:layout_width="fill_parent"
android:layout_height="fill_parent"
>
<TextView
android:id="@+id/act2_textview1"
android:layout_width="fill_parent"
android:layout_height="wrap_content"
/>
</LinearLayout>
strings.xml
<?xml version="1.0" encoding="utf-8"?>
<resources>
    <string name="app_name">demo_android1</string>
    <string name="activity1">activity1</string>
    <string name="activity2">activity2</string>
    <string name="button1">  加  </string>
</resources>
AndroidManifest.xml
<?xml version="1.0" encoding="utf-8"?>
<manifest xmlns:android="http://schemas.android.com/apk/res/android"
      package="com.pj"
      android:versionCode="1"
      android:versionName="1.0">
    <application android:icon="@drawable/icon" android:label="@string/app_name">
        <activity android:name=".Activity1"
                  android:label="@string/app_name">
            <intent-filter>
                <action android:name="android.intent.action.MAIN" />
                <category android:name="android.intent.category.LAUNCHER" />
            </intent-filter>
        </activity>
  <activity android:name=".Activity2" android:label="@string/activity2">
  </activity>
    </application>
    <uses-sdk android:minSdkVersion="7" />
</manifest>
最后来一张程序运行图,有兴趣的同事可以直接将附件下载下来装到手机里面试一下(Android2.1以后版本可用)。

