ubuntu9.04+hadoop0.20.2+eclipse环境搭建
看hadoop也有一段时间了,今天花了一些时间把整个开发环境搭起来了,期间遇到了不小的麻烦,经过查阅大量资料,终于搞定了!
由于我的电脑配置不好,所以在实验室ubuntu服务器上搭建了单机的环境,然后再我的电脑用eclipse上传编写好的程序。
1.安装JDK6
这个不用多说,下一个bin文件,修改一下权限,配置一下环境变量就可以了。
2. 配置SSH
新增hadoop组及同名用户:
$ sudo addgroup hadoop
$ sudo adduser --ingroup hadoop hadoop
接下来做些特别的工作:
$ su
$ chmod u+x /etc/sudoers
$ vim /etc/sudoers
在 root ALL=(ALL)的下一行加上:
hadoop ALL=(ALL)
$ chmod u-x /etc/sudoers
$ exit
安装ssh-server:
$ sudo apt-get install openssh-server
简历SSH KEY:
$ su - hadoop
$ ssh-keygen -t rsa -P ""
Generating public/private rsa key pair.
Enter file in which to save the key (/home/hadoop/.ssh/id_rsa):
Created directory '/home/hadoop/.ssh'.
Your identification has been saved in /home/hadoop/.ssh/id_rsa.
Your public key has been saved in /home/hadoop/.ssh/id_rsa.pub.
The key fingerprint is:
9d:47:ab:d7:22:54:f0:f9:b9:3b:64:93:12:75:81:27 hadoop@ubuntu
让其不输入密码就能登录:
hadoop@ubuntu:~$ cat ~/.ssh/id_rsa.pub >> ~/.ssh/authorized_keys
$ sudo /etc/init.d/ssh reload
使用:
$ ssh localhost
看看是不是直接ok了。
3.安装Hadoop0.20.2
将包中内容解压到/usr/local/hadoop,并改变其所有者:
$ sudo chown -R hadoop:hadoop hadoop
配置Hadoop:
$ cd /usr/local/hadoop
$ vim conf/core-site.xml
将内容改为:
其中fs.default.name指定namenode的ip和端口;dfs.replication指定文件块在hdfs中的备份数目,默认为3;hadoop.tmp.dir指定临时目录。
$ vim conf/mapred-site.xml
内容改为:
格式化namenode:
hadoop@guohe-desktop:/usr/local/hadoop$ ./bin/hadoop namenode -format
启动hadoop
hadoop@guohe-desktop:/usr/local/hadoop$ ./bin/start-all.sh
注意:0.20.2启动后默认会在safemode,所以要退出安全模式。具体原因未知,我装0.21的时候没有这种情况。
hadoop@guohe-desktop:/usr/local/hadoop$ bin/hadoop dfsadmin -safemode leave
运行jps看看是否启动了5个进程。
可以跑一个wordcount程序来验证一下hadoop是否正确启动,具体方法网上有很多,这里不再叙述。
好了,hadoop已经在服务器上运行起来了。为了在我的电脑上能用eclipse向服务器发布hadoop程序,要配置一下eclipse。
hadoop包中自带mapreduce插件可以使我们很容易的使用eclipse调试运行程序,但是这个插件对eclipse的版本要求很高。0.21中自带的插件与我电脑中的任何一个eclipse版本都不兼容,所以这里才使用0.20.2。0.20中的插件可以与eclipse-java-europa-winter这个版本很好的兼容。
首先要下载安装eclipse-java-europa-winter,然后将根目录里,contrib\eclipse-plugin 文件夹下有,Hadoop 在Eclipse 的插件hadoop-0.20.2-eclipse-plugin.jar 。将其拷贝到Eclipse 的plugins 目录下。
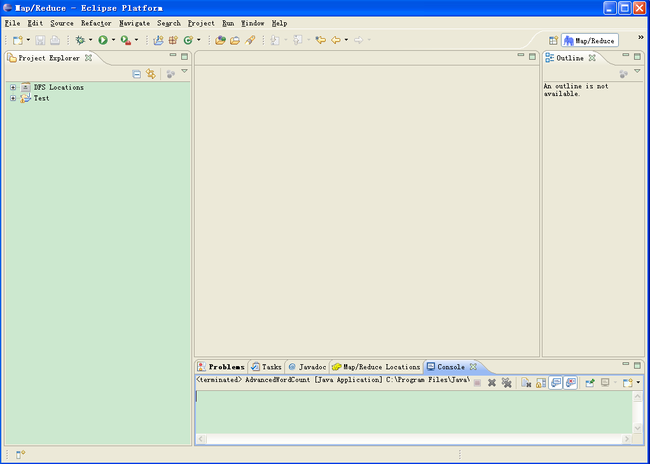
启动eclipse,我们可以看到以下界面:

设置 Hadoop 主目录
点击 Eclipse 主菜单上 Windows->Preferences, 然后在左侧选择 Hadoop Home Directory, 设定你的 Hadoop 解压后的目录,这是为了编写程序的时候将库自动加载进来, 如图所示:

在 Eclipse 设置 Hadoop Location
打开 Map/Reduce location中右键,选择New Hadoop Location
在General中设置:

先点击finish,然后再出现的hadoopserver点右键选择edit hadoop location,这样做的原因是选edit后会新出现很多选项:
主要将hadoop.tmp.dir设置成/home/hadoop/tmp
将一些0.0.0.0都换成服务器的ip59.72.109.206
将hadoop.job.ugi第一个逗号前改为hadoop
这样在左侧 Project Explorer 内, DFS Locations 内可以查看 HDFS 文件系统内的文件,可以进行新增,删除等操作。
然后我们新建一个测试工程test,并编写一个测试得类,代码如下:
运行前设置命令行参数:

注意:这两个路径指的是服务器上hdfs上的路径,如test-in就代表hdfs根目录下的test-in
运行程序就可以得到结果啦!
至此,一个简单的开发运行环境搭建完毕了,还是蛮有成就感的,呵呵,明天就开始学习hadoop下的程序设计了。
由于我的电脑配置不好,所以在实验室ubuntu服务器上搭建了单机的环境,然后再我的电脑用eclipse上传编写好的程序。
1.安装JDK6
这个不用多说,下一个bin文件,修改一下权限,配置一下环境变量就可以了。
2. 配置SSH
新增hadoop组及同名用户:
$ sudo addgroup hadoop
$ sudo adduser --ingroup hadoop hadoop
接下来做些特别的工作:
$ su
$ chmod u+x /etc/sudoers
$ vim /etc/sudoers
在 root ALL=(ALL)的下一行加上:
hadoop ALL=(ALL)
$ chmod u-x /etc/sudoers
$ exit
安装ssh-server:
$ sudo apt-get install openssh-server
简历SSH KEY:
$ su - hadoop
$ ssh-keygen -t rsa -P ""
Generating public/private rsa key pair.
Enter file in which to save the key (/home/hadoop/.ssh/id_rsa):
Created directory '/home/hadoop/.ssh'.
Your identification has been saved in /home/hadoop/.ssh/id_rsa.
Your public key has been saved in /home/hadoop/.ssh/id_rsa.pub.
The key fingerprint is:
9d:47:ab:d7:22:54:f0:f9:b9:3b:64:93:12:75:81:27 hadoop@ubuntu
让其不输入密码就能登录:
hadoop@ubuntu:~$ cat ~/.ssh/id_rsa.pub >> ~/.ssh/authorized_keys
$ sudo /etc/init.d/ssh reload
使用:
$ ssh localhost
看看是不是直接ok了。
3.安装Hadoop0.20.2
将包中内容解压到/usr/local/hadoop,并改变其所有者:
$ sudo chown -R hadoop:hadoop hadoop
配置Hadoop:
$ cd /usr/local/hadoop
$ vim conf/core-site.xml
将内容改为:
<?xml version="1.0"?>
<?xml-stylesheet type="text/xsl" href="configuration.xsl"?>

<!-- Put site-specific property overrides in this file. -->

<configuration>
	<property>
		<name>fs.default.name</name>
		<value>hdfs://59.72.109.206:9000</value>
	</property>
	<property>
		<name>dfs.replication</name>
		<value>1</value>
	</property>
	<property>
		<name>hadoop.tmp.dir</name>
		<value>/home/hadoop/tmp</value>
	</property>
</configuration>
其中fs.default.name指定namenode的ip和端口;dfs.replication指定文件块在hdfs中的备份数目,默认为3;hadoop.tmp.dir指定临时目录。
$ vim conf/mapred-site.xml
内容改为:
<?xml version="1.0"?>
<?xml-stylesheet type="text/xsl" href="configuration.xsl"?>

<!-- Put site-specific property overrides in this file. -->

<configuration>

	<property>
		<name>mapred.job.tracker</name>
		<value>59.72.109.206:9001</value>
	</property>
</configuration>
格式化namenode:
hadoop@guohe-desktop:/usr/local/hadoop$ ./bin/hadoop namenode -format
启动hadoop
hadoop@guohe-desktop:/usr/local/hadoop$ ./bin/start-all.sh
注意:0.20.2启动后默认会在safemode,所以要退出安全模式。具体原因未知,我装0.21的时候没有这种情况。
hadoop@guohe-desktop:/usr/local/hadoop$ bin/hadoop dfsadmin -safemode leave
运行jps看看是否启动了5个进程。
可以跑一个wordcount程序来验证一下hadoop是否正确启动,具体方法网上有很多,这里不再叙述。
好了,hadoop已经在服务器上运行起来了。为了在我的电脑上能用eclipse向服务器发布hadoop程序,要配置一下eclipse。
hadoop包中自带mapreduce插件可以使我们很容易的使用eclipse调试运行程序,但是这个插件对eclipse的版本要求很高。0.21中自带的插件与我电脑中的任何一个eclipse版本都不兼容,所以这里才使用0.20.2。0.20中的插件可以与eclipse-java-europa-winter这个版本很好的兼容。
首先要下载安装eclipse-java-europa-winter,然后将根目录里,contrib\eclipse-plugin 文件夹下有,Hadoop 在Eclipse 的插件hadoop-0.20.2-eclipse-plugin.jar 。将其拷贝到Eclipse 的plugins 目录下。
启动eclipse,我们可以看到以下界面:

设置 Hadoop 主目录
点击 Eclipse 主菜单上 Windows->Preferences, 然后在左侧选择 Hadoop Home Directory, 设定你的 Hadoop 解压后的目录,这是为了编写程序的时候将库自动加载进来, 如图所示:

在 Eclipse 设置 Hadoop Location
打开 Map/Reduce location中右键,选择New Hadoop Location
在General中设置:

先点击finish,然后再出现的hadoopserver点右键选择edit hadoop location,这样做的原因是选edit后会新出现很多选项:
主要将hadoop.tmp.dir设置成/home/hadoop/tmp
将一些0.0.0.0都换成服务器的ip59.72.109.206
将hadoop.job.ugi第一个逗号前改为hadoop
这样在左侧 Project Explorer 内, DFS Locations 内可以查看 HDFS 文件系统内的文件,可以进行新增,删除等操作。
然后我们新建一个测试工程test,并编写一个测试得类,代码如下:
package examples;

import java.io.IOException;
import java.util.Random;
import java.util.StringTokenizer;

import org.apache.hadoop.conf.Configuration;
import org.apache.hadoop.fs.FileSystem;
import org.apache.hadoop.fs.Path;
import org.apache.hadoop.io.IntWritable;
import org.apache.hadoop.io.Text;
import org.apache.hadoop.io.WritableComparator;
import org.apache.hadoop.mapreduce.Job;
import org.apache.hadoop.mapreduce.Mapper;
import org.apache.hadoop.mapreduce.Reducer;
import org.apache.hadoop.mapreduce.Reducer.Context;
import org.apache.hadoop.mapreduce.lib.input.FileInputFormat;
import org.apache.hadoop.mapreduce.lib.output.FileOutputFormat;
import org.apache.hadoop.util.GenericOptionsParser;

public class AdvancedWordCount {

	public static class TokenizerMapper extends
		Mapper<Object, Text, Text, IntWritable> {

		private final static IntWritable one = new IntWritable(1);
		private Text word = new Text();
		private String pattern = "[^\\w]";

		@Override
		protected void map(Object key, Text value, Context context)
				throws IOException, InterruptedException {
			String line = value.toString();
			System.out.println("-------line todo: " + line);
			line = line.replaceAll(pattern, " ");
			System.out.println("-------line done: " + line);

			StringTokenizer itr = new StringTokenizer(line.toString());

			while (itr.hasMoreTokens()) {
				word.set(itr.nextToken());
				context.write(word, one);
			}
		}
	}

	public static class IntSumReducer extends
		Reducer<Text, IntWritable, Text, IntWritable> {

		private IntWritable result = new IntWritable();
		@Override
		protected void reduce(Text key, Iterable<IntWritable> values,
				Context context) throws IOException, InterruptedException {
			// TODO Auto-generated method stub
			int sum = 0;
			for (IntWritable val : values) {
				sum += val.get();
			}
			result.set(sum);
			context.write(key, result);
		}


	}

	public static class MyInverseMapper extends
		Mapper<Object, Text, IntWritable, Text> {

		@Override
		protected void map(Object key, Text value, Context context)
				throws IOException, InterruptedException {
			String[] keyAndValue = value.toString().split("\t");
			System.out.println("---------------->" + value);
			System.out.println("--------0------->" + keyAndValue[0]);
			System.out.println("--------1------->" + keyAndValue[1]);

			context.write(new IntWritable(Integer.parseInt(keyAndValue[1])), new Text(keyAndValue[0]));
		}


	}

	public static class IntWritableDecreasingComparator extends
		IntWritable.Comparator {

		@Override
		public int compare(byte[] b1, int s1, int l1, byte[] b2, int s2, int l2) {
			// TODO Auto-generated method stub
			return -super.compare(b1, s1, l1, b2, s2, l2);
		}

		public int compare(WritableComparator a, WritableComparator b) {
			// TODO Auto-generated method stub
			return -super.compare(a, b);
		}
	}


	public static boolean countingJob(Configuration conf, Path in, Path out) throws IOException, InterruptedException, ClassNotFoundException {
		Job job = new Job(conf, "wordcount");
		job.setJarByClass(AdvancedWordCount.class);
		job.setMapperClass(TokenizerMapper.class);
		job.setCombinerClass(IntSumReducer.class);
		job.setReducerClass(IntSumReducer.class);
		job.setOutputKeyClass(Text.class);
		job.setOutputValueClass(IntWritable.class);
		FileInputFormat.addInputPath(job, in);
		FileOutputFormat.setOutputPath(job, out);

		return job.waitForCompletion(true);
	}


	public static boolean sortingJob(Configuration conf, Path in, Path out) throws IOException, InterruptedException, ClassNotFoundException {
		Job job = new Job(conf, "sort");
		job.setJarByClass(AdvancedWordCount.class);
		job.setMapperClass(MyInverseMapper.class);

		job.setOutputKeyClass(IntWritable.class);
		job.setOutputValueClass(Text.class);

		job.setSortComparatorClass(IntWritableDecreasingComparator.class);

		FileInputFormat.addInputPath(job, in);
		FileOutputFormat.setOutputPath(job, out);

		return job.waitForCompletion(true);
	}

	public static void main(String[] args) {
		Configuration conf = new Configuration();
		String[] otherArgs = new GenericOptionsParser(conf, args).getRemainingArgs();

		Path temp = new Path("wordcount-temp-" + Integer.toString(new Random().nextInt(Integer.MAX_VALUE)));
		boolean a = false, b = false;

		Path in = new Path(otherArgs[0]);
		Path out = new Path(otherArgs[1]);

		if(otherArgs.length != 2)
			System.exit(2);

		try {
			a = AdvancedWordCount.countingJob(conf, in, temp);
			b = AdvancedWordCount.sortingJob(conf, temp, out);
		} catch (IOException e) {
			// TODO Auto-generated catch block
			e.printStackTrace();
		} catch (InterruptedException e) {
			// TODO Auto-generated catch block
			e.printStackTrace();
		} catch (ClassNotFoundException e) {
			// TODO Auto-generated catch block
			e.printStackTrace();
		} finally {
			try {
				FileSystem.get(conf).delete(temp, true);
			} catch (IOException e) {
				// TODO Auto-generated catch block
				e.printStackTrace();
			}
			if (!a || !b)
				try {
					FileSystem.get(conf).delete(out, true);
				} catch (IOException e) {
					// TODO Auto-generated catch block
					e.printStackTrace();
				}
		}
	}
}
运行前设置命令行参数:

注意:这两个路径指的是服务器上hdfs上的路径,如test-in就代表hdfs根目录下的test-in
运行程序就可以得到结果啦!
至此,一个简单的开发运行环境搭建完毕了,还是蛮有成就感的,呵呵,明天就开始学习hadoop下的程序设计了。