http://www.softwaretestinghelp.com/hudson-continuous-integration-tool-selenium-tutorial-25/
In the last two tutorials, we discussed about the two most important build tools – ANT and Maven. We discussed about their significance and practical importance.
In the current Selenium online training tutorial, we would discuss about a continuous integration tool known as Hudson. We would study about its importance and benefits that we get out of any continuous integration tool. We would look at the Hudson straight from the beginning, from its installation to its advance settings.
Continuous Integration
Many a times, we end up working in a project where a large bunch of developers and testers are working together on different modules. Developers and Testers work on their modules thereby developing executables. These work products are then integrated at regular intervals. Thus, every time we create a development code, it needs to be integrated, tested and built to ensure that the code developed doesn’t break or introduces errors or defects.
This process of building and testing the development work integrated at regular intervals is known as Continuous Integration (CI). Continuous Integration lets you identify and address the defects or errors as soon as possible in the development lifecycle i.e. closer to the time, they were introduced.
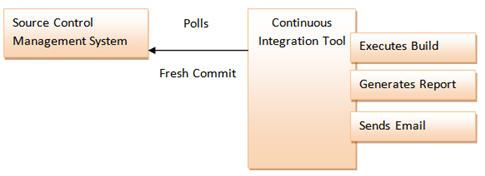
Continuous Integration system builds and tests the application as soon as the fresh/changed code is committed to the Source Control Management system acronym as SCM. With its great benefits and impact over the industries, it has become an integral part of Software Development life cycle and is mandatorily practiced.
Hudson – Continuous Integration Tool
Continuous Integration can be performed automatically. Hudson is one of the popularly known tools to perform Continuous Integration. Hudson is a Java based open source Continuous Integration tool. Like any other Continuous Integration tool, Hudson provides the teams to trigger builds and tests with any change in the Source Control Management System.
Hudson supports a large range of tools and plugins.
Hudson:
- Supports SCM tools like CVS, Subversion (SVN), Git etc.
- Is capable of building ANT based projects, Maven based projects etc.
- Is capable of executing shell scripts and Windows batch commands
- Is capable of Sending reports, notifications etc via Email, SMS, Skype etc.
Hudson Installation
Pre-requisites
To be able to use Hudson, we need the following things to be in place before we get started:
- Source Code Repository (SVN/Git/CVS etc.)
- Build Script (Ant/Maven etc.)
Installation
Hudson can be easily installed on variety of environments. Hudson can be installed on both the Linux machine and the windows machine. It is also distributed as a package specific to the OS type for different Linux flavors thereby making the installation a few minute’s task. Hudson can be run as a standalone application or within the Servlet Container. In this tutorial, we would explain the Hudson Installation on Windows machine. There are two distinct approaches to install Hudson.
- Using WAR file
- Using Native Package
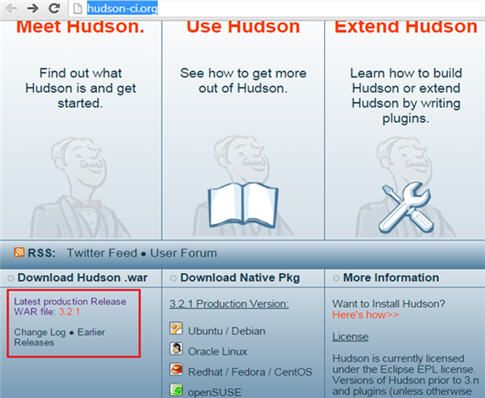
Native Packages are available for Ubuntu/Debian, Oracle Linux, Redhat/Fedora/CentOS and openSUSE.
For this tutorial, we would discuss installation by WAR file. Let us discuss the entire process step by step.
Step 1: Download the Hudson WAR file from the Hudson’s official website – “http://hudson-ci.org/”. Keep the war file in the desired location in the local file system. This WAR file can be started directly via command prompt or can be used in Servlet Container. The WAR is an executable file that has a Servlet Container embedded in itself.
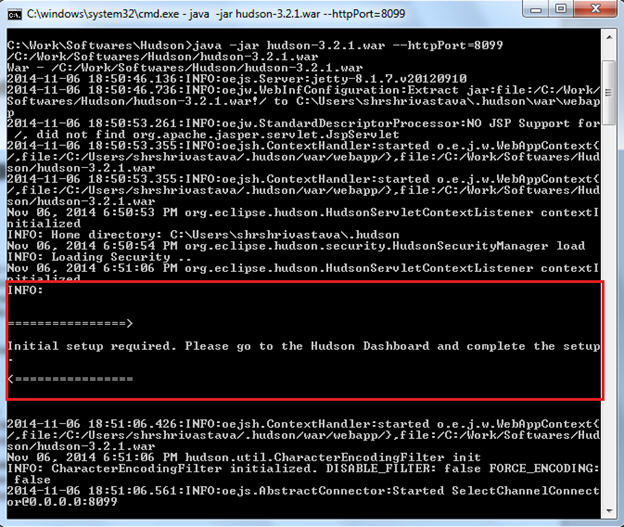
Step 2: The next step is to initialize the Hudson web user interface. For this, we need to open command prompt and go to the folder where Hudson war is kept.
- Type java -jar hudson-3.0.1.war –httpPort=8099
The above command would show that the Initial setup is required to be done on Hudson Dashboard. Refer the below screen.
(Click to enlarge image)
Note: It is advisable to start Hudson as a service on Windows or Linux machine.
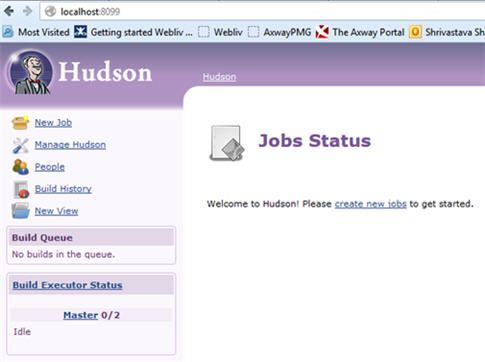
Step 3: To be able to access the Hudson window, open your browser and launch Hudson.
- Type “http://localhost:8099/” – This will open hudson window.
(Click to enlarge image)
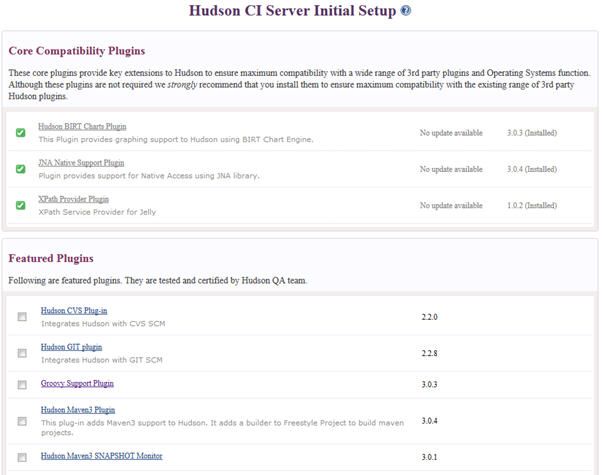
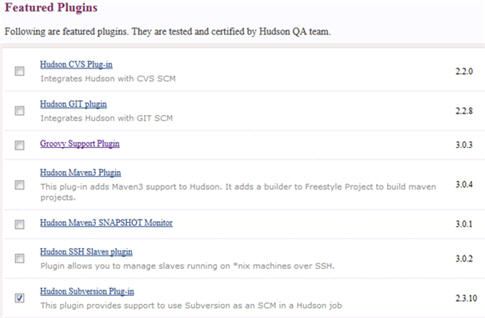
Step 4: Select the desired plugins and click on the Finish button. Please be patient as it is likely to take a few minutes to install all the plugins.
Note: There are several options available to provide support for SCM. Check mark the SCM option, you wish to use.
Once, all the plugins have been installed, user can view the Hudson Dashboard.
Hudson Configuration
Now that the Hudson Dashboard is ready, the next step is to configure the Hudson. Let us again discuss the entire process in steps:
Step 1: To configure the Hudson, click on the “Manage Hudson” link displayed in the left menu.
Step 2: Click on the “Configure System” link in the next step. Refer the following screenshot.
Step 3: As soon as you click on the Configure system link, numerous sections for connection parameters would be should. Add an entry to JDK as shown in the following figure. User needs to provide the name of the JDK installation and the location where java is installed. More than one Java instances can be added.
User can also install JDK automatically by checking a “Install automatically” checkbox.
Step 4: In the next step, add an entry to Ant as shown in the following figure. User needs to provide the name of the Ant installation and the location where Ant is installed locally.
Like JDK and Ant, user can configure other connection parameters.
Note: Always remember to uncheck the “Install automatically” checkbox. The checkbox should be selected in case if you wish to download the artifact from the internet.
Configuring Email Notification
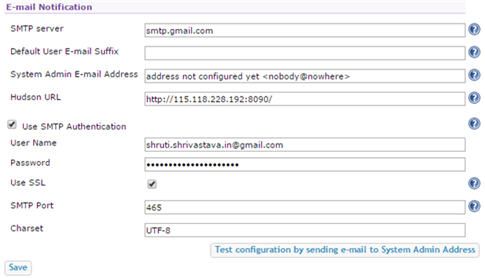
Email Notification section is shown in the end of the same webpage. User needs to configure the following fields:
Click on advanced button to see all the options related to Email Notification.
- SMTP server: SMTP Server stores the information about SMTP Server i.e. the IP number or fully qualified name of the server. For demonstration, In this tutorial, we will use Gmail’s SMTP server.
- Default User E-mail Suffix: An email suffix can be provided in this field which could be suffixed with the username and can be used to send the email notification.
- System Admin E-mail Address: Admin E-mail Address is used as a sender email id from which all the notifications would be sent.
- Hudson URL: If you are likely to publish reports or build information within the Email Notification, then Hudson URL needs to be provided. Hudson URL will be used to access the reports. A valid URL needs to be provided, however if all the receivers are connected to the intranet, then the IP address of the machine hosting Hudson can also be provided.
- Use SMTP Authentication: Enabling this option lets the username and password field appear for authentication purpose.
- Use SSL: User can activate SSL by selecting this option to connect with the SMTP Server.
- SMTP Port: User needs to provide the port number in this field which is used to communicate with the mail Server. If no port numbers are specified, then default port numbers are assigned.
- Charset: This field specifies the character set used to compose emails.
As we already mentioned that we would be using Gmail mail server to send email notification in this tutorial, refer the following screenshots and make the necessary changes in the Email Notification section.
Click on the Save button in order to save all the newly made changes.
Creating Hudson Project
Now that we have installed and configured the Hudson on to our machines, we shall move ahead and create Hudson Projects. Like, Hudson configuration, we have several configuration options for a Hudson Project. In this tutorial, we would shed light on the most useful and popularly used options and extensions.
To create and configure a new Hudson Project, follow the steps ahead:
Click on the “New Job” option displayed in the left menu. The following page would open which displays the options related to project creation and project styles.
There are numerous styles in which the project/job can be created. Take a note that project and job can be used interchangeably as they both tend to mean the same thing.
- Build a free-style software job: This is the most commonly used method to create a new Hudson Job.
- Build multi-configuration job: This style of project is used to execute variety of jobs.
- Monitor an external job: This style of project monitors an external job.
- Copy existing job: In case if we have a project similar to an existing project, then this style can be helpful. All you have to do is to specify the existing job’s name and the replica of this job would be created.
However, for this tutorial, we would create a free style Hudson project. Type in the name of the job you wish to create and click on the OK button. Clicking OK will land you to the Job’s configuration page as shown below:
Configuring Hudson Project
Once, we have created the Hudson job, it’s time to configure it. Like Hudson configuration, Hudson Job has also got various configuration settings. Let us discuss the important ones here.
To be specific, there are namely six types of settings to configure a job:
------------
- General Job Settings: This section allows the user to mention the basic information about the job. User can submit the job description, disable the job, parameterize the job, trash the older builds and can execute more than one build for the same job concurrently.
- Advanced Job Options: This section allows the user to configure some advanced options.
- Source Code Management: The section allows you to provide the settings related to Source Code Management system. Select “None” if no SCM is being used. Take a note that the user would be able to see only those SCM options whose plugin was installed at the time of Hudson installation. In order to add more SCM to the Hudson, user can visit the Manage Plugins page and can install the required plugins.
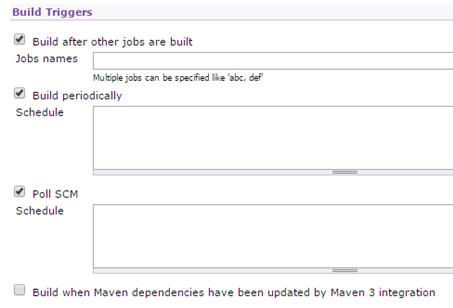
- Build Triggers: This section lets the user decide how to initiate the build execution.
- Build: This section lets the user provide the build mechanism settings.
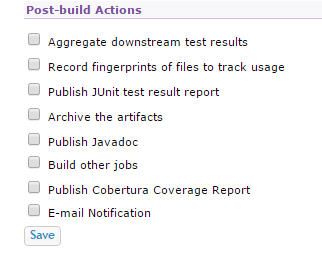
- Post-build Actions: This section lets the user provide settings to the post build actions that would be executed once the build execution is completion.
Let us take a step ahead and configure the job with the necessary settings. User can leave the options under “General Job Settings” and “Advanced Job Options” to their default state.
Configuring Source Code Management
We have been talking much about creation of Hudson project in the above sections of this tutorial. Hudson project is customarily used with an actual project (Source Code) which is linked to a particular Source Code Management System. As mentioned in the beginning of this tutorial, Hudson has a great support to variety of SCMs. To name a few, Hudson supports CVS, Git, SVN etc. Thus, in this tutorial, we will configure Subversion (SVN) as SCM.
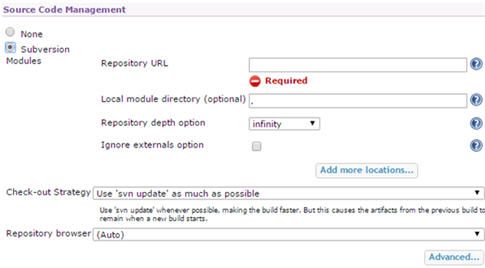
Step 1: Select “Subversion” option. As soon as the user selects Subversion, following options would appear.
Step 2: The next step is to provide the SVN’s “Repository URL”. As I have created a local repository, I would provide a local repository URL. A local repository can be created using Tortoise SVN.
Keep all the other settings in this section to default.
Selecting Build Triggers
The next step is to configure the build triggers. Hudson allows you to set triggers to initiate the build execution process automatically. User can configure the job to build automatically if any other project/job is built. Alternatively, user can also set the build to execute periodically i.e. scheduling the build execution or user can also schedule a build to look for fresh commits in the SCM and trigger execution if any or the user can also set to initiate the build execute whenever there is an update in the maven dependencies provided your project is a Maven based project.
To set these options, all you have to do is select the desired build trigger. User is also leveraged to select more than one option at a time.
While selecting any of the above triggers, user might have to provide some additional information specific to the trigger type.
- Build after other jobs are built: The name of the jobs which can trigger the execution of this job should be mentioned.
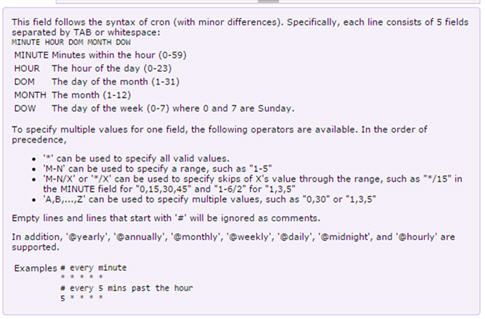
- Build periodically: The schedule should be mentioned. There is a specific protocol that needs to be followed to mention the schedule. More information on Schedule is shown below:
- Poll SCM: User needs to specify the schedule. The field acts same as that of “Build periodically”.
- Build when Maven dependencies have been updated by Maven 3 integration: This section doesn’t require any input to be submitted.
More information can be found by expanding the Help icons.
If the user doesn’t desire to set any of these build triggers, he/she can decide to build the job/project manually. All he/she has to do is to click on the “Build Now” link displayed in the left menu.
Invoking Build Steps
Now that we have seen all the basic steps to configure a build project, let us move ahead and add some more build steps. This section lets the user define his/her build with multiple build steps.
Each of the build steps has its own convention to define and invoke.
For instance, check out the ANT invocation below:
Configuring Post-build Actions
At times, it becomes necessary as well as vital to perform certain post build actions. Post build actions are nothing but some actions those are triggered once the build is executed. User is leveraged to trigger more than one post build action if he/she desires.
As we all know that the build execution statuses and reports are one of the most important artifacts or exit criteria for a Software development life cycle. Therefore, Hudson lets you publish the build execution report, generate documentations, generate executables/archives etc.
Test execution reports can be published and sent across to the stakeholders via Email. Results of this build can trigger the execution of another build.
Post build Actions are many, let us take a moment to discuss the most basic ones.
#1. Aggregate downstream test results – The setting lets the user aggregate the test execution results of this job and downstream jobs together to produce more impactful test results. All user needs to do is to provide the name of the downstream job. In case if the user doesn’t wish to provide any downstream job but still wishes to exploit the setting he can direct the Hudson to find all the downstream projects.
#2. Record fingerprints of files to track usage – The setting can be used by the user to track down where a particular file was used.
#3. Publish JUnit test result report – The setting allows the user to publish the JUnit test report by reading and understanding the custom report generated by JUnit. The JUnit test result report provides the user with a web interface to view the created reports. These reports can be sent over the mails to the stakeholders. To enable this option, all user is required to do is to provide the path to the custom report generated by JUnit.
#4. Archive the artifacts – This setting lets the user create artifacts which can be distributed for further use. The artifact can be produced after every successful build. These artifacts can directly be accessed by the user over the web interface. Artifacts can be release executables in the form of war files, jar files, zipped or tar folders.
#5. Publish Javadoc – This setting lets you publish the java doc to customers and users on the Hudson web interface provided your project generates the java doc. To enable this option, user is required to provide the location of the Java Doc against Javadoc directory.
If user checks mark the option “Retain Javadoc for each successful build”, the newly generated Javadoc would be saved in the specified folder. Thus, all the Javadocs corresponding to the successful build would be maintained.
#6. Build other jobs – The setting lets the user trigger the execution of other jobs once this job is executed. User can trigger execution of more than one job at the same time. The setting can be helpful to execute unit test and integration test scenarios. User can even set the option to build other jobs even if this job fails (unstable).
#7. Publish Cobertura Coverage Report – Cobertura is a java based testing tool which analyzes the code coverage of your project i.e. it assess the percentage of code covered by the tests. Thus the setting allows the user to generate a report with Code coverage analysis. The setting requires a few parameters to be provided before you can get a fully fledged testing report on code coverage. Take a note that this setting doesn’t come by default i.e. it requires a plugin to be installed (Which we did at the time of installation as it is generally a part of the suggested plugins).
(Click on image to enlarge)
#8. E-mail Notification – Email Notification is one of the most important post build action. The option lets the user send the build notification email to the stakeholders (developers, testers, product owners etc.) by configuring their email ids. Hudson can send the email when the build is unstable, successful, failed etc. User can also set E-mail Notification triggers. The notification email can be send to more than one recipient at the same time just by providing a white-space between their email ids. Refer the below screenshot to check how these settings can be provided.
(Click on image to enlarge)
Notes:
- User can anytime come back to this page and change the settings if required.
- User can view the information about each option within the help icon associated with it.
- User can add more post build actions with the help of plugins.
Conclusion:
In this tutorial, we made you acquainted with the concept of Continuous Integration. We also laid emphasis on its importance during a Software Development life cycle especially in a developer’s or tester’s life.
Next Tutorial #26: Moving ahead in the series, we would discuss about some advanced Selenium concepts that would directly or indirectly help in optimizing the Automation framework and brings more visibility to the users. Thus, in the next tutorial, we would discuss about the logging feature, its potential, debugging capabilities and much more

