利用maven创建webx3项目——实现简单的留言板(三)
创建留言板项目基础
1、创建项目
还是从创建项目开始,这次将项目的名称换一下,命令如下:
 mvn archetype:generate
 -DgroupId=com.alibaba.webx3
 -DartifactId=messageboard
 -Dversion=1.0-SNAPSHOT
 -Dpackage=com.alibaba.webx3
 -DarchetypeArtifactId=archetype-webx-quickstart
 -DarchetypeGroupId=com.alibaba.citrus.sample
 -DarchetypeVersion=1.0
 -DinteractiveMode=false
命令的作用,参考上一篇。
项目创建后,在项目目录下运行命令:
mvn eclipse:eclipse
就可以生成eclipse的项目,然后在eclipse中导入这个项目,可以看见其目录结构跟上一篇的一样,只是pom.xml中gruoId、artifactId以及包结构为上面命令中设置的参数。
2、创建包结构和模板目录等
这里我们新建一个子应用messageBoard。
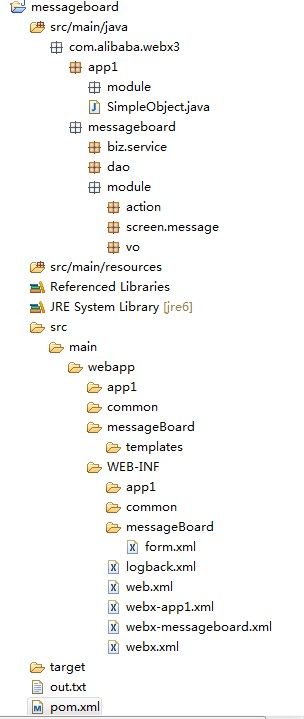
最后的目录结构为
其中包com.alibaba.webx3.messageboard就是留言板系统的代码包;
代码分为三个部分:module,service,dao
1)由于webx前端使用的是turbine框架,所以创建module实现接受页面数据和渲染页面的作用;
2)service主要负责业务逻辑的控制;
3)dao主要负责数据的操作。
webapp/messageboard/templates用来存放页面的模板vm文件;
WEB-INF/messageboard/form.xml是表单验证的配置文件;
WEB-INF/webx-messageboard.xml是子应用的webx配置;
3、配置文件
配置webx-messageboard.xml,如下:
--------------------------------------------------------------
<?xml version="1.0" encoding="UTF-8" ?>
<!-- Webx Sub Context Configuration.  -->
<beans:beans xmlns:xsi="http://www.w3.org/2001/XMLSchema-instance"
    xmlns:services="http://www.alibaba.com/schema/services"
    xmlns:ml-adapters="http://www.alibaba.com/schema/services/module-loader/adapters"
    xmlns:ml-factories="http://www.alibaba.com/schema/services/module-loader/factories"
    xmlns:beans="http://www.springframework.org/schema/beans"
    xmlns:p="http://www.springframework.org/schema/p"
    xsi:schemaLocation="
        http://www.alibaba.com/schema/services http://localhost:8080/schema/services.xsd
        http://www.alibaba.com/schema/services/module-loader/adapters http://localhost:8080/schema/services-module-loader-adapters.xsd
        http://www.alibaba.com/schema/services/module-loader/factories http://localhost:8080/schema/services-module-loader-factories.xsd
        http://www.springframework.org/schema/beans http://localhost:8080/schema/www.springframework.org/schema/beans/spring-beans.xsd
    ">

    <!-- 支持${xxx}替换。 -->
    <services:property-placeholder>
        <services:property key="component">messageBoard</services:property>
    </services:property-placeholder>

    <!-- 共享配置。 -->
    <beans:import resource="common/webx-component-and-root.xml" />
    <beans:import resource="common/webx-component.xml" />

    <!-- 执行管道。 -->
    <beans:import resource="common/pipeline.xml" />

    <!-- 表单验证。 -->
    <beans:import resource="messageBoard/form.xml" />

    <!-- 装载模块。 -->
    <services:module-loader>
        <ml-factories:class-modules>
            <ml-factories:search-packages type="$1" packages="com.alibaba.webx3.messageboard.module.*" />
        </ml-factories:class-modules>
    </services:module-loader>

</beans:beans>
其中![]() 设置“component”的属性值为“messageBoard”,这个值就是我们在webapp中新创建的文件夹messageBoard;
设置“component”的属性值为“messageBoard”,这个值就是我们在webapp中新创建的文件夹messageBoard;
![]() 导入两个webx子文件,共享其中的配置;
导入两个webx子文件,共享其中的配置;
![]() 配置pipeline.xml文件
配置pipeline.xml文件
![]() 配置表单验证配置文件form.xml
配置表单验证配置文件form.xml
![]()
![]() 配置moduleService,指定为我们创建的module
配置moduleService,指定为我们创建的module
--------------------------------------------------------------
common/webx-component-and-root.xml中配置了velocity渲染模板的路径,就是用到上面配置的“component”,还配置了名称的查找规则;
common/webx-component.xml中配置了pullService;
form.xml
--------------------------------------------------------------
<?xml version="1.0" encoding="UTF-8"?>
<beans:beans xmlns:xsi="http://www.w3.org/2001/XMLSchema-instance"
    xmlns:services="http://www.alibaba.com/schema/services"
    xmlns:fm-conditions="http://www.alibaba.com/schema/services/form/conditions"
    xmlns:fm-validators="http://www.alibaba.com/schema/services/form/validators"
    xmlns="http://www.alibaba.com/schema/services/form/validators"
    xmlns:beans="http://www.springframework.org/schema/beans"
    xmlns:p="http://www.springframework.org/schema/p"
    xsi:schemaLocation="
        http://www.alibaba.com/schema/services http://localhost:8080/schema/services.xsd
        http://www.alibaba.com/schema/services/form/conditions http://localhost:8080/schema/services-form-conditions.xsd
        http://www.alibaba.com/schema/services/form/validators http://localhost:8080/schema/services-form-validators.xsd
        http://www.springframework.org/schema/beans http://localhost:8080/schema/www.springframework.org/schema/beans/spring-beans.xsd
    ">

    <services:form postOnlyByDefault="true">
        <!--
          - ===============================================
          - 用来检查csrf token。
          - ===============================================
         -->
        <services:group name="csrfCheck">
            <services:field name="csrfToken">
                <csrf-validator>
                    <message>提交的数据已过期</message>
                </csrf-validator>
            </services:field>
        </services:group>
        <!--
          - ===============================================
          - login form
          - ===============================================
         -->
        <services:group name="login" extends="csrfCheck">
            <services:field name="username" displayName="你的名字">
                <required-validator>
                    <message>必须填写 ${displayName}</message>
                </required-validator>
            </services:field>
            <services:field name="password" displayName="你的密码">
                <required-validator>
                    <message>必须填写 ${displayName}</message>
                </required-validator>
            </services:field>
        </services:group>
        <!--
          - ===============================================
          - register form
          - ===============================================
         -->
        <services:group name="register" extends="csrfCheck">

            <services:field name="username" displayName="你的名字">
                <required-validator>
                    <message>必须填写 ${displayName}</message>
                </required-validator>
            </services:field>

            <services:field name="password" displayName="你的密码">
                <required-validator>
                    <message>必须填写 ${displayName}</message>
                </required-validator>
            </services:field>

            <services:field name="repassword" displayName="确认密码">
                <required-validator >
                	<message>必须填写 ${displayName}</message>
                </required-validator>
                <string-compare-validator equalTo="password" >
               		<message>两次密码不一致 </message>
                </string-compare-validator>
            </services:field>

        </services:group>


    </services:form>

</beans:beans>
--------------------------------------------------------------
配置webx.xml文件,将子应用messageboard作为项目的主应用,配置内容如下:
    ......

    <!-- 资源装载。 -->
    <beans:import resource="common/resources.xml" />

    <!-- URI生成。 -->
    <beans:import resource="common/uris.xml" />

    <!-- 综合设置。 -->
    <services:webx-configuration>
        <!-- 默认将productionMode设为true,建议在jetty插件中设置-DproductionMode=false。 -->
        <services:productionMode>${productionMode:true}</services:productionMode>
     <!-- <services:components defaultComponent="app1" />   -->
        <services:components defaultComponent="messageboard" />
    </services:webx-configuration>

     ......

