XML-RPC(远程调用)
The XmlRpcClient
xml-rpc java的下载路径
http://apache.freelamp.com/ws/xmlrpc/
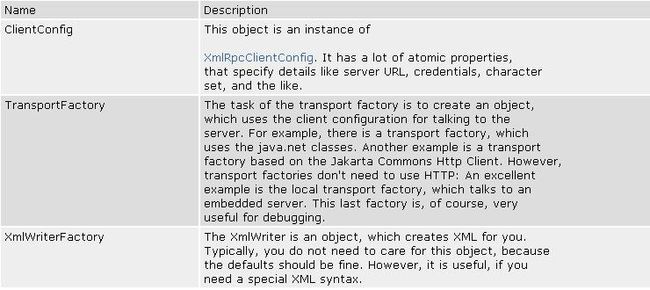
客户端的配置要设置下面几个对象。

例子如下:
利用默认的TransportFactory的客户端代码片段:
我们调用远程方法Calculator.add,输入参数2,3.得到预期结果。
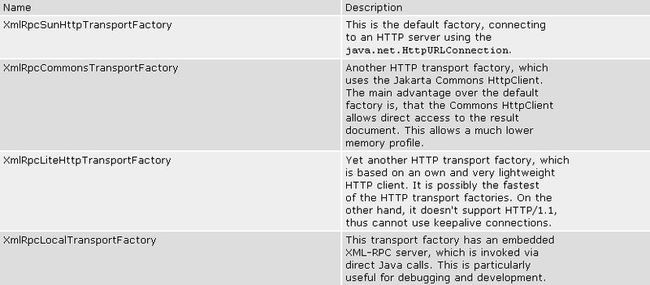
注意 :运行XmlRpcCommonsTransportFactory的时候出现异常 ,用到基于Jakarta HTTP Client的Factory时,因为这个开源包没有包含 Jakarta HTTP Client的jar包,因此需要到官网上下载这个jar包。
The Transport Factory

Server-side XML-RPC
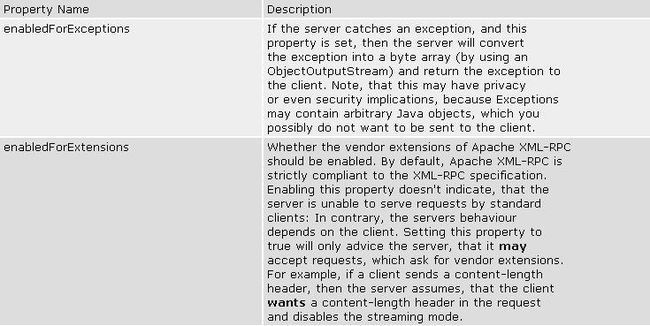
The Server configuration

从上面的server端代码可以看出:
可以有2中方式实现server端代码
和
下面这中情况需要建一个MyHandler.properties文件。
内容:
Calculator=org.apache.xmlrpc.demo.Calculator
对于server端,还可以这样写
用这种方式的话,必须有个XmlRpcServlet.properties这个文件
properties文件必须在org.apache.xmlrpc.webserver这个目录下
Calculator=org.apache.xmlrpc.demo.Calculator
xml-rpc java的下载路径
http://apache.freelamp.com/ws/xmlrpc/
客户端的配置要设置下面几个对象。

例子如下:
利用默认的TransportFactory的客户端代码片段:
public static void main(String[] args) throws Exception {
        // create configuration
        XmlRpcClientConfigImpl config = new XmlRpcClientConfigImpl();
        config.setServerURL(new URL("http://127.0.0.1:8080/XmlRpc"));
        config.setEnabledForExtensions(true);
        config.setConnectionTimeout(60 * 1000);
        config.setReplyTimeout(60 * 1000);
        XmlRpcClient client = new XmlRpcClient();
        // use Commons HttpClient as transport
        client.setTransportFactory( new XmlRpcSunHttpTransportFactory(client));//default TransportFactory
//        client.setTransportFactory( new XmlRpcLocalTransportFactory(client));
//        client.setTransportFactory( new XmlRpcLiteHttpTransportFactory(client));
//        client.setTransportFactory( new XmlRpcCommonsTransportFactory(client));

        // set configuration
        client.setConfig(config);
        // make the a regular call
        Object[] params = new Object[]{ new Integer(2), new Integer(3) };
        Integer result = (Integer) client.execute("Calculator.add", params);
        System.out.println("2 + 3 = " + result);

        // make a call using dynamic proxy
//        ClientFactory factory = new ClientFactory(client);
//        Calculator calculator = (Calculator) factory.newInstance(Calculator.class);
//        int sum = calculator.add(2, 4);
//        System.out.println("2 + 4 = " + sum);
    }
我们调用远程方法Calculator.add,输入参数2,3.得到预期结果。
注意 :运行XmlRpcCommonsTransportFactory的时候出现异常 ,用到基于Jakarta HTTP Client的Factory时,因为这个开源包没有包含 Jakarta HTTP Client的jar包,因此需要到官网上下载这个jar包。
The Transport Factory

Server-side XML-RPC
The Server configuration

private static final int port = 8080;

    public static void main(String[] args) throws Exception {
        WebServer webServer = new WebServer(port);
        XmlRpcServer xmlRpcServer = webServer.getXmlRpcServer();
        PropertyHandlerMapping phm = new PropertyHandlerMapping();
        /* Load handler definitions from a property file.
         * The property file might look like:
         *   Calculator=org.apache.xmlrpc.demo.Calculator
         *   org.apache.xmlrpc.demo.proxy.Adder=org.apache.xmlrpc.demo.proxy.AdderImpl
         */
       // phm.load(Thread.currentThread().getContextClassLoader(),"\\org\\apache\\xmlrpc\\webserver\\MyHandler.properties");

        phm.addHandler("Calculator", org.apache.xmlrpc.demo.Calculator.class);
//          phm.addHandler(org.apache.xmlrpc.demo.proxy.Adder.class.getName(),
//              org.apache.xmlrpc.demo.proxy.AdderImpl.class);
        xmlRpcServer.setHandlerMapping(phm);
        XmlRpcServerConfigImpl serverConfig = (XmlRpcServerConfigImpl) xmlRpcServer.getConfig();
        serverConfig.setEnabledForExtensions(true);
        serverConfig.setContentLengthOptional(false);
        webServer.start();
        System.out.println("Registered Calculator to \"Calculator\"");
		System.out.println("Now Accepting Requests ...");
    }
从上面的server端代码可以看出:
可以有2中方式实现server端代码
phm.addHandler("Calculator", org.apache.xmlrpc.demo.Calculator.class);
和
phm.load(Thread.currentThread().getContextClassLoader(),"\\org\\apache\\xmlrpc\\webserver\\MyHandler.properties");
下面这中情况需要建一个MyHandler.properties文件。
内容:
Calculator=org.apache.xmlrpc.demo.Calculator
对于server端,还可以这样写
private static final int port = 8080;

    public static void main(String[] args) throws Exception {
        XmlRpcServlet servlet = new XmlRpcServlet();
        ServletWebServer webServer = new ServletWebServer(servlet, port);
        webServer.start();
    	System.out.println("Now XmlRpcServlet Accepting Requests  ...");
    }
用这种方式的话,必须有个XmlRpcServlet.properties这个文件
properties文件必须在org.apache.xmlrpc.webserver这个目录下
Calculator=org.apache.xmlrpc.demo.Calculator