第七章 使用Intents与Phone Dialer——中
为给你的Activity分配正确的权限,你首先需要知道你需要分配什么权限。正确的例子是使用Dialer Activity。访问Dailer Activity被CALL_PHONE权限所管理。通过分配权限,Android可以让你的Intent启动Dialer Activity。
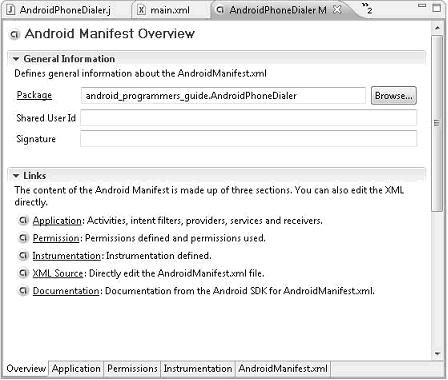
如何给Activity添加权限?你需要编辑Activity的Manifest。如果使用Eclipse的话,双击AndroidManifest.xml。这会打开Manifest预览窗口,如下所示:
要编辑Android的权限,点击Permissions链接,会把你带到Android Manifest Permissions窗口,如下所示:
该窗口列出了你当前为Activity分配的权限。假设你在新项目中工作,你不需要分配权限。因此,点击Add 按钮开始流程。在打开的对话框中,选择Uses Permission并点击OK。
回到Android Manifest Permissions窗口,在Name下拉列表中,选择android.permission.CALL_PHONE,如下所示。这就将CALL_PHONE权限添加到了你的Activity中。
由于你已经添加了CALL_PHONE权限。看一下AndroidManifest.xml文件。它应该类似如下:
<?xml version="1.0" encoding="utf-8"?>
<manifest xmlns:android=http://schemas.android.com/apk/res/android
package="android_programmers_guide.AndroidPhoneDialer">
<application android:icon="@drawable/icon">
<activity android:name=".AndroidPhoneDialer"
android:label="@string/app_name">
<intent-filter>
<action android:name="android.intent.action.MAIN" />
<category android:name="android.intent.category.LAUNCHER" />
</intent-filter>
</activity>
</application>
<uses-permission android:name="android.permission.CALL_PHONE">
</uses-permission>
</manifest>
最有意思的那行在文件的最后:
<uses-permission android:name="android.permission.CALL_PHONE">
</uses-permission>
这一行是由Eclipse的Android插件添加的。如果你想要亲自干,你可以直接编辑AndroidManifest.xml文件来分配权限。然而,如果你不确定你要添加什么权限或者用什么语法添加,你可以使用Manifest的向导。
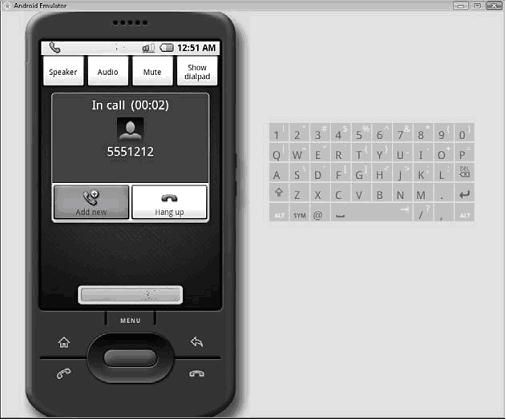
既然添加了权限,那就重编译你的恶Activity。你的模拟器现在应该可以拨号了,如下所示:
你创建的Activity用了一个Intent来启动设备的Call Activity并呼叫了555-1212号码。这演示了你可以如何方便的利用Intent。然而,这个应用离实际相差太远。也就是说,实际上会如何启动一个带有硬编码的电话号码的Activity,仅为了拨号?
下面的章节,你会更加具体地使用创建的应用,通过添加一个按钮,初始化CALL_ACTION Intent启动,和一个文本框,来使用户输入他们自己选择的电话号码。
修改AndroidPhoneDialer
本章为你演示,如何通过添加一些特性来更改你的AndroidPhoneDailer以是它更加具体一点。在本章结尾,你会很熟练的使用不仅仅是Intents,而且还有EditTexts和Buttons。
添加按钮
本章为你展示如何更改你的项目以增加一个按钮。不是在Activity启动时启动Intent,而是通过按钮启动。除了文本之外,按钮也是应用中最普遍的对象类型。
按钮构成了用户和应用之间的交互。了解如何在Android中创建和利用按钮对创建一个实用的,友好的Activity来说非常重要。
你将在main.xml中创建按钮。回想一下第五章,里面我们为你的Hello World!Activity创建了TextView。TextView有一个明显的结构,大概如此:
<View android:id=<id>
android:layout_width=<width>
android:layout_height=<height>
>
这种格式在视图中非常普通,而按钮也不例外。你用到的设置按钮的XML属性有 android:id,android:layout_width,andtoid:layout_height和android:text。这四个XML属性有效的描述了你的按钮,所以你可以在你的Activity中使用它。
1. Assign to your Button the ID callButton:
android:id="@+id/callButton"
2. Set layout_width and layout_height to fill_parent and wrap_content, respectively:
android:layout_width="fill_parent"
android:layout_height="wrap_content"
3. Set the text of the Button to “Show Dialer,” which is descriptive enough to identify
what the Button will do:
android:text="Show Dialer"
完整的带属性的按钮XML,看起来像:
<Button android:id="@+id/callButton"
android:layout_width="fill_parent"
android:layout_height="wrap_content"
android:text="Show Dialer" />
看一下完成的main.xml文件。按钮出现在了内容中了,并等着你去对它编码:
<?xml version="1.0" encoding="utf-8"?>
<LinearLayout xmlns:android=http://schemas.android.com/apk/res/android
android:orientation="vertical"
android:layout_width="fill_parent"
android:layout_height="fill_parent"
>
<Button android:id="@+id/callButton"
android:layout_width="fill_parent"
android:layout_height="wrap_content"
android:text="Show Dialer" />
</LinearLayout>
为了开始给按钮添加功能,你需要给AndroidPhoneDailer.java添加其它的包。这个包含在按钮视图中的包是
android.widget.Button;
现在你已经将按钮部件导入到了你的项目中。
这为开始编码给你提供了必要的信息。你在项目中的编码应用会在你的Activity中输出一个按钮,当点击时,启动Call Activity。Call Activity应该启动带“tel:5551212”的数据。屏幕的结果会和你原先的AndroidPhoneDialer一样。
描述的功能包括一些不同的概念。首先,你必须使用main.xml中创建的按钮属性编写一个按钮。其次,你需要创建一个功能,从你上一个项目中调用CALL_ACTION Intent代码。最后,你的按钮需要能够执行这个功能,并启动Intent。
创建按钮的属性是
final Button <button_name> = <button>
等号左侧在代码中创建了按钮。等号右侧是你从main.xml中调用按钮属性的地方。为了调用这些属性,你需要使用findViewById()并将结果类型限定为一个Button。这听起来要比实际上复杂。
记住,当你给main.xml添加一个按钮属性,你需要给按钮一个唯一的android:id,callButon,即被Eclipse的Android插件在id文件中所注册的R.id.callButton。通过传递id callButton使用findViewById()从main.xml中取出按钮属性。
findViewById(R.id.callButton)
不要忘记给结果类型限定为Button。
(Button) findViewById(R.id.callButton)
这个声明做成了等号的右侧部分。创建按钮的全部看起来像:
final Button callButton = (Button) findViewById(R.id.callButton);
现在你有了可用的按钮,但是你还需做些事情。这个按钮本身若无更多代码并不能做什么。如本例中,你需要让它执行CALL_ACTION Intent。因此你需要在你已存在的Intent call基础上创建一个小功能。当按钮被按下时会给你传递呼叫的内容。
这没啥大不了的,如果你熟悉Java编程的话。你需要安装onClick()方法,从前一节中调用Intent 代码。这个onClick()方法,将视图当做是一个参数。;然而,本项目中,onClick()本身并没有进行拨号:
public void onClick(View v){
Intent callIntent = new
Intent(Intent.CALL_ACTION,Uri.parse("tel:5551212"));
callIntent.setLaunchFlags(Intent.NEW_TASK_LAUNCH );
startActivity(callIntent);
}
应用剩下的最后一部分代码是绑定按钮和onClick的监听器。Java开发者应该熟悉监听器。对于那些不熟悉Java或监听器的人来说,监听器就是Java对象能监听其它对象的调用的方法。Android中的概念相同。你会在Android中创建监听器,让Android视图监听onClick方法。
对于该工程来说,你需要为你的按钮创建一个监听器,来监听来自Button Activity的onClick事件。当用户按下按钮,监听器就会调用onClick()方法。为了创建你所需的监听器,你要使用按钮的seOnClickListener()方法。
如果你熟悉Java开发,这种结构你不会陌生。这是Java中一个典型的onClickListener接口实现。你将看到的是利用Java匿名了类来执行Button的onClickListener事件。当然,作为匿名类,你也可以使用本地的变量——例如Button——如果变量定义为final.
setOnClickListener()方法带了一堆参数,第一个是个实例化的onClickListener()第二个是先前创建的onClick。你的setOnClickListener()看起来像:
callButton.setOnClickListener(new Button.OnClickListener() {
public void onClick(View v){
Intent callIntent = new
Intent(Intent.CALL_ACTION,Uri.parse("tel:5551212"));
callIntent.setLaunchFlags(Intent.NEW_TASK_LAUNCH );
startActivity(callIntent);
}
});
这个代码段表名,当callButton被按下时,onClickListener会在onClick中执行代码。Onclick中的代码会执行CALL_ACTION Intent并呼叫电话555-1212.
你最终的AndroidPhoneDialer.java看起来像:
package android_programmers_guide.AndroidPhoneDialer;
import android.app.Activity;
import android.os.Bundle;
import android.widget.Button;
import android.view.View;
import android.content.Intent;
import android.net.Uri;
public class AndroidPhoneDialer extends Activity {
/** Called when the activity is first created. */
@Override
public void onCreate(Bundle icicle) {
super.onCreate(icicle);
setContentView(R.layout.main );
/** Create the Button */
final Button callButton = (Button) findViewById(R.id.callButton);
/** Set the onClickListener to call the onClick */
callButton.setOnClickListener(new Button.OnClickListener() {
/** Use the onClick to call the existing Intent code */
public void onClick(View v){
Intent callIntent = new
Intent(Intent.CALL_ACTION,Uri.parse("tel:5551212"));
callIntent.setLaunchFlags(Intent.NEW_TASK_LAUNCH );
startActivity(callIntent);
}
});
}
}
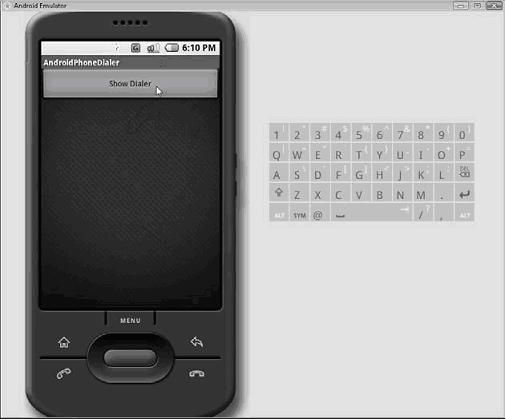
编译并在模拟器中运行该Activity。主Activity会显示一个名为Show Dialer的按钮。它会打开Call Activity并拨打555-1212.主Activity如下所示.
如你所见,Android是一个非常稳健和灵活的平台。利用相对较少的代码行,少于一页,你就创建了基于设备上的手机硬件,并通过一个按钮启动的Activity。通过这一点,你也应该熟悉了Android处理Activity、Intent和View的方式。
你的AndroidPhoneDialer Activity仍然不实用。你需要为它添加更多功能。本章的最后一节为你讲述如何利用EditText视图让你的用户输入电话号码。该号码会传递给CALL_ACTION Intent(而不是硬编码值tel:5551212)。


