android density
为什么要引入dip
—The reason for dip to exist is simple enough. Take for instance the T-Mobile G1. It has a pixel resolution of 320x480 pixels. Now image another device, with the same physical screen size, but more pixels, for instance 640x480. This device would have a higher pixel density than the G1.
—If you specify, in your application, a button with a width of 100 pixels, it will look at lot smaller on the 640x480 device than on the 320x480 device. Now, if you specify the width of the button to be 100 dip, the button will appear to have exactly the same size on the two devices.
—The density-independent pixel is equivalent to one physical pixel on a 160 dpi screen, the baseline density assumed by the platform (as described later in this document). At run time, the platform transparently handles any scaling of the dip units needed, based on the actual density of the screen in use. The conversion of dip units to screen pixels is simple: pixels = dips * (density / 160). For example, on 240 dpi screen, 1 dip would equal 1.5 physical pixels. Using dip units to define your application's UI is highly recommended, as a way of ensuring proper display of your UI on different screens.
跨屏幕的两种方式
—通过系统兼容模式
—程序员控制
两种主要控制方法
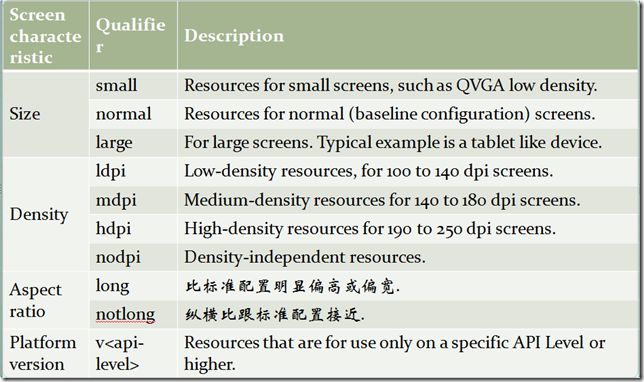
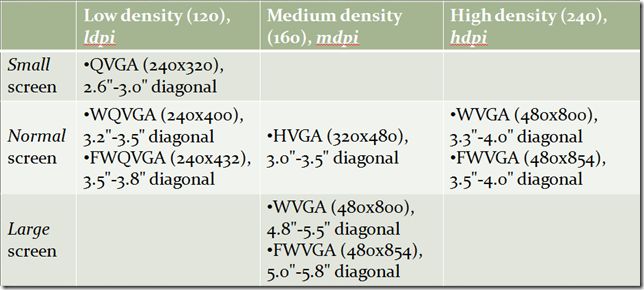
—The platform provides a set of resource qualifiers that let you provide size- and density-specific resources, if needed. The qualifiers for size-specific resources are large, normal, and small, and those for density-specific resources are hdpi (high), mdpi (medium), and ldpi (low).
—The platform also provides a element, whose attributes android:largeScreens, android:normalScreens, and android:smallScreens let you specify what generalized screen sizes your application supports. A fourth attribute, android:anyDensity, lets you indicate whether or not your application includes built-in support for multiple densities.
系统做了什么
—加载资源时进行缩放处理(如图片)
—对基于象素的坐标和尺寸进行自动缩放。For instance, suppose a given device is using a WVGA high-denisty screen, which is 480x800 and about the same size as a traditional HVGA screen, but it's running an app that states that it does not support multiple densities. In this case, the system will "lie" to the application when it queries for screen dimensions, and report 320x533. Then, when the app does drawing operations, such as invalidating the rectangle from (10,10) to (100, 100), the system will likewise automatically transform the coordinates by scaling them the appropriate amount, and actually invalidate the region (15,15) to (150, 150).
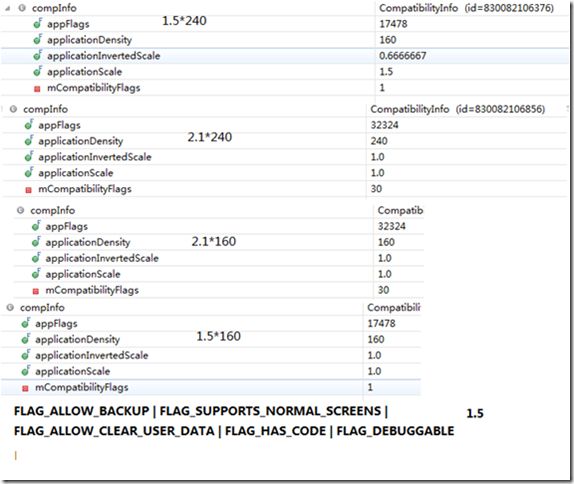
—在屏幕上开辟一个“模拟器”
上图是2.1版的设置画面,各版本的默认参数不大一样,1.6版以上默认全部为true,1.5版默认只有Normal screens一项为真。XML表述如下:
资源限定符
以指定密度启动模拟器
在命令行下运行emulator -avd youravdname -dpi-device 160
设计指导
—尽量使用wrap_content、 fill_parent 和dip。对于文字,则应该使用sp,它除了密度外还受用户偏好设置影响。
—避免使用AbsoluteLayout。
—不要直接使用象素。可使用ViewConfiguration取得系统定义的一些常量或带getScaled 前缀的方法。必须直接指定的话,可通过dip转换,如下:
final float scale = getContext().getResources().getDisplayMetrics().density;
mGestureThreshold = (int) (GESTURE_THRESHOLD_DIP * scale + 0.5f);
—使用特定密度或特定屏幕资源
本文来自CSDN博客,转载请标明出处:http://blog.csdn.net/zouxueping/archive/2010/05/18/5605332.aspx


