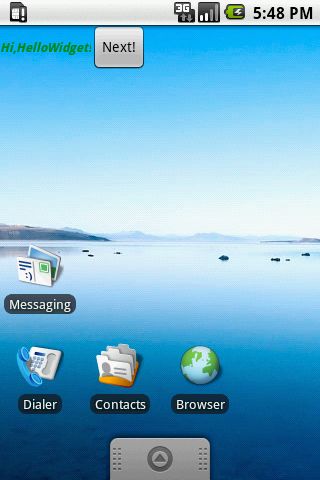
widget 第一步 HelloWidget 皆 widget模版
widge
[功能]
widget开发和别的应用程序还是有点不同的 因为其使用比较麻烦 所以今天打算建一个widget模版 把一些固定的东西写死 而把具体定制化内容 的地方 告诉大家 以后要使用的话 直接移过去就可以了
[思路]
1. 一个最基本的widget 的内容
2. 扩展内容 包括:
* startActivity(Intent)
* sendBroadcast(Intent)
[代码 步骤]
1. 创建无用的 initialActivity 用途是:运行该应用程序用 设置其属性为:
<activity android:name=".initialActivity"
                  android:label="@string/app_name">
            <intent-filter>
                <action android:name="android.intent.action.MAIN" />
                <category android:name="android.intent.category.LAUNCHER" />
            </intent-filter>
        </activity>
2. 定义该woidge 所包含的View 及 布局 wlayout.xml :
<?xml version="1.0" encoding="utf-8"?>
<LinearLayout xmlns:android="http://schemas.android.com/apk/res/android"
    android:orientation="horizontal"
    android:layout_width="fill_parent"
    android:layout_height="fill_parent"
    >
<TextView
    android:id="@+id/text"
    android:textSize="12px"
    android:textStyle="bold|italic"
    android:textColor="#008800"
    android:layout_width="wrap_content"
    android:layout_height="wrap_content" />
<Button
    android:id="@+id/next"
    android:text="Next!"
    android:layout_width="wrap_content"
    android:layout_height="wrap_content" />
</LinearLayout>
2. 定义该widget所需的属性文件 R.xml.wattra.xml 包括:
写道
1. 占用大小
2. 更新频率
3. 布局文件
2. 更新频率
3. 布局文件
<?xml version="1.0" encoding="utf-8"?>
<appwidget-provider xmlns:android="http://schemas.android.com/apk/res/android"
    android:minWidth="246dip"
    android:minHeight="22dip"
    android:updatePeriodMillis="1000"
    android:initialLayout="@layout/wlayout" />
3. 在提及widget之前 说说widget 的原理
写道
1.其实 widget 也是一种 BroadcastReceiver
2.其action = “android.appwidget.action.APPWIDGET_UPDATE”
2.其action = “android.appwidget.action.APPWIDGET_UPDATE”
写道
所以 我们的工作就是: 实现 AppWidgetProvider 的方法:
void onUpdate(Context context,
AppWidgetManager appWidgetManager,int[] appWidgetIds)
但是 因为 AppWidgetProvider 特殊上下文Context 的缘故 很多方法不可用
所以 我们打算把具体的刷新工作放在Service 然后通过startService 来启动之
void onUpdate(Context context,
AppWidgetManager appWidgetManager,int[] appWidgetIds)
但是 因为 AppWidgetProvider 特殊上下文Context 的缘故 很多方法不可用
所以 我们打算把具体的刷新工作放在Service 然后通过startService 来启动之
写道
本文中 这个Service 就是:WidgetUpdate
该Service 的实现如下:
public static class WidgetUpdate extends Service {
    	RemoteViews rview;

    	public void onStart(Intent intent, int startId) {

    		//to initial RemoteViews instance
    		rview = new RemoteViews(getPackageName(),
                    R.layout.wlayout);


    	}


    	@Override
    	public IBinder onBind(Intent arg0) {
    		// TODO Auto-generated method stub
    		return null;
    	}

}
写道
可能很多人对 RemoteView 感动奇怪 问:为什么不要findViewById()
那是因为方法:findViewById() 只在 Activity 中才可见
而 RemoteView 的作用 还是贴一下source 里面的注释把。
/**
* A class that describes a view hierarchy that can be displayed in
* another process. The hierarchy is inflated from a layout resource
* file, and this class provides some basic operations for modifying
* the content of the inflated hierarchy.
*/
public class RemoteViews implements Parcelable, Filter
注意关键字: "in another process"
4. 因为widget 肯定要接收外界的一些信息/数据 而工具就是:BroadcastReceiver 所以需要定义一个BroadcastReceiver 我们定义其为:WidgetInfoListenerHelper
public class WidgetInfoListenerHelper extends BroadcastReceiver {
    		Context context;

    		WidgetInfoListenerHelper listener;

    		//construct
    		public WidgetInfoListenerHelper(Context c){
    			context = c;

    			//to instance it
    			listener = this;
    		}

    		public void registerAction(String action){
    			IntentFilter filter = new IntentFilter();
    			filter.addAction(action);

    			context.registerReceiver(listener,filter);
    		}

    		@Override
    		public void onReceive(Context arg0, Intent arg1) {
    			// TODO Auto-generated method stub
    			Bundle b = arg1.getExtras();

    			if(b.containsKey(HelloHelper.MessageWidgetText)){
    				String string = b.getString(HelloHelper.MessageWidgetText);
    				updateText(string);
    			}


    		}

    	}
写道
在WidgetUpdate.onStart() 注册为:
//to register an BroadcastReceiver to listen update message
WidgetInfoListenerHelper helper = new WidgetInfoListenerHelper(this);
helper.registerAction(HelloHelper.BroadcastHelloWidget);
//to register an BroadcastReceiver to listen update message
WidgetInfoListenerHelper helper = new WidgetInfoListenerHelper(this);
helper.registerAction(HelloHelper.BroadcastHelloWidget);
5. 其他:
* startActivity(Intenr)
写道
因为桌面的空间有限 所以一般只会在widget中显示一下粗略信息 当有比较多的信息时 把之放入Activity 而在widget上注册一个单击监听器 来启动目标Activity 来显示详细信息
public void setViewActivityClickListener(RemoteViews remte,int id,Intent i){

    		PendingIntent pi = PendingIntent.getActivity(this,1,i,0);

    		remte.setOnClickPendingIntent(id, pi);
    	}
如何使用:
setViewActivityClickListener(rview,R.id.text,
    				new Intent(this,HelloActivity.class));


如此 当点击View: R.id.text 就会进入目标Activity:HelloActivity
* sendBroadcast(Intent)
写道
上面有提过怎么接受Broadcast 那应该怎么发生Broadcast 呢? 也可以在View上 注册 监听器
public void setViewBroadcastClickListener(RemoteViews remte,int id,String filter){
    		Intent i = new Intent(filter);

    		PendingIntent pi = PendingIntent.getBroadcast(this,1,i,0);

    		remte.setOnClickPendingIntent(id, pi);
    	}
如何使用:
setViewBroadcastClickListener(rview,R.id.next,HelloHelper.BroadcastDestTaskNext);


如此 当点击View:R.id.next 就会发生 action=HelloHelper.BroadcastDestTaskNext 的 BroadcastReceiver
5. 最后一个问题:改动widget显示的内容, 比如:
* 改动文字:
RemoteViews.setTextViewText()
* 改动图片资源
RemoteViews.setImageViewBitmap()
*
写道
补充 任何View 改动 都必须 刷新widget 才会生效 如何刷新
public void notifyViewChanged(){
// Push update for this widget to the home screen
ComponentName batteryWidget = new ComponentName(this, HelloWidget.class);
AppWidgetManager manager = AppWidgetManager.getInstance(this);
manager.updateAppWidget(batteryWidget, rview);
}
public void notifyViewChanged(){
// Push update for this widget to the home screen
ComponentName batteryWidget = new ComponentName(this, HelloWidget.class);
AppWidgetManager manager = AppWidgetManager.getInstance(this);
manager.updateAppWidget(batteryWidget, rview);
}
6. emulator 运行截图:
done!
