android中的UI控制(二)
android中的UI控制(二)
转载自 : http://www.android777.com/index.php/tutorial/androids-ui-control-b.html
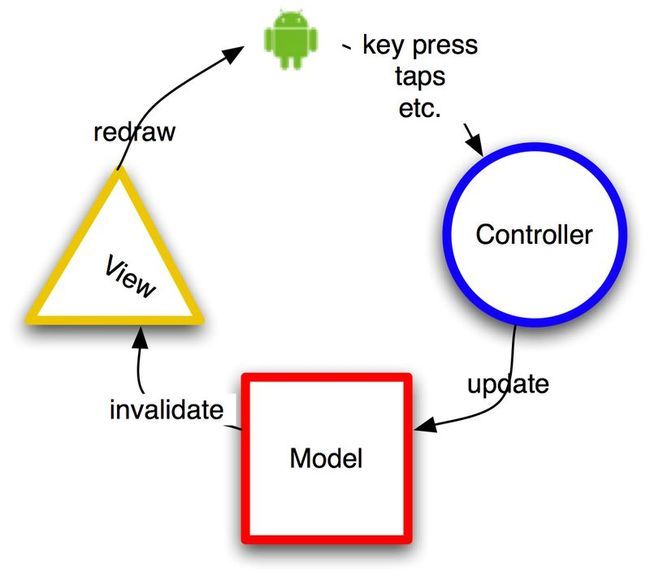
上一篇 我们讲到android中创建UI的几种方式,用户应该可以根据学到的内容创建简单的界面。这边我们再看一下android SDK里面提供的一些简单控件的用法,包括:文本控制、按钮、checkbox、radio等,然后接下来是稍微复杂点的控件如用来显示列表的ListView、Grid、Gallery等,最后是更复杂的mapview对象。 首先我们要先了解下Android中GUI的架构。Android SDK中提供的GUI控件,实际上是融合了AWT、swing、SWT等技术,所以整个UI框架的设计和代码编写与Java GUI的形式差不多。它是一个单线程(只有一个UI线程)的、事件驱动的模型,使用MVC模式。用户编写Controller来处理按钮点击、失去焦点、用户输入等事件,然后在Controller中可以改变数据模型,然后UI线程将图形信息展示到屏幕上。
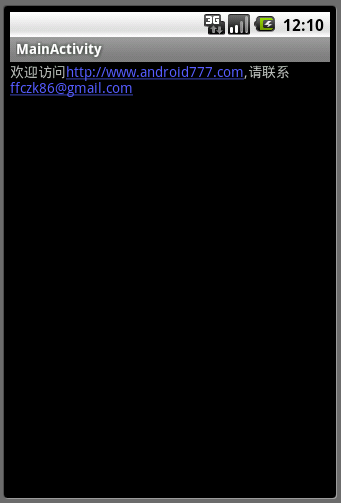
模型层: 任意需要显示的数据信息。可以是联系人信息、短信信息、通话信息等。 视图层: 数据的表达形式,像联系人以列表的形式显示之类的。如一个MP3播放器中的播放、暂停、停止等按钮。整个UI视图层是一个树形结构,通过先序遍历的方式遍 历整棵树画出UI界面。就是每个视图里的子节点先画出自己,然后再画出它的子节点们,所以离根节点越近越早被系统绘制出来,子节点视图将呈现在父节点的之 上。 整个UI框架的绘制过程当然比上面描述的复杂、高效。因为既然子节点会挡住父节点,那如果子节点不是透明的,那么被子节点挡住的部分或全部父节点视图则可 以不用绘制,减少资源消耗。而且每次底层模型层发生变化时,其实只需要绘制变化的部分即可。 控制层: 控制层是对外部事件做出反应的部分如:触摸屏幕、点击按键等。所有的事件排成一个队列,按照FIFO(先进先出)的队列顺序由UI线程进行处理。 当用户按键盘一个按键时,系统就会产生一个键盘事件(KeyEvent),然后将这个事件加入到事件队列(Event Queue),当队列中排在它前面的事件被处理完之后,系统就将键盘事件从事件队列中移除,然后分发给各个视图进行响应。如在MP3播放器中,当音乐在播 放时,如果用户点击暂停按钮,则系统就会产生一个按钮事件,添加到事件队列,事件队列发现该事件后就会移除它,然后分发给对应的按钮对象进行处理,按钮对 象则会调用这个按钮的对应控制代码,暂停播放,然后更新按钮的状态为暂停状态。这时候视图层发现按钮状态变化则对应更新视图显示暂停状态。 通过以上分析应该对Android中GUI的架构有一些认识,它使用的是跟java GUI一样的模型,所以最好不要在UI的事件代码里进行一些耗时的堵塞操作,因为这样会让界面停止响应其他请求。要做复杂的计算或网络请求等堵塞操作时请 记得开启另一个线程执行以让UI线程整随时正常响应。 接下来我们先了解一下Android SDK提供的一些简单的UI控件的使用方法,这边分为几个类别来学习,首先先了解文本控制 : 从TextView、EditText、AutoCompleteTextView和MultiCompleteTextView几个控件的使用方法开始看。 TextView: TextView用来显示一些不能编辑的文本信息,看起来它就像是GUI里常见的Label,但是其实它不止是Label那么简单。它还提供一些独特的控 制功能,如可以将TextView里面的网址和Email链接转换成链接形式。在xml布局中使用属性:android:autoLink。
<?xml version="1.0" encoding="utf-8"?>
<LinearLayout xmlns:android="http://schemas.android.com/apk/res/android"
    android:layout_width="fill_parent"
    android:layout_height="fill_parent"
    >
	<TextView
		android:id="@+id/textview1"
		android:layout_width="wrap_content"
   		android:layout_height="wrap_content"
   		android:autoLink="all"
	    android:text="欢迎访问http://www.android777.com,请联系 [email protected]"
	    />
</LinearLayout>
效果图如下(图1):
图1
当然也可以通过代码直接设置这个autoLink功能:
把下面代码从xml文件中移除:
android:autoLink="all"
然后在Activity代码中加上:
        TextView tv = (TextView)findViewById(R.id.textview1);
        Linkify.addLinks(tv,Linkify.ALL);
执行后,同样可以得到上面(图1)所示的效果。
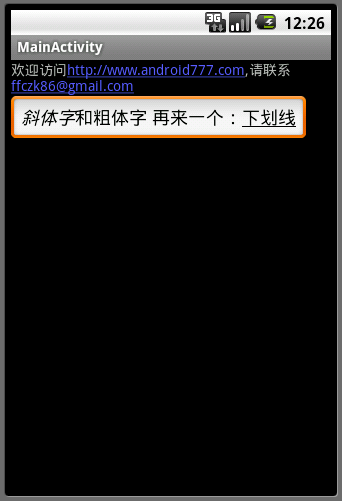
EditText: EditText是TextView的子类,EditText扩展了TextView使其具备能编辑文字的能力。你可以设置EditText的很多控制功 能:capitalize(首字母大写)、只允许输入数字、当成密码输入框等。还可以引用一些有定义样式的文本内容像是:斜体、粗体、下划线。 在res\values\string.xml里添加
<string name="text1"><i>斜体字</i>和<b>粗体字</b> 再来一个:<u>下划线</u></string>
然后布局文件为:
<?xml version="1.0" encoding="utf-8"?>
<LinearLayout xmlns:android="http://schemas.android.com/apk/res/android"
	android:orientation="vertical"
    android:layout_width="fill_parent"
    android:layout_height="wrap_content"
    >
	<TextView
		android:id="@+id/textview1"
		android:layout_width="wrap_content"
   		android:layout_height="wrap_content"
   		android:autoLink="all"
	    android:text="欢迎访问http://www.android777.com,请联系 [email protected]"
	    />
    <EditText
        android:id="@+id/edittext1"
        android:layout_width="wrap_content"
        android:layout_height="wrap_content"
        android:text="@string/text1"
    />
</LinearLayout>
效果图如下(图2):
图2
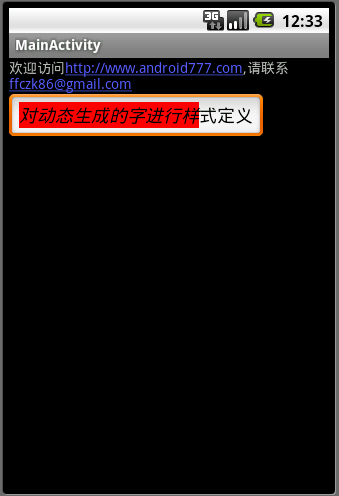
也可以使用代码动态生成样式:
        EditText et = (EditText)findViewById(R.id.edittext1);
        et.setText("对动态生成的字进行样式定义");
        Spannable spn = et.getText();
        spn.setSpan(new BackgroundColorSpan(Color.RED), 0, 10,
        		Spannable.SPAN_EXCLUSIVE_EXCLUSIVE);
        spn.setSpan(new StyleSpan(android.graphics.Typeface.BOLD_ITALIC)
        , 0, 10, Spannable.SPAN_EXCLUSIVE_EXCLUSIVE);
效果图如下(图3):
图3
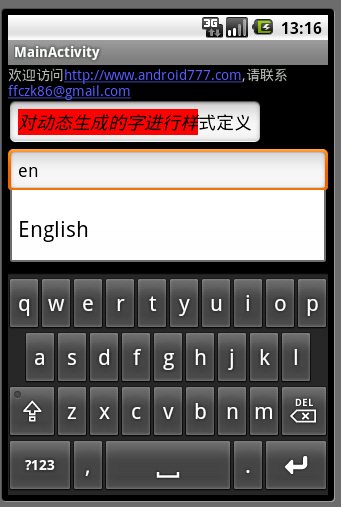
AutoCompleteTextView: AutoCompleteTextView继承了EditText,添加了额外的AutoComplete功能。用户需要先设置一个Adapter以提供 AutoComplete所需的数据源(AutoComplete就像是使用Google或百度搜索时提示的建议搜索词)。它实际上由2部分组成:一个是 EditText用来输入字符,另一个是建议列表的List。用户需要在代码中指定如何显示AutoComplete的建议列表。
布局文件:
<?xml version="1.0" encoding="utf-8"?>
<LinearLayout xmlns:android="http://schemas.android.com/apk/res/android"
	android:orientation="vertical"
    android:layout_width="fill_parent"
    android:layout_height="wrap_content"
    >
	<TextView
		android:id="@+id/textview1"
		android:layout_width="wrap_content"
   		android:layout_height="wrap_content"
   		android:autoLink="all"
	    android:text="欢迎访问http://www.android777.com,请联系 [email protected]"
	    />
    <EditText
        android:id="@+id/edittext1"
        android:layout_width="wrap_content"
        android:layout_height="wrap_content"
        android:text="@string/text1"
    />
    <AutoCompleteTextView
    	android:id="@+id/actv"
        android:layout_width="fill_parent"
        android:layout_height="wrap_content"
    />
</LinearLayout>
Activity代码中增加:
        AutoCompleteTextView actv = (AutoCompleteTextView) findViewById(R.id.actv);
        ArrayAdapter<String> adapter = new ArrayAdapter<String>(this,
                android.R.layout.simple_dropdown_item_1line,
                new String[] {"English", "Hebrew", "Hindi",
        		"Spanish", "German", "Greek" });
        actv.setAdapter(adapter);
上面代码读取了一个AutoCompleteTextView对象,然后设置ArrayAdapter作为建议的数据源,然后将其绑定到AutoCompleteTextView对象(通过setAdapter方法)。
效果图如下(图4):
图4
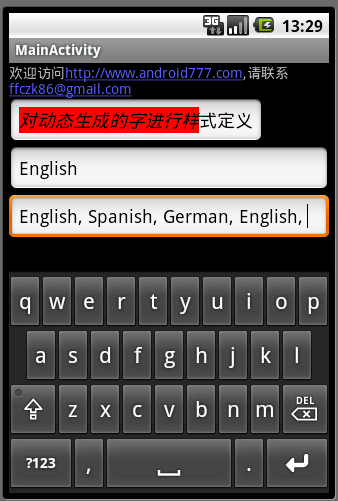
MultiAutoCompleteTextView: MultiAutoCompleteTextView继承了AutoCompleteTextView,扩展了它的建议功能。因为在使用 AutoCompleteTextView时有一个不便的地方是:它做的是整个TextView中文本信息的全匹配。假设你要输入的是一个句子而又要具备 能提示里面单词的功能的话AutoCompleteTextView就完成不了,因为它会将整个句子都作为匹配对象所以无法进行单词建议,而 MultiAutoCompleteTextView则解决了这个问题,它会根据用户所打的字进行匹配而不是整个TextView中的文本信息,它的使用 方法跟AutoCompleteTextView差不多。如下:
布局文件:
<?xml version="1.0" encoding="utf-8"?>
<LinearLayout xmlns:android="http://schemas.android.com/apk/res/android"
	android:orientation="vertical"
    android:layout_width="fill_parent"
    android:layout_height="wrap_content"
    >
	<TextView
		android:id="@+id/textview1"
		android:layout_width="wrap_content"
   		android:layout_height="wrap_content"
   		android:autoLink="all"
	    android:text="欢迎访问http://www.android777.com,请联系 [email protected]"
	    />
    <EditText
        android:id="@+id/edittext1"
        android:layout_width="wrap_content"
        android:layout_height="wrap_content"
        android:text="@string/text1"
    />
    <AutoCompleteTextView
    	android:id="@+id/actv"
        android:layout_width="fill_parent"
        android:layout_height="wrap_content"
    />
    <MultiAutoCompleteTextView
    	android:id="@+id/mactv"
        android:layout_width="fill_parent"
        android:layout_height="wrap_content"
    />
</LinearLayout>
Activity代码中增加:
        MultiAutoCompleteTextView mactv = (MultiAutoCompleteTextView)findViewById(R.id.mactv);
		ArrayAdapter<String> aa2 = new ArrayAdapter<String>(this,
			android.R.layout.simple_dropdown_item_1line,
			new String[] {"English", "Hebrew", "Hindi", "Spanish", "German", "Greek" });
		mactv.setAdapter(aa2);
		mactv.setTokenizer(new MultiAutoCompleteTextView.CommaTokenizer());
如上,对比它与AutoCompleteTextView,它只多了一行代码:
mactv.setTokenizer(new MultiAutoCompleteTextView.CommaTokenizer());
这行代码的意思是当用户输入“,”时,匹配往后的字符将重新开始单词匹配,匹配介绍后会自动加上“,” ,然后后面的字符又将重新开始匹配。代码运行的效果如下(图5):
图5
