Cocos2d-x 地图行走的实现1:图论与Dijkstra算法
本文的实现基于Cocos2d-x 3.2。
本文,我们最终实现的地图行走效果如下2图:
下面是2张屏幕录制的gif动画图,有点大,看不到的话,耐心等待一下,或者刷新页面试试。
1.什么是地图行走
很多游戏会有一个“世界”的概念。玩家在这个世界中行走,到达不同的地方去执行的任务,打怪或者是触发剧情等。下图是《锁链战记》的世界地图的截图。
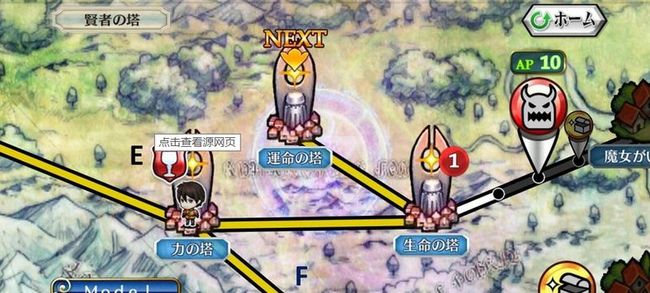
不同游戏的世界地图行走表现不同,以锁链战记为例,对于打过的关卡,玩家角色是直接瞬移过去的。对与未打过的关卡,有一个玩家角色行走过去的动画。另一些游戏的地图行走则是到达任何地方都有玩家角色的行走动画。我个人比较青睐于后者。《锁链战记》的瞬移设计,可能是出于这样的考虑:行走动画的播放需要耗费时间,有时候看起来比较烦,拖慢游戏节奏。但行走动画,有一个“走过去的过程”,能更加表现现实,更有代入感。这是一个游戏策划的问题了,到底是瞬移过去,还是走过去。一个折中的方案是,任何行走都控制在指定的一段时间内完成。这样既有代入感也不会拖慢游戏节奏。
一般来说,制作行走过程要比直接瞬移复杂。做出了行走过程要改成瞬移是不难的,但反之则有点麻烦。所以,下面我们先实现地图行走。
2.图论简介
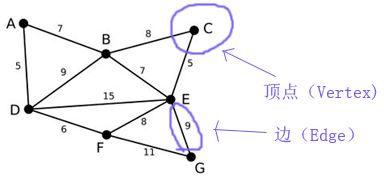
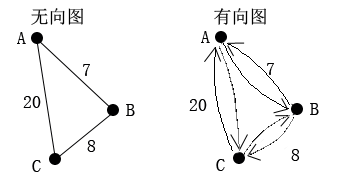
仔细观察游戏的世界地图就会发现,除去界面表现后,地图的结构非常类似《离散数学》或《数据结构》中的图论。图论的图表示如下图所示:
上图中,实心圆形在图论中叫做顶点(Vertex),连接2个顶点之间的线段叫做边(Edge)。顶点和边都是抽象的,顶点没有几何位置信息,边通常只是表示2个顶点之间有通路和这条通路的路过的代价。代价也是一个抽象的概念,上图中,顶点A到顶点B的代价是7,可以表示城堡A到城堡B的路程是7公里,也可以表示城堡A到城堡B的路费是7英镑。
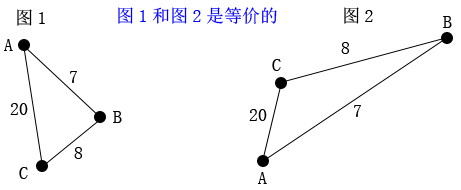
下图中,图1和图2是等价的,尽管它们的几何形态不同。
判断它们相同的依据是:顶点相同,边相同,边上的代价也相同。因为顶点没有几何位置信息,所以把顶点A放在任何几何位置都可以,只要它到顶点B的代价不变(7),到顶点C的代价不变(20)。如果A到B的代价改变了,从7变到了50,那么图就改变了,尽管顶点A、B的几何位置不变。老实说,图论的这种抽象,让我刚接触图论时多少有点不适应。(学美术出身的我总是会关注图像的形态,之前总是觉得看起来的样子不同就是不同)但这种抽象恰恰是数学和编程解决问题的精妙之处。
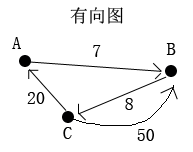
以上说的是无向图。无向图就是图的边是没有方向的。如果,顶点A到顶点B之间有一条边,就认为可以从A到B也可以从B到A。还有另一种图是有向图,有向图如下所示:
有向图就是图的边是有方向的。如上图所示,顶点A到顶点B有一条有向边,但这条边只表示能从A到B,而B没有一条到A的有向边,所以不能从B直接到A。从B到A只有先到C再从C到A。有向图有自己的一些概念术语,顶点A和顶点B之间的那条边,对于顶点A来说叫做出度,对于顶点B来说叫做入度。为了让解释更加易懂,下面我们称出度叫出边,入度叫入边吧。
有向图一般用来表示什么含义呢?某些城市的某些路段是车辆单行线的,因为某种原因,扩路困难但同时某个方向的车流量又大,所以规定车辆只能往一个方向走。这种情况就可以用有向图来表示了。
上图中,顶点B到顶点C的代价是8,而反过来顶点C到顶点B的代价是50。这又是什么情况呢?
情况1:假设B是山顶位置,C地山底位置,从山顶徒步下山耗费的体力是8,而要徒步上山耗费的体力是50。C到B还可以另加一条代价是1的边。表示坐缆车上山只需要耗费1的体力。这种建模,可以用来做某种策略的计算,比如:计算最节省体力达到山顶的策略。
情况2:图可以表示从一点到另一点驾车所耗费的时间。Siliphen驾车从家B出发,到达了途中的一个位置C,这时突然想起有一个重要文件落在家B了,需要回去取。B到C的时间是8分钟,而因为路况问题,下班车辆单向高峰期等原因,从C到B需要50分钟。Siliphen回家取文件的最快策略应该是先花费20分钟开车到A,再从A花费7分钟到B。总体耗时27分钟。
可以看到有向图很有用,可以为情况建模并设计算法去计算出要达到某种目的的策略。
有向图可以用2条有向边来模拟无向图的一条无向边。如下图所示:
3.图论的数据结构的实现
图是一种很重要的数据结构。路径寻找、人工智能、策略选择等都会用到。
一般来说有向图能够比无向图表达更多的内容,同时有向图也能够模拟出无向图。所以,这里我们选择实现有向图。
我们的目标是:“自己写一个图论的数据结构的类封装,在这里可以用来表示世界地图和寻路计算。也可以作为不同的使用目的、用在别的使用不同技术的项目中,例如:QT,MFC等。”
要做类封装,第一件事就是抽象出类了,什么东西应该成为一个类。我个人有一个经验:你看到的或者你意识到存在的东西都可以考虑定为一个类。从图中,我们看到了顶点和边。OK,我们有2个类了:class Vertex , class Edge。顶点和边的集合构成一张图。OK,class Graph 类有了。
图的数据结构表示通常有2种。1.邻接矩阵 2.邻接表。邻接表较为常用。如果邻接表的顶点类只保存其出度的信息,对于查询该顶点的入度信息就比较麻烦了,需要遍历其他所有的顶点来确定哪些顶点的出度是指向该顶点的。所以,也可以增加一个入度信息表来方便查询入度信息,这个做法称为逆邻接表。
我的封装实现是邻接表,顶点类Vertex有出边信息也有入边信息。因为,需要维护入边信息,所以插入、删除顶点和边的操作会复杂一些。
下面是我的有向图的封装的实现代码:
头文件:
- #pragma once
- #include <vector>
- #include <unordered_map>
- using namespace std ;
- class Edge ;
- class Vertex ;
- class Graph ;
- class GraphPathfinding ;
- /*
- 图顶点
- */
- class Vertex
- {
- friend class Graph ;
- friend class GraphPathfinding ;
- friend class Dijkstra ;
- public:
- Vertex( const string& Name )
- {
- m_strId = Name ;
- m_Cost = 0 ;
- m_pGraph = 0 ;
- }
- ~Vertex( ) { };
- public:
- // 附加数据
- unordered_map< string , void*> UserData ;
- public :
- const unordered_map< string , Edge* >& GetEdgesOut( ) const { return m_EdgesOut ; }
- const unordered_map< string , Edge* >& GetEdgesIn( ) const { return m_EdgesIn ; }
- const string& GetId( ) const { return m_strId ; }
- const string& GetText( ) const { return m_Text ; }
- void SetText( const string& Text ) { m_Text = Text ; }
- Graph * GetGraph( ) { return m_pGraph ; }
- protected:
- // 出边集合
- unordered_map< string , Edge* > m_EdgesOut ;
- // 入边集合
- unordered_map< string , Edge* > m_EdgesIn ;
- // 节点表示的字符串
- string m_Text ;
- // 节点的ID
- string m_strId ;
- // 用于寻路算法。路径代价估计
- int m_Cost ;
- // 所属的图
- Graph * m_pGraph ;
- };
- /*
- 图顶点的边
- 有向边
- */
- class Edge
- {
- friend class Graph ;
- public:
- Edge( )
- {
- m_Weight = 0 ;
- m_pStartVertex = m_pEndVertex = 0 ;
- }
- Edge( Vertex* pStartVertex , Vertex* pEndVertex , int Weight = 0 )
- {
- m_Weight = Weight ;
- m_pStartVertex = pStartVertex ;
- m_pEndVertex = pEndVertex ;
- }
- public:
- int GetWeight( ) const { return m_Weight ; }
- void SetWeight( int var ) { m_Weight = var ; }
- Vertex* GetStartVertex( ) const { return m_pStartVertex ; }
- Vertex* GetEndVertex( ) const { return m_pEndVertex ; }
- protected:
- // 边的权值
- int m_Weight ;
- // 起点的顶点
- Vertex * m_pStartVertex ;
- // 终点的顶点
- Vertex * m_pEndVertex ;
- };
- /*
- 图.
- 图会负责释放顶点和边的内存
- */
- class Graph
- {
- public :
- Graph( ) ;
- ~Graph( ) ;
- public :
- // 添加一个顶点
- void AddVertex( Vertex* pV ) ;
- // 删除一个顶点
- void DeleleVertex( const string& VertexName ) ;
- // 添加一条边。返回边对象
- Edge* AddEdge( const string& Vertex1Name , const string& Vertex2Name , int Weight = 0 ) ;
- // 删除一条边
- void DeleteEdge( const string& StartVertexName , const string& EndVertexName ) ;
- public :
- const unordered_map< string , Vertex* >& GetVertexes( ) const { return m_Vertexes ; }
- protected:
- // 顶点的集合
- unordered_map< string , Vertex* > m_Vertexes ;
- // 边的集合。Key的格式“顶点1name->顶点2name"
- unordered_map< string , Edge* > m_Edges ;
- protected:
- #define GetEdgeKey( pV1 , pV2 )( pV1->m_strId + "->" + pV2->m_strId ) ;
- };
实现文件:
- #include "Graph.h"
- Graph::Graph( )
- {
- }
- Graph::~Graph( )
- {
- // 释放所有顶点
- for ( auto& kv : m_Vertexes )
- {
- delete kv.second ;
- }
- // 施放所有的边
- for ( auto& kv : m_Edges )
- {
- delete kv.second ;
- }
- }
- void Graph::AddVertex( Vertex* pV )
- {
- if ( m_Vertexes.find( pV->GetId( ) ) != m_Vertexes.end( ) )
- {
- // 已经存在相同Key的顶点
- }
- m_Vertexes[ pV->GetId( ) ] = pV ;
- pV->m_pGraph = this ;
- }
- void Graph::DeleleVertex( const string& VertexName )
- {
- Vertex *pV = m_Vertexes.find( VertexName )->second ;
- // 遍历要删除的节点的出边
- for ( auto it = pV->m_EdgesOut.begin( ) , end = pV->m_EdgesOut.end( ) ; it != end ; ++it )
- {
- Edge *pEdgeOut = it->second ;
- // 删除入边记录
- pEdgeOut->m_pEndVertex->m_EdgesIn.erase( VertexName ) ;
- // 在边集合列表中删除
- string key = GetEdgeKey( pV , pEdgeOut->m_pEndVertex ) ;
- m_Edges.erase( key ) ;
- // 删除边对象
- delete pEdgeOut ;
- }
- delete pV ;
- }
- Edge * Graph::AddEdge( const string& Vertex1Name , const string& Vertex2Name , int Weight /*= 0 */ )
- {
- Vertex *pV1 = m_Vertexes.find( Vertex1Name )->second ;
- Vertex *pV2 = m_Vertexes.find( Vertex2Name )->second ;
- // 加入边集合
- Edge *pEdge = new Edge( pV1 , pV2 , Weight ) ;
- string key = GetEdgeKey( pV1 , pV2 ) ;
- m_Edges[ key ] = pEdge ;
- // 加入V1的出边
- pV1->m_EdgesOut[ Vertex2Name ] = pEdge ;
- // 加入V2的入边
- pV2->m_EdgesIn[ Vertex1Name ] = pEdge ;
- return pEdge ;
- }
- void Graph::DeleteEdge( const string& StartVertexName , const string& EndVertexName )
- {
- Vertex *pV1 = m_Vertexes.find( StartVertexName )->second ;
- Vertex *pV2 = m_Vertexes.find( EndVertexName )->second ;
- string key = GetEdgeKey( pV1 , pV2 ) ;
- Edge *pEdge = m_Edges.find( key )->second ;
- // 在顶点1的出边列表中删除
- pV1->m_EdgesOut.erase( EndVertexName ) ;
- // 在顶点2的入边列表中删除
- pV2->m_EdgesIn.erase( StartVertexName ) ;
- // 在边集合列表中删除
- m_Edges.erase( key ) ;
- delete pEdge ;
- }
说明下以上代码的设计。
要增加一个图顶点。需要先为顶点确定一个字符串类型的ID,new一个Vertex对象出来,然后Graph::AddVertex把顶点加入到图中。Graph管理顶点对象的释放,不用手动delete。
有一种设计是:Graph::NewVertex(); 用图类对象来创建顶点。表明这个顶点对象的内存由Graph来管理。TinyXml库的接口就是这样的。考虑到可能用户要继承自Vertex派生出自己的顶点类,所以没采用这种设计。
这里我们的图是用在cocos2d-x中作为地图行走的,有些人觉得Vertex类应该继承自Node。假如这样做的话,我们的图数据结构就依赖于cocos2d-x库了。尽管,我们是用在cocos2d-x的项目中,但为了通用考虑,应该尽量设计得与cocos2d-x无关。所以,我只用了C++语言本身来实现。考虑下这种情况,某一天策划需要一个完善的地图编辑器,可以编辑关卡内要触发的事件或者是敌人的生成规则。这种情况,由于cocos2d-x内置的控件较少,我们可能需要用QT写一个编辑器,这时,我们的图数据结构也可以放到QT的项目中使用。
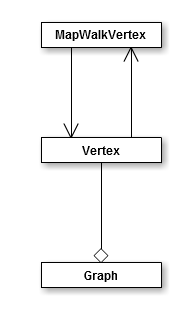
地图行走上的节点涉及到了表现,我们可以另写一个类:class MapWalkVertex : public Node。MapWalkVertex 和Vertex互相关联,互相保存一个对方的引用(指针)。图类与图顶点类、地图行走的节点的关系如下:
MapWalkVertex头文件 代码如下:
- #pragma once
- #include "cocos2d.h"
- USING_NS_CC ;
- class Vertex ;
- class MapWalkVertex :
- public Node
- {
- public:
- MapWalkVertex( );
- ~MapWalkVertex( );
- public:
- CREATE_FUNC( MapWalkVertex ) ;
- bool init( ) ;
- public :
- void SetGraphVertex( Vertex * Var ) { m_pGraphVertex = Var ; }
- Vertex* GetGraphVertex( ) { return m_pGraphVertex ; }
- private:
- Vertex * m_pGraphVertex ;
- };
我们的Vertex并没有MapWalkVertex类型的字段。它怎么关联到MapWalkVertex对象呢?我们的Vertex有一个字段:unordered_map<string , void*> UserData ; 这个字段模拟了“动态属性”。要关联MapWalkVertex对象对象可以这样做:
- Vertex *pVtx = new Vertex( “A” ) ;
- MapWalkVertex *pMwv = MapWalkVertex::create() ;
- // 互相关联起来
- pVtx->UserData[ “mwv” ] = pMwv ;
- pMwv-> SetGraphVertex( pVtx ) ;
- // 要取得图顶点关联的地图行走的节点可以这样做
- MapWalkVertex *pMwv2 = (MapWalkVertex *)pVtx->UserData[ “mwv” ] ;
在使用上,这样做有点绕,有点麻烦,互相关联来关联去的。设计可复用的组件就要在使用上付出一定的代价,没办法。
4.图编辑器的实现思路
一般编辑器应该用普通应用软件开发的技术来做。如:Winform , QT , MFC等。这里方便起见,图的编辑也在cocos2d-x中做了。做可视化的图形编辑器首先是定义操作状态类型。比如:鼠标点了一点屏幕,这个操作是放置人物,还是放置一个节点。像Photoshop这样的软件,在画布上点了一点,是用画笔点画了一下,还是用魔棒选取工具做了选择。操作状态类型就是用来区分动作(比如,点击)的不同含义。
操作状态定义如下:
- // 操作模式状态
- enum class OperationMode
- {
- // 放置顶点
- PutVertex ,
- // 拖曳场景
- DragContent ,
- // 拖曳边
- DragEdge ,
- // 放置角色
- PositionRole ,
- // 行走
- RoleWalk ,
- };
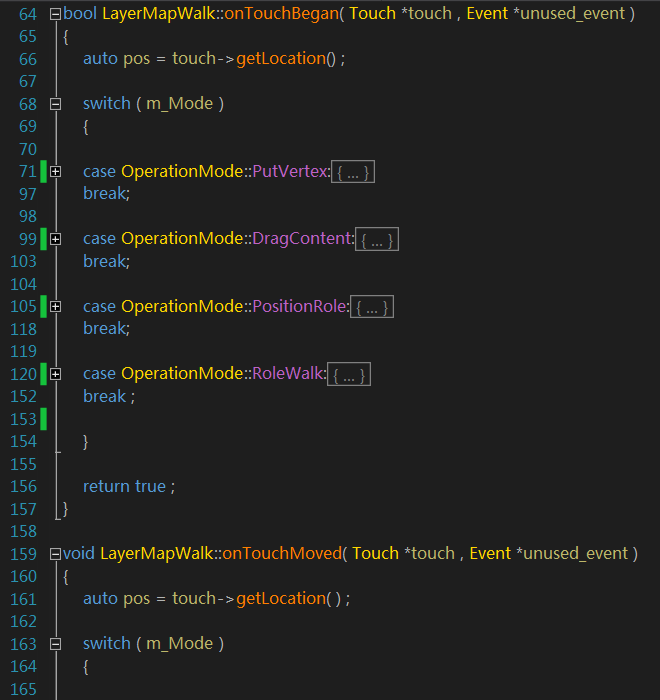
然后,我们在onTouchBegan,onTouchMoved, onTouchEnded 3个触摸函数中针对不同情况做不同的处理。
由于编辑处理的代码较多,就不直接贴代码了,截图演示一下大概的思路。
这也是手游实现复杂操作的一种处理方法。在不同的操作状态下,执行不同的代码。状态的切换大部分是通过按下左边的按钮。如下图:
这组按钮是用CocoStudio的UI编辑器做的。善用各种工具,事半功倍。
有必要说下顶点之间边和拖曳边的显示的实现。该操作如下图:
边的显示,其实是一张图片。如何让一个Sprite当作直线来用呢?先准备一个水平线段的图片,大小没关系,可以用10*5像素。有2个操作:1.算出起点到终点的长度,根据长度进行Sprite的缩放。2.起点到终点是一条直线,计算这条直线与水平的角度,Sprite进行相应的旋转。
实现代码如下:
- void LayerMapWalk::MakeLine( Sprite* pSpr , const Point& pt1 , const Point& pt2 )
- {
- // 设置锚点与位置
- pSpr->setAnchorPoint( Point( 0 , 0.5 ) ) ;
- pSpr->setPosition( pt1 ) ;
- // 缩放
- float width = pSpr->getTexture( )->getContentSize( ).width ;
- auto v = pt2 - pt1 ;
- float len = v.getLength( ) ;
- float ScaleX = len / width ;
- pSpr->setScaleX( ScaleX ) ;
- // 旋转
- float rad = v.getAngle( ) ;
- float Rotation = CC_RADIANS_TO_DEGREES( -rad ) ;
- pSpr->setRotation( Rotation ) ;
- }
5.图数据结构的保存和载入
我们编辑好的图,需要持久化。下次可以载入使用。对于地图行走节点需要保存的信息有:顶点ID,节点的位置。边需要保存的信息有:起始顶点的ID,终点顶点的ID,边上的权值
我们选择用xml进行保存。Cocos2d-x集成有TinyXml库,读写xml是比较方便的。
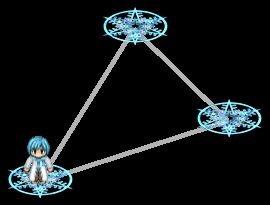
上图中的图,保存为xml后的数据是这样:
- <Graph>
- <Vertexes>
- <Vertex Id="938" x="505.957" y="358.936"/>
- <Vertex Id="721" x="411.113" y="206.187"/>
- <Vertex Id="64" x="599.803" y="267.086"/>
- </Vertexes>
- <Edges>
- <Edge StartVertexId="938" EndVertexId="64" Weight="131"/>
- <Edge StartVertexId="938" EndVertexId="721" Weight="179"/>
- <Edge StartVertexId="721" EndVertexId="64" Weight="198"/>
- <Edge StartVertexId="721" EndVertexId="938" Weight="179"/>
- <Edge StartVertexId="64" EndVertexId="721" Weight="198"/>
- <Edge StartVertexId="64" EndVertexId="938" Weight="131"/>
- </Edges>
- </Graph>
咦,图中有3条边,为什么保存为xml后,有6条边的信息?回顾下之前,我们实现的是有向图的数据结构,有向图模拟无向图,就是多加一条反向的有向边。所以有向图模拟无向图,有向图边的数量是无向图边的数量的2倍。
图数据的保存和读取,也就是场景数据的持久化,我们可以用一个单独的类来做。避免Layer层的代码过多。我们写的类叫:MapWalkConfigManager(地图行走配置管理器)。
该类头文件代码:
- #pragma once
- #include <string>
- using namespace std ;
- class LayerMapWalk ;
- class MapWalkConfigManager
- {
- public:
- MapWalkConfigManager( );
- ~MapWalkConfigManager( );
- public :
- static void Load( const string& ConfigFileName , LayerMapWalk * pLayerMapWalk ) ;
- static void Save( const string& ConfigFileName , LayerMapWalk * pLayerMapWalk ) ;
- };
Cpp代码
- #include "MapWalkConfigManager.h"
- #include "LayerMapWalk.h"
- #include "MapWalkVertex.h"
- #include "tinyxml2/tinyxml2.h"
- using namespace tinyxml2 ;
- MapWalkConfigManager::MapWalkConfigManager( )
- {
- }
- MapWalkConfigManager::~MapWalkConfigManager( )
- {
- }
- void MapWalkConfigManager::Load( const string& ConfigFileName , LayerMapWalk * pLayerMapWalk )
- {
- tinyxml2::XMLDocument doc ;
- doc.LoadFile( ConfigFileName.c_str( ) ) ;
- unordered_map< string , MapWalkVertex* > m_MwvList ;
- auto pElemRoot = doc.RootElement( ) ;
- // 读取顶点的信息。创建出相应的顶点在界面上显示
- auto pElemVertexes = pElemRoot->FirstChildElement( "Vertexes" ) ;
- for ( auto pElem = pElemVertexes->FirstChildElement( ) ; pElem != 0 ; pElem = pElem->NextSiblingElement( ) )
- {
- string strId = pElem->Attribute( "Id" ) ;
- float x = atof( pElem->Attribute( "x" ) ) ;
- float y = atof( pElem->Attribute( "y" ) ) ;
- auto pMwv = MapWalkVertex::create( ) ;
- pMwv->setPosition( x , y ) ;
- pLayerMapWalk->AddVertex( pMwv , strId.c_str() ) ;
- m_MwvList[ strId ] = pMwv ;
- }
- // 读取边的信息。创建出相应的边。
- auto pElemEdge = pElemRoot->FirstChildElement( "Edges" ) ;
- for ( auto pElem = pElemEdge->FirstChildElement( ) ; pElem != 0 ; pElem = pElem->NextSiblingElement( ) )
- {
- string v1Id = pElem->Attribute( "StartVertexId" ) ;
- string v2Id = pElem->Attribute( "EndVertexId" ) ;
- int Weight = atof( pElem->Attribute( "Weight" ) ) ;
- pLayerMapWalk->AddEdge( m_MwvList[ v1Id ] , m_MwvList[ v2Id ] ) ;
- }
- }
- void MapWalkConfigManager::Save( const string& ConfigFileName , LayerMapWalk * pLayerMapWalk )
- {
- tinyxml2::XMLDocument doc ;
- auto pElemGraph= doc.NewElement( "Graph" ) ;
- doc.InsertEndChild( pElemGraph ) ;
- auto pElemGvRoot = doc.NewElement( "Vertexes" ) ;
- pElemGraph->InsertEndChild( pElemGvRoot ) ;
- // 保存顶点信息
- for ( size_t i = 0 ; i < pLayerMapWalk->m_MapWalkVertexes.size( ) ; ++i )
- {
- auto pMwv = pLayerMapWalk->m_MapWalkVertexes[ i ] ;
- auto pElemGv = doc.NewElement( "Vertex" ) ;
- pElemGv->SetAttribute( "Id" , pMwv->GetGraphVertex()->GetId().c_str() ) ;
- pElemGv->SetAttribute( "x" , pMwv->getPositionX( ) ) ;
- pElemGv->SetAttribute( "y" , pMwv->getPositionY( ) ) ;
- pElemGvRoot->InsertEndChild( pElemGv ) ;
- }
- auto pElemEdgeRoot = doc.NewElement( "Edges" ) ;
- pElemGraph->InsertEndChild( pElemEdgeRoot ) ;
- // 保存边的信息
- for ( size_t i = 0 ; i < pLayerMapWalk->m_MapWalkVertexes.size( ) ; ++i )
- {
- auto pMwvStart = pLayerMapWalk->m_MapWalkVertexes[ i ] ;
- auto pVS = pMwvStart->GetGraphVertex( ) ;
- // 遍历所有出边
- const auto& Eo = pVS->GetEdgesOut( ) ;
- for ( auto& it : Eo )
- {
- auto pElemEdge = doc.NewElement( "Edge" ) ;
- auto pEdge = it.second ;
- auto pVE = pEdge->GetEndVertex( ) ;
- pElemEdge->SetAttribute( "StartVertexId" , pVS->GetId( ).c_str() ) ;
- pElemEdge->SetAttribute( "EndVertexId" , pVE->GetId( ).c_str() ) ;
- pElemEdge->SetAttribute( "Weight" , pEdge->GetWeight() ) ;
- pElemEdgeRoot->InsertEndChild( pElemEdge ) ;
- }
- }
- doc.SaveFile( ConfigFileName.c_str() ) ;
- }
6.经典的最短路径算法Dijkstra
到此为止,图的创建、编辑、保存、载入都做完了。是时候让玩家角色实现地图行走了。一般角色从一点到另一点走的是一个最短路径,而不会是乱走。
图的最短路径的计算,需要依赖边上的权值。这里我们需要计算的是一点到另一点在几何距离上最短的路径,所以我们边上的权值就是2个顶点的几何距离。这个在编辑图创建边的时候计算好。
计算图最短路径的算法很多,这里介绍并实践经典的Dijkstra算法。Dijkstra的执行类似BFS(广度优先搜索),并且使用了贪心策略。很多最短路径算法都使用了一种叫做“松弛(Relax)”操作,Dijkstra也不例外,Relax是个怎样的操作呢?
松弛是针对边的,但可能会改变出边终点对应的顶点的路径代价估计值。顶点的路径代价估计值又是什么?要计算最短路径,每个顶点还需要一个属性,这个属性就是路径代价估计。回头看看Vertex类的代码,找到一个int m_Cost ; 的字段,这个字段就是路径代价估计。
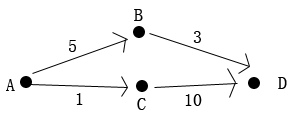
一个顶点的路径代价估计属性表示从起始顶点出发到达该顶点所花费的代价。这个花费的代价是怎样计算出来的呢?通过累加边上的权值。看下图:
从A点出发,目的地是D。A到C边上的权值是1,A到B边上的权值是5。A的路径估计为0,因为它到起点的代价为0,显然,自己到自己是无代价的。C的路径代价是1。因为从A到C的边上的权值是1。B的路径代价是5,因为从A到B的边上的权值是5。D有2个可能的路径代价值,8和11。8是B本身的路径代价值加上B到C边上的权值,11是C本身的路径代价值加上从C到D边上的权值。最短路径就是,路径代价相加起来最小的那条路径。显然,A到B的最短路径是A- >B->D,而不是A->C->D。
一开始,我们只知道起点A的路径代价为0,B和C的路径代价都是不知道的,但我们知道从A到C和B的边上的权值。通过A路径代价值和边权值的累加,我们就可以知道B和C的路径代价了。OK,来看看Relax对出度顶点的路径代价的影响。
Relax松弛A到B的边。如果A的路径代价加上边上的权值的和小于B的路径代价的值,就把B的路径代价值更新为这个和。
中文伪代码是这样:
- void Relax( 顶点1,顶点2,顶点1到顶点2边上的权值)
- {
- int n = 顶点1的路径代价 + 顶点1到顶点2边上的权值 ;
- 如果 n 小于顶点2的路径代价
- {
- 顶点2的路径代价 = n ;
- }
- }
结合我们的图数据结构代码,Relax的C语言代码是这样:
- void Relax( Vertex * pVertex1 , Vertex * pVertex1 , int Weight )
- {
- int n = pVertex1->m_Cost + Weight ;
- If( n < pVertex2->m_Cost )
- {
- pVertex2->m_Cost = n ;
- }
- }
注意,这里是顶点1到顶点2的出边。Relax只可能会修改顶点2的路径代价值,而不会修改顶点1的。理解了Relax对顶点的路径代价的影响后,我们模拟这样一个过程:
1.对所有顶点的路径代价值进行初始化,比如都为1000。然后设置起点A的路径代价值为0。
2.对A的所有出边进行松弛,B的路径代价会被更新为5,C的路径代价会被更新为1。
3.对B的所有出边进行松弛,D的路径代价会被更新为8。
4.对C的所有出边进行松弛,D的路径代价不变。因为11大于8,不满足Relax 函数里面的判断条件。
Relax实际上是“紧缩”出边终点上的顶点的路径代价,让路径代价值不断变小。通过模拟这样一个过程,我们发现找到了D的最短路径的路径代价值8。但我们没有记录这个相加边权值的路径是怎样走过来的。要记录路径,我们可以用一个哈希映射表,比如:unordered_map< Vertex* , Vertex* > PathTree ;
PathTree[pVertex2] = pVertex1 ; 表示设置pVertex1顶点的前驱路径顶点是pVertex2。完整的Relax操作不光是改进出边终点顶点的路径代价估计值,还会更新出边终点顶点的前驱顶点。完整的Relax操作C代码如下:
- void Relax( Vertex * pVertex1 , Vertex * pVertex2 , int Weight , unordered_map< Vertex* , Vertex* >& PathTree )
- {
- int n = pVertex1->m_Cost + Weight ;
- If( n < pVertex2->m_Cost )
- {
- pVertex2->m_Cost = n ;
- PathTree[pVertex2 ] = pVertex1 ;
- }
- }
这个时候,我们再模拟上面的过程。就会发现PathTree记录了A达到D的最短路径。以D对象为key查找映射表会查到B对象,以B对象为key查找映射表会查到A对象。这个就是A到D的最短路径了。
实际上,整个unordered_map<Vertex* , Vertex* > PathTree表示的是一个路径树。
之前我们模拟的那4步过程,是人为地挑选顶点出来进行松弛,从而找到最短路径。Dijkstra其实就是一个挑选顶点出来松弛的一个算法,这个挑选过程使用贪心策略。OK,看下Dijkstra是怎样执行的。
- Dijkstra
- {
- 遍历所有的图顶点
- 图顶点的路径估值初始化为一个很大的值,比如:0x0FFFFFFF
- 把所有的顶点都加入一个列表Q中
- 起始顶点的路径估值初始化为0
- PathTree[起始顶点 ] = 0 ; // 起始顶点没有父节点
- 如果 Q列表 不为空的话 就一直做如下循环
- {
- 在Q列表中选出一个路径估值最小的顶点v
- 对顶点v所有的出边进行Relax松弛操作
- }
- }
Dijkstra的核心思想其实是非常简短的。说Dijkstra用了贪心策略,就是它会从列表Q中选出一个路径估值最小的顶点v进行Relax松弛。注意:这里的“选出”是这样的含义,在列表中找出一个路径估值最小的顶点,然后列表移除该顶点。Dijkstra的结束条件是把列表Q给选空了。也可以把结束条件修改一下,当选出了目的顶点时就终止。
Dijkstra执行完后,会对整个图输出一个路径树。也就是PathTree表达的内容。这个路径树包括了起始顶点到其他顶点的最短路径。
我的Dijkstra算法继承自GraphPathfinding类。GraphPathfinding作为基类主要是为了以后增加一些其他的路径搜索算法类。
GraphPathfinding头文件
- #pragma once
- #include "Graph.h"
- #include <unordered_map>
- using namespace std ;
- /*
- 路径搜索结果
- */
- struct Result
- {
- // 路径树
- unordered_map< Vertex* , Vertex* > PathTree ;
- };
- class GraphPathfinding
- {
- public:
- GraphPathfinding( );
- ~GraphPathfinding( );
- public :
- virtual void Execute( const Graph& Graph , const string& VetexId ) = 0 ;
- };
Dijjkstra 类.h
- #pragma once
- #include "GraphPathfinding.h"
- class Dijkstra : public GraphPathfinding
- {
- public:
- Dijkstra( );
- ~Dijkstra( );
- public:
- public :
- void Execute( const Graph& Graph , const string& VetexId ) override ;
- private:
- // 抽出最小路径估值的顶点
- Vertex* ExtractMin( vector< Vertex* >& Q ) ;
- // 松弛
- void Relax( Vertex* v1 , Vertex* v2 , int Weight ) ;
- public :
- Result& GetResult( ) { return m_Ret ; }
- private :
- Result m_Ret ;
- };
Dijkstra Cpp
- #include "Dijkstra.h"
- #include <queue>
- Dijkstra::Dijkstra( )
- {
- }
- Dijkstra::~Dijkstra( )
- {
- }
- void Dijkstra::Execute( const Graph& Graph , const string& VetexId )
- {
- m_Ret.PathTree.clear( ) ;
- const auto& Vertexes = Graph.GetVertexes( ) ;
- Vertex* pGvStart = Vertexes.find( VetexId )->second ;
- vector< Vertex* > Q ;
- // 初始化
- for ( auto& it : Vertexes )
- {
- it.second->m_Cost = 0x0FFFFFFF ;
- Q.push_back( it.second ) ;
- }
- m_Ret.PathTree[ pGvStart ] = 0 ; // 起始顶点的前驱顶点为空
- pGvStart->m_Cost = 0 ;
- for ( ; Q.size() > 0 ; )
- {
- // 选出最小路径估计的顶点
- auto v = ExtractMin( Q ) ;
- // 对所有的出边进行“松弛”
- const auto& EO = v->GetEdgesOut( ) ;
- for ( auto& it : EO )
- {
- Edge* pEdge = it.second ;
- Relax( v , pEdge->GetEndVertex( ) , pEdge->GetWeight() ) ;
- }
- }
- }
- Vertex* Dijkstra::ExtractMin( vector< Vertex* >& Q )
- {
- Vertex* Ret = 0 ;
- Ret = Q[ 0 ] ;
- int pos = 0 ;
- for ( int i = 1 , size = Q.size( ) ; i < size ; ++i )
- {
- if ( Ret->m_Cost > Q[ i ]->m_Cost )
- {
- Ret = Q[ i ] ;
- pos = i ;
- }
- }
- Q.erase( Q.begin() + pos ) ;
- return Ret ;
- }
- void Dijkstra::Relax( Vertex* v1 , Vertex* v2 , int Weight )
- {
- int n = v1->m_Cost + Weight ;
- if ( n < v2->m_Cost )
- {
- v2->m_Cost = n ;
- m_Ret.PathTree[ v2 ] = v1 ;
- }
- }
我的Dijkstra选出最小路径估计的顶点的方法,用的是列表遍历。要优化Dijkstra的话,可以用优先级队列,终极优化是斐波那契堆。
计算出了最短路径,就可以用Sequene动作序列串联MoveTo动作把行走的动画表现出来了。
7.本文工程源代码下载
由于实现代码比较多,我就不贴完了。直接发工程,大家自己去看吧。
整个cocos2d-x的项目比较大,我只上传Classes和Resources 2个关键的文件夹。大家本地创建一个cocos2d-x的项目,然后覆盖掉这2个文件夹,应该就可以了。
下载地址:http://download.csdn.net/detail/stevenkylelee/7723917
转载自:http://blog.csdn.net/stevenkylelee
