laravel5安装 数据库配置 模板 路由
安装;
windows安装
Laravel 框架有一些系统上的需求:
PHP 版本 >= 5.4
Mcrypt PHP 扩展
OpenSSL PHP 扩展
Mbstring PHP 扩展
Tokenizer PHP 扩展
都不想安装的可以从https://github.com/overtrue/latest-laravel 这里下载大神整理好的,解压即可使用
首先等安装cpmposer, 提示openssl错误的打开PHP.INI配置文件将extension=php_openssl.dll 前面的注释去掉,大概在第887行。
copmposer安装过程就不说了。
下面开始Laravel 5安装过程,github有下载,这里分享个网盘连接:http://pan.baidu.com/s/1dD50dWH
下载后解压,为了方便你可以解压到网站根目录下。我这里解压到F:/laravel [当然了,这不是我的根目录,需要配置虚拟主机]。
由于众所周知的原因国内安装composer,laravel比较慢,推荐使用镜像安装。
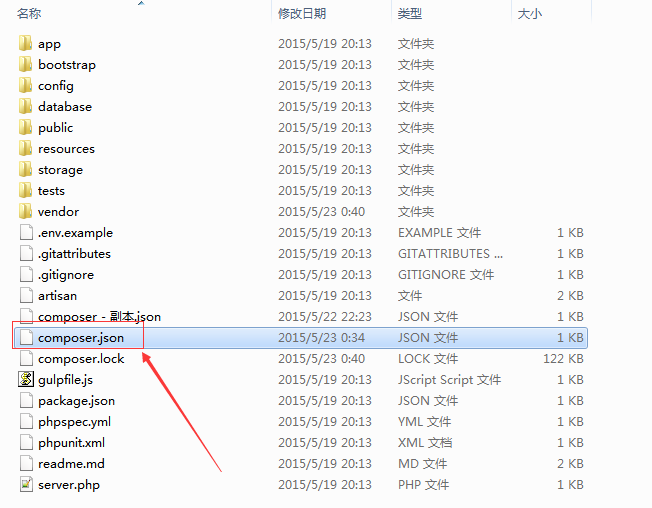
修改laravel目录的composer.json文件
在末尾结束括号前加上:
,
     "repositories": [
        {"type": "composer", "url": "http://comproxy.cn/repo/packagist"},
        {"packagist": false}
    ]
若不能用试试http://packagist.phpcomposer.com
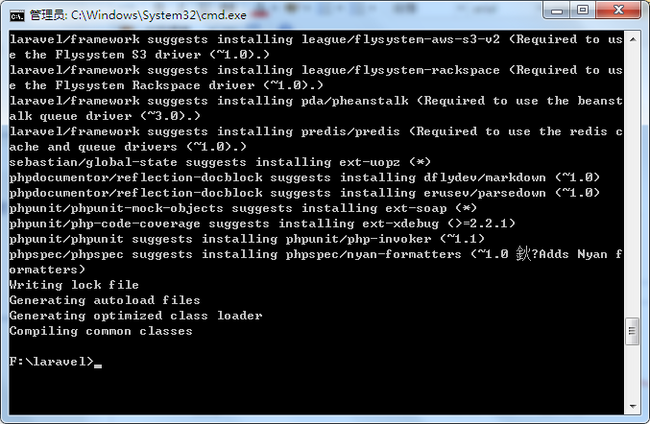
在文件夹内单击鼠标右键选择安装
几分钟后就安装完成啦!
这时会发现目录下多了个vendor文件夹。
laravel的默认首页是server.php,需要配置下,打开httpd.conf配置文件
找到[大概第249行以下]
<IfModule dir_module>
    DirectoryIndex index.html index.php index.htm l.php server.php
</IfModule>
加上 server.php重启即可。
试试去浏览器打开http://t.com 试看看, 以你自己的安装为准。
到此为止安装成功了,打开慢的原因是使用了谷歌字体, 可以使用国内CDN,找到F:\laravel\resources\views文件夹,打开welcome.blade.php文件,将第五行改为 <link href='//ajax.useso.com/css?family=Lato:100' rel='stylesheet' type='text/css'>
360前端公共库:http://libs.useso.com/
接着去试试写个方法,
找到F:\laravel\app\Http文件夹,打开routes.php,加上
/*
|--------------------------------------------------------------------------
| Application Routes
|--------------------------------------------------------------------------
|
| Here is where you can register all of the routes for an application.
| It's a breeze. Simply tell Laravel the URIs it should respond to
| and give it the controller to call when that URI is requested.
|
*/

Route::get('/', 'WelcomeController@index');

Route::get('home', 'HomeController@index');

Route::controllers([
    'auth' => 'Auth\AuthController',
    'password' => 'Auth\PasswordController',
]);
Route::get('hi', function(){
    return "hi";
});
打开浏览器输入http://t.com/public/hi
试看看,这就是路由了。
如需直接访问到public项目文件夹可以配置vhost
<VirtualHost *:80>
    DocumentRoot "F:\laravel\public"
    ServerName t.com    ServerAlias t1.zy62.com  <Directory "F:\laravel>
      Options FollowSymLinks ExecCGI      AllowOverride All
      Order allow,deny      Allow from all
      Require all granted  </Directory></VirtualHost>
2.linux安装
laravel必须PHP>5.4支持mcrypt。
从https://github.com/overtrue/latest-laravel 这里下载大神整理好的,解压即可使用
nginx伪静态:[我这里用的是LNMP]
server
    {
        listen 80;
        #listen [::]:80;
        server_name laravel.zy62.com;
        index index.html index.htm index.php default.html default.htm default.php;
        root  /home/wwwroot/laravel.zy62.com/public;

        include other.conf;
        #error_page   404   /404.html;
        location ~ .*\.(php|php5)?$
        {
            try_files $uri =404;
            fastcgi_pass  unix:/tmp/php-cgi.sock;
            fastcgi_index index.php;
            include fcgi.conf;
        }

        location ~ .*\.(gif|jpg|jpeg|png|bmp|swf)$
            {
                expires      30d;
            }

        location ~ .*\.(js|css)?$
            {
                expires      12h;
            }
if (!-d $request_filename)
            {
                rewrite ^/(.+)/$ /$1 permanent;
            }

            # removes trailing "index" from all controllers
            if ($request_uri ~* index/?$)
            {
                rewrite ^/(.*)/index/?$ /$1 permanent;
            }

            # unless the request is for a valid file (image, js, css, etc.), send to bootstrap
            if (!-e $request_filename)
            {
                rewrite ^/(.*)$ /index.php?/$1 last;
                break;
            }
        access_log  /home/wwwlogs/laravel.zy62.com.log  access;
    }
include fcgi.conf;
fastcgi_param  SCRIPT_FILENAME    $document_root$fastcgi_script_name;
fastcgi_param  QUERY_STRING       $query_string;
fastcgi_param  REQUEST_METHOD     $request_method;
fastcgi_param  CONTENT_TYPE       $content_type;
fastcgi_param  CONTENT_LENGTH     $content_length;

fastcgi_param  SCRIPT_NAME        $fastcgi_script_name;
fastcgi_param  REQUEST_URI        $request_uri;
fastcgi_param  DOCUMENT_URI       $document_uri;
fastcgi_param  DOCUMENT_ROOT      $document_root;
fastcgi_param  SERVER_PROTOCOL    $server_protocol;

fastcgi_param  GATEWAY_INTERFACE  CGI/1.1;
fastcgi_param  SERVER_SOFTWARE    nginx/$nginx_version;

fastcgi_param  REMOTE_ADDR        $remote_addr;
fastcgi_param  REMOTE_PORT        $remote_port;
fastcgi_param  SERVER_ADDR        $server_addr;
fastcgi_param  SERVER_PORT        $server_port;
fastcgi_param  SERVER_NAME        $server_name;

# PHP only, required if PHP was built with --enable-force-cgi-redirect
fastcgi_param  REDIRECT_STATUS    200;
ERROR: An another FPM instance seems to already listen on /tmp/php-cgi-714ms.com.sock
解决办法:
/root/lnmp reload
数据库配置:\config\database.php
'mysql' => [
            'driver'    => 'mysql',
            'host'      => 'localhost',
            //'host'      => env('DB_HOST', 'localhost'),
            'database'  => 'test',
            //'database'  => env('DB_DATABASE', 'forge'),
            'username'  => 'root',
            //'username'  => env('DB_USERNAME', 'forge'),
            'password'  => 'qaz123',
            //'password'  => env('DB_PASSWORD', ''),
            'charset'   => 'utf8',
            'collation' => 'utf8_unicode_ci',
            'prefix'    => '',
            'strict'    => false,
        ],
视图,传值:
路由:
Route::get('/hi',function(){
    //echo 123;
    return View::make('hi')->with('name','laravel');//way1
});
在laravel\resources\views下新建hi.blade.php文件
<?php
?>

<html>
 <head>
  <meta charset="UTF-8" />
  <title>test</title>
  <meta name="viewport" content="width=device-width, initial-scale=1, maximum-scale=1, user-scalable=no" />
   <script src="http://libs.baidu.com/jquery/2.0.0/jquery.min.js"></script>
<script src="http://libs.baidu.com/bootstrap/3.0.3/js/bootstrap.min.js"></script>
<link href="http://libs.baidu.com/bootstrap/3.0.3/css/bootstrap.min.css" rel="stylesheet">
 </head>
 <body>
  <div>
  <h1>laravel view</h1>
  <p><?php echo $name; ?></p>
</div>
 </body>
</html>
视图传值方式:
return View::make('hi')->with('name','laravel');//way1
2.魔术方法
return View::make('hi')->withName('laravel');
$data['name']='laravel';
return View::make('hi',$data);
路由传值限制:
那么现在我的博客有一堆文章,我想通过地址 http://yourdomain/article/1 访问 id 为 1 的文章,通过 http://yourdomain/article/2 访问 id 为 2 的文章怎么办?
Route::get('article/{id}', function($id) {
    return 'Article:' . $id;
});
但是,假如有这样一种情况,有很多地方都需要 id 作为参数,id 大都是这种数字,我们肯定不希望每一个路由规则都要写一次 where 方法来设置 id 的匹配规则。这时候可以通过这样一个方法来实现:
Route::pattern('id', '[0-9]+');
资源控制器:
命令行创建:
php artisan make:controller ArticleController
就可以创建一个名为 ArticleController 的资源控制器,文件默认在 app/Http/Controllers 下。我们打开 ArticleController.php,发现里面已经写好了许多方法,比如 index、create、show 等等。分别是什么意思?如何在路由定义才能访问到?
我们如果要在路由里定义一个资源控制器只需要一条:
Route::resource('article', 'ArticleController');
这个时候,肯定有人会疑惑,那访问的地址规则呢?如果你已经了解了 RESTful,再去阅读以下官方文档,基本就已经明白了。我就着上述的控制器、路由,来说明。先看一张表:
| 请求方法 | 请求 URI | 对应的控制器方法 | 代表的意义 |
| GET | /article | index | 索引/列表 |
| GET | /article/create | create | 创建(显示表单) |
| POST | /article | store | 保存你创建的数据 |
| GET | /article/{id} | show | 显示对应id的内容 |
| GET | /article/{id}/edit | edit | 编辑(显示表单) |
| PUT/PATCH | /article/{id} | save | 保存你编辑的数据 |
| DELETE | /article/{id} | destroy | 删除 |
当我访问地址 http://yourdomain/article ,相当于访问控制器 ArticleController 的 index 方法。
当我访问地址 http://yourdomain/article/create ,就会访问到 create 方法。
当我通过 POST 提交数据至地址 http://yourdomain/article,相当于由 store 方法处理。
修改下show方法:
/**
	 * Display the specified resource.
	 *
	 * @param  int  $id
	 * @return Response
	 */
	public function show($id)
	{
		//
		echo $id;
	}
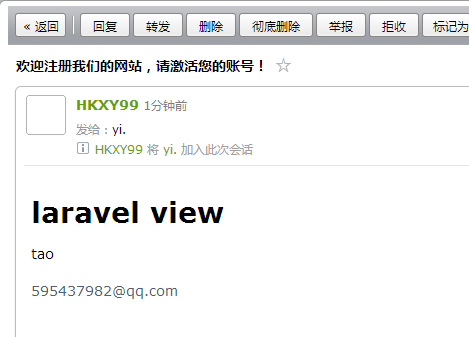
发送邮件:
先配置发送邮件账号信息,config/mail.php
public function getPage() {
		$data = ['email'=>'[email protected]', 'name'=>'tao']
		;
		Mail::send ( 'hi', $data, function ($message) use($data) {
			$message->to ( $data ['email'], $data ['name'] )->subject ( '欢迎注册我们的网站,请激活您的账号!' );
		} );
	}
hi是模板文件hi.blade.php
数据库查询:
namespace App\Http\Controllers;

use Request;
use View;
use DB;
$rs = DB::select ( "select * from cf_user limit 10" );
// print_r($rs);
echo $rs [0]->user;
阿里云OSS上传文件
安装
将以下内容增加到 composer.json:
require: { "johnlui/aliyun-oss": "dev-master" }
use JohnLui\AliyunOSS\AliyunOSS;
use DateTime;

public function getFile(){
		$oss = AliyunOSS::boot('http://oss-cn-beijing.aliyuncs.com',  'accesskey', 'secret');
		//青岛则为  oss-cn-qingdao,以此类推,改成你自己的
		// 设置 Bucket
		$oss = $oss->setBucket('bucket');

		// 上传一个文件(示例文件为 public 目录下的 favicon.ico)
		// 两个参数:资源名称、文件路径
		$oss->uploadFile('favicon.ico', public_path('favicon.ico'));

		// 从服务器获取这个资源的 URL 并打印
		// 两个参数:资源名称、过期时间
		echo $oss->getUrl('favicon.ico', new DateTime("+1 day"));
	}
laravel输出当前操作/方法名:
echo \Route::current()->getActionName();


