ios小项目——新浪微博客户端总结
们还是登录不了,你们要用还是得自己申请appkey并且把回调网址设为baidu。或者是再下面留言,留下你的微博uid我把你加入测试用户。
就像题目说的,这次的小项目是做一个新浪微博的客户端。
平台是Xcode4.2,用storyboard和ARC,因为自己一开始接触ios开发就学的是ios5的,所以就一直都是用storyboard和arc进行开发,对于之前的xib和没有arc的开发,以后会找机会学习,各有各的优缺点吧。storyboard的话,各个场景之间的切换一目了然,可以在一个屏幕上管理所有视图,xib的话,就需要用代码来串接各个视图。但是storyboard帮我们完成了很多工作,使得对于底层的一些运作不是很清晰。相反的,看了一些xib的例子,觉得那些在代码上视图的关系比较清晰,但是没有那么方便咯。
好了,回归正题。
一、OAuth2.0认证篇
要使用新浪微博读取用户的数据,需要先进行OAuth授权,现在新浪主推是OAuth2.0,所以这次的认证,当然也是用新的OAuth机制进行认证。新浪提供给移动应用的认证方式有两种,但是对于我们这种练手的,非商业的用户,其实就只有一种,那就是web认证方式,web认证说明。web认证的URL是https://api.weibo.com/oauth2/authorize需要传的参数有几个。
首先是client_id(申请一个应用后就会有,就是那个appkey)。
还有redirect_uri回调网址,由于我是做客户端,所以这个回调网址,我没设置,传参数的时候,值就都不用写。
第三个是response_type,这个参数很重要,因为我在调用新浪的其他API时,需要access_token,所以在这个这个参数的类型要选择token,这样就可以在返回的数据中找到返回的access_token。
第四个参数是display,设置这个参数为mobile,因为我的是在iphone上运行的,所以这个大小刚好是手机屏幕的大小。
传参的格式,就是在认证的URL后面先加一个'?'然后在传各个参数和值,每个参数之间用'&'隔开,这个看API的说明就知道了。
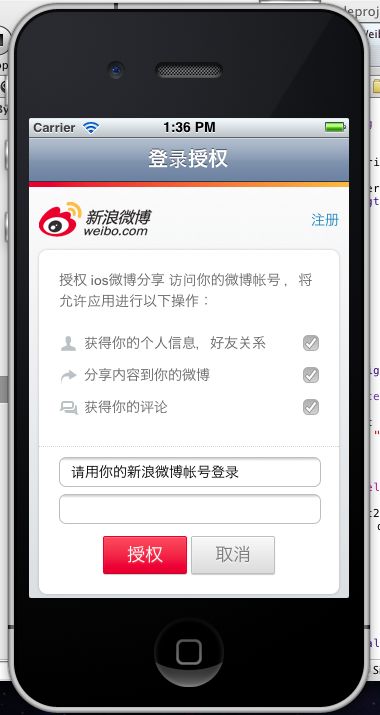
在程序中,认证的界面是我的第一个界面,显示的时候,像下面这个样子:
就是在UIViewController上面添加一个WebView,然后为这个webView添加一个outlet到这个controller的类中。
在这个类中,我将用来存放获取到的access_token的变量设为静态变量,并且为该类添加了一个类方法来返回access_token,原因待后面解说。
下面是我的viewDidLoad函数中的代码:
[cpp] view plaincopyprint?
- (void)viewDidLoad
{
    [super viewDidLoad];

    NSString *url = [[NSString alloc]initWithString:OAuthUrl];
    NSURLRequest *request = [[NSURLRequest alloc] initWithURL:[NSURL URLWithString:url]];
    [self.webView setDelegate:self];
    [self.webView loadRequest:request];

}
- (void)viewDidLoad
{
[super viewDidLoad];
NSString *url = [[NSString alloc]initWithString:OAuthUrl];
NSURLRequest *request = [[NSURLRequest alloc] initWithURL:[NSURL URLWithString:url]];
[self.webView setDelegate:self];
[self.webView loadRequest:request];
}
在代码中可以看到,首先是创建了一个字符串url在里面我放的就是用来进行web认证的url,然后就loadrequest咯,要取回新浪给我的access_token,需要用到webView的delegate中的方法,所以在这里先设置delegate为本类。
大家可以在浏览器中实验一下,用web认证的方式来获取access_token,可以看到在输入完用户的帐号密码之后,新浪会将现在的web重定向到你的redirect_uri中,但是由于我没有设置我的redirect_uri所以会出现一个无法加载的空白页面,但是在该页面的URL中,新浪已经把access_token给了我,我只需要在这个URL中提取就可以了,我的做法hava a little trick.我事先数好了重定向后的URL会在哪个字符后面出现access_token,并且access_token的长度都是一样的,所以我就用NSString的方法来提取。在什么地方来提取呢?当然是在这个重定向之后的网页上提取,当webview进行重定向,并且加载完成时,会调用下面这个函数。
[cpp] view plaincopyprint?
-(void)webViewDidFinishLoad:(UIWebView *)webView
{
    NSString *url = webView.request.URL.absoluteString;
    NSRange rang = NSMakeRange(52, 32);
    _access_token = [url substringWithRange:rang];
    //NSLog(@"access_token:%@",_access_token);
    if([_access_token characterAtIndex:1] == '.')
    {
        //NSLog(@"OK");
        [self.webView setHidden:YES];
        [self performSegueWithIdentifier:@"show" sender:nil];
    }
}
一开始当web认证页面刚出来的时候,也会调用这个函数,所以我需要判断我提取到的东西是不是我要的,利用的就是access_token的第二个字符是一个小数点,在整个URL中,我暂时没发现哪个字段是有小数点的,所以就用这个来进行判断咯。
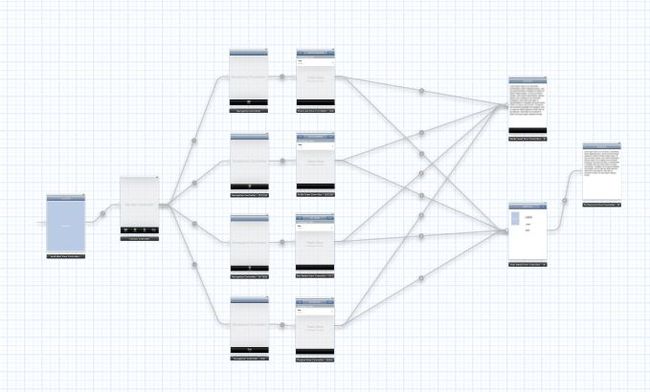
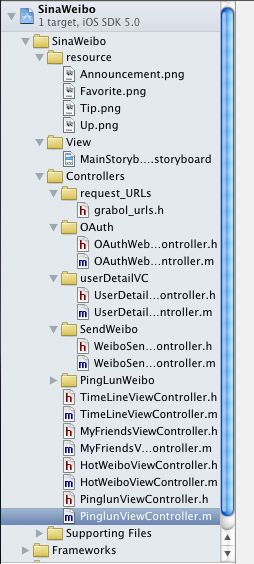
在获取到access_token之后是 [self performSegueWithIdentifier:@"show" sender:nil];跳转到下一个界面,为了后面的讲解的方便,我先贴出这个程序的storyboard和文件列表的图片。
从图中可以发现,第二个界面是一个UITabbarController,由于TabbarController不是在NavigationController的嵌套下的,所以segue的属性不可以是push,而要用modal,这样才可以实现跳转。
现在就来说为什么我要把第一个页面的类中的access_token设为静态变量。
就是因为我的第二个页面是一个UITabbarController,我不能直接去控制他,所以不可以去传参数给他,所以为了后面的页面可以使用API,所以后面的类只需要调用OAuthWebViewController类中的类方法,就可以了。
二、微博内容篇
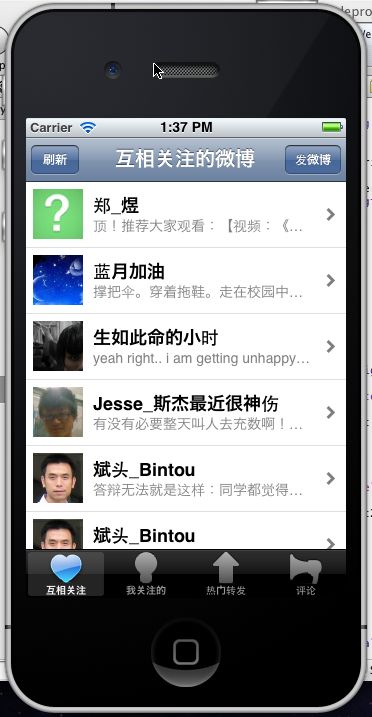
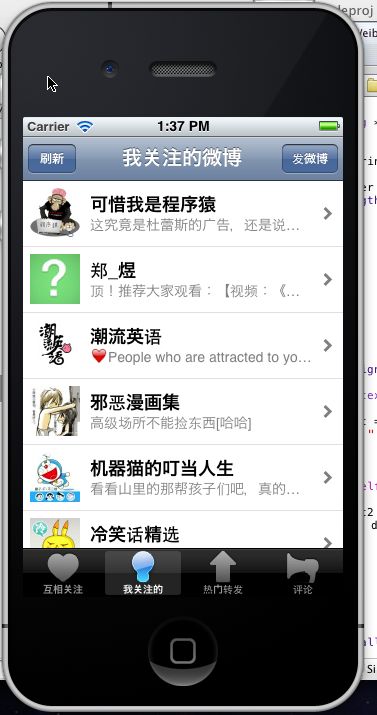
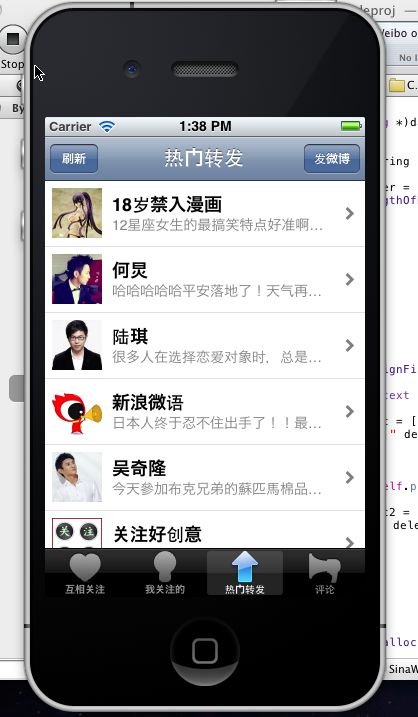
下面就是客户端的主体部分了,下面是各个页面的内容:
这就是各个Tab的内容。上面的按钮后面再说。
下面就以两个类来做说明,其中前三个标签的类基本上是一样的,所以只说一个,后面的获取评论的类稍微有点不一样,所以就拿出来再说一下。
下面就先说我是如何获取热门转发的微博内容的。
获取热门转发的微博内容需要用到是热门转发API,这个API的请求方式是GET,所以直接用NSData来下载就可以了。
调用这个API必选的参数只有一个,就是access_token,其他参数就根据自己的需要去设置咯
我处理这个UITableViewController的类是HotWeiboViewController。
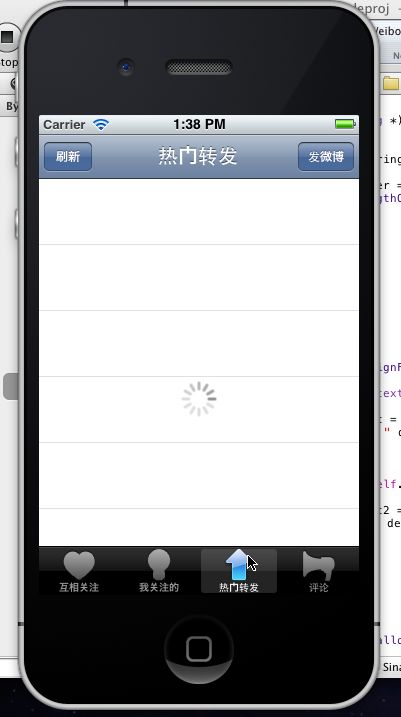
下面这个图片是第一次切换到热门转发这个tab时的样子
头文件中各个属性的定义:
[cpp] view plaincopyprint?
//
//  HotWeiboViewController.h
//  SinaWeibo
//
//  Created by mac11 on 12-4-16.
//  Copyright (c) 2012年 __MyCompanyName__. All rights reserved.
//

#import <UIKit/UIKit.h>
#import "UserDetailViewController.h"
#import "OAuthWebViewController.h"

@interface HotWeiboViewController : UITableViewController

@property (strong ,nonatomic) NSString *access_token;
@property (strong, nonatomic) NSMutableArray *statusArray;
@property (strong, nonatomic) NSMutableArray *imageItems;
@property (strong, nonatomic) NSMutableArray *userNames;
@property (strong, nonatomic) NSMutableArray *userText;
@property (strong, nonatomic) UIActivityIndicatorView *activityIndicator;
@property (strong, nonatomic) NSMutableArray *weiboId;
@end
// // HotWeiboViewController.h // SinaWeibo // // Created by mac11 on 12-4-16. // Copyright (c) 2012年 __MyCompanyName__. All rights reserved. // #import <UIKit/UIKit.h> #import "UserDetailViewController.h" #import "OAuthWebViewController.h" @interface HotWeiboViewController : UITableViewController @property (strong ,nonatomic) NSString *access_token; @property (strong, nonatomic) NSMutableArray *statusArray; @property (strong, nonatomic) NSMutableArray *imageItems; @property (strong, nonatomic) NSMutableArray *userNames; @property (strong, nonatomic) NSMutableArray *userText; @property (strong, nonatomic) UIActivityIndicatorView *activityIndicator; @property (strong, nonatomic) NSMutableArray *weiboId; @end
[cpp] view plaincopyprint?
- (void)viewDidLoad
{
    [super viewDidLoad];

    self.access_token = [OAuthWebViewController getAccesstoken];
    self.imageItems = [[NSMutableArray alloc] init];
    self.userText = [[NSMutableArray alloc] init];
    self.userNames = [[NSMutableArray alloc] init];
    self.weiboId = [[NSMutableArray alloc] init];

    self.activityIndicator = [[UIActivityIndicatorView alloc] initWithActivityIndicatorStyle:UIActivityIndicatorViewStyleWhiteLarge];
    [self.activityIndicator setColor:[UIColor grayColor]];

    [_activityIndicator setCenter:CGPointMake(160, 220)];
    [self.tableView addSubview:_activityIndicator];
    [_activityIndicator startAnimating];
    [self downloadData];
}
在这个函数中,首先通过OAuthWebViewController的类方法来获取access_token。然后接下来是四个NSMutableArray来申请空间。分别是存用户的头像、微博、昵称和该微博的id,id的用法后面再说。
然后是创建了一个UIActivityIndicatorView的对象,也就是上图的那个风火轮,在函数的最后调用了downloadData函数。这个函数就是通过API来下载热门转发榜上面的微博数据。
[cpp] view plaincopyprint?
-(void)downloadData
{
    dispatch_queue_t downloadQueue = dispatch_queue_create("download data", NULL);

    dispatch_async(downloadQueue, ^{
        NSMutableString *url = [[NSMutableString alloc]initWithString:Hotweibo];
        [url appendFormat:@"?access_token=%@&count=30",self.access_token];
        NSData *userdata = [[NSData alloc]initWithContentsOfURL:[NSURL URLWithString:url]];

        NSError *error;
        NSMutableArray *timeLine = [NSJSONSerialization JSONObjectWithData:userdata options:kNilOptions error:&error];

        for(int i=0;i < [timeLine count];i++)
        {
            NSDictionary *dict = (NSDictionary *)[timeLine objectAtIndex:i];
            [self.userText addObject:[dict objectForKey:@"text"]];
            [self.weiboId addObject:[dict objectForKey:@"id"]];
            [self.userNames addObject:[[dict objectForKey:@"user"] objectForKey:@"screen_name"]];
            NSString *url = [[dict objectForKey:@"user"] objectForKey:@"profile_image_url"];
            NSData *imageData = [[NSData alloc] initWithContentsOfURL:[NSURL URLWithString:url]];
            [self.imageItems addObject:[UIImage imageWithData:imageData]];
        }

        dispatch_async(dispatch_get_main_queue(), ^{
            self.statusArray = timeLine;
        });
    });
    dispatch_release(downloadQueue);

}
在这个函数中,我们用了GCD,由于我只是做一个操作,就是下载并解析数据,所以在这里用并发的队列或者是连续的队列都可以。用一个异步函数来下载数据并解析,下载的数据类型是JSON,在ios5中,加入了一个很强大的解析JSON的类,就是NSJSONSerialization。解析完再对数组中的每一项进行提取,拿自己需要的数据,对于和UI相关的操作,都要在主线程中进行,所以在主线程中,将存储有数据的指针复制给一个属性statusArray,此时这个statusArray就会调用它的setter函数
[cpp] view plaincopyprint?
-(void)setStatusArray:(NSMutableArray *)statusArray
{
    if(_statusArray != statusArray)
    {
        _statusArray = statusArray;
        if(self.tableView.window)
            [self.tableView reloadData];
    }
    [_activityIndicator stopAnimating];

}
-(void)setStatusArray:(NSMutableArray *)statusArray
{
if(_statusArray != statusArray)
{
_statusArray = statusArray;
if(self.tableView.window)
[self.tableView reloadData];
}
[_activityIndicator stopAnimating];
}
判断数据是否改变了,是的话就对视图进行reloadData,之前还加了一个判断,用来判断该视图现在是否在主页面上。
关于block和GCD的知识,会再写一篇总结,这里就只是大概讲一下。
由于用了GCD所以在加载数据的时候,页面也就不会卡住了。
下面对于UITableView的dataSource的操作,就不说什么了,之前一篇UITableViewController总结已经有说明,下面就直接给出代码。
[cpp] view plaincopyprint?
#pragma mark - Table view data source

- (NSInteger)tableView:(UITableView *)tableView numberOfRowsInSection:(NSInteger)section
{
    return [self.statusArray count];
}

- (UITableViewCell *)tableView:(UITableView *)tableView cellForRowAtIndexPath:(NSIndexPath *)indexPath
{
    static NSString *CellIdentifier = @"Cell";

    UITableViewCell *cell = [tableView dequeueReusableCellWithIdentifier:CellIdentifier];
    if (cell == nil) {
        cell = [[UITableViewCell alloc] initWithStyle:UITableViewCellStyleDefault reuseIdentifier:CellIdentifier];
    }

    // Configure the cell...
    cell.imageView.image = [self.imageItems objectAtIndex:indexPath.row];
    cell.textLabel.text = [self.userNames objectAtIndex:indexPath.row];
    cell.detailTextLabel.text = [self.userText objectAtIndex:indexPath.row];
    return cell;
}
当选中其中某一行之后,会跳转到另一个页面,显示那条微博的一些内容,如下图所示:
这个UIViewController的类是UserDetailViewController。在storyboard中已经使用了segue来进行跳转,所以在热门转发的VC(ViewController)中,只需要在prepareForSegue方法中传相应的参数即可。
[cpp] view plaincopyprint?
-(void)prepareForSegue:(UIStoryboardSegue *)segue sender:(id)sender
{
    if([segue.identifier isEqualToString:@"userDetail4"])
    {
        [segue.destinationViewController setImage:[self.imageItems objectAtIndex:self.tableView.indexPathForSelectedRow.row]];
        [segue.destinationViewController setName:[self.userNames objectAtIndex:self.tableView.indexPathForSelectedRow.row]];
        NSString *time = [[self.statusArray objectAtIndex:self.tableView.indexPathForSelectedRow.row]objectForKey:@"created_at"];
        [segue.destinationViewController setTime:time];
        [segue.destinationViewController setText:[self.userText objectAtIndex:self.tableView.indexPathForSelectedRow.row]];
        [segue.destinationViewController setWeiboId:[self.weiboId objectAtIndex:self.tableView.indexPathForSelectedRow.row]];
    }
}
现在看会热门转发的这个界面,在界面的navigationBar中我们看到有两个按钮,一个是刷新,一个是发微博。
刷新按钮,做的操作和downdata这个方法的工作一样,就是下载数据,最后如果数据和现在页面上的不一样的话,就reloaddata,一样是用GCD,所以不会影响当前视图。
发微博这个按钮,就是通过segue来到一个新的VC中。
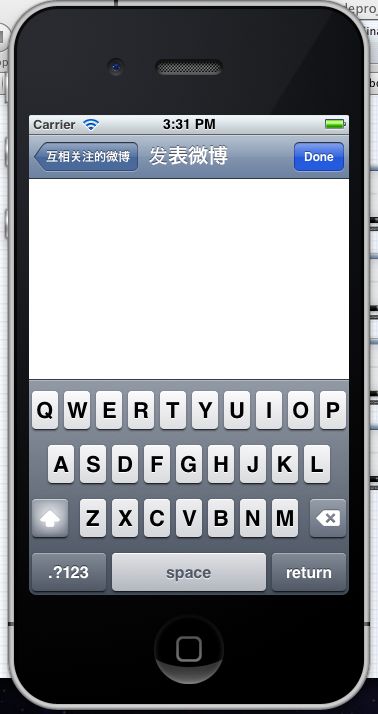
三、发微博
上面这个界面就是发微博时候的界面,就是一个TextView,只能实现输入文本,无法发送图片和表情。
在输入前右上角的done按钮不会出现,这个按钮是为了在用户输入完成后,可以让键盘缩回去而设置的。原先的设计是在下面会有一个发送按钮,但是后来被老师一说,也觉得其实在done按钮实现发送就可以了,没必要再多弄一个按钮。所以done按钮的任务就是将键盘推下和发送微博。
首先,先说下如何让键盘消失的,是通过TextView的delegate来实现的。当轻点TextView时,键盘上来时会同时响应下面这个函数
[cpp] view plaincopyprint?
-(void)textViewDidBeginEditing:(UITextView *)textView
{
    UIBarButtonItem *done = [[UIBarButtonItem alloc]initWithBarButtonSystemItem:UIBarButtonSystemItemDone target:self action:@selector(pressDone)];
    self.navigationItem.rightBarButtonItem = done;
    self.weiboText.text = @"";
}
-(void)textViewDidBeginEditing:(UITextView *)textView
{
UIBarButtonItem *done = [[UIBarButtonItem alloc]initWithBarButtonSystemItem:UIBarButtonSystemItemDone target:self action:@selector(pressDone)];
self.navigationItem.rightBarButtonItem = done;
self.weiboText.text = @"";
}
我就是在这个函数中为WeiboSendViewController添加一个done按钮,并将原来屏幕上的提示输入的信息去掉。
当键盘推下去时,又会响应下面的函数
[cpp] view plaincopyprint?
-(void)textViewDidEndEditing:(UITextView *)textView
{
    self.navigationItem.rightBarButtonItem = nil;
}
-(void)textViewDidEndEditing:(UITextView *)textView
{
self.navigationItem.rightBarButtonItem = nil;
}
在里面将done按钮去掉。
前面说了,当按下done的时候,让键盘推下并发送微博,在发送前要对微博内容进行检查,因为要符合内容不能为空或者是不可以超过140字,新浪的140字是这样计算的,中文状态下,每个汉字和符号都算一个字,在英文状态下,字母和符号都算半个字。针对这个来检查看看是否不符合条件,给出警告。符合条件的时候就发送。
下面是统计微博内容长度的函数
[cpp] view plaincopyprint?
-(int)textLength:(NSString *)dataString
{
    float sum = 0.0;
    for(int i=0;i<[dataString length];i++)
    {
        NSString *character = [dataString substringWithRange:NSMakeRange(i, 1)];
        if([character lengthOfBytesUsingEncoding:NSUTF8StringEncoding] == 3)
        {
            sum++;
        }
        else
            sum += 0.5;
    }

    return ceil(sum);
}
-(int)textLength:(NSString *)dataString
{
float sum = 0.0;
for(int i=0;i<[dataString length];i++)
{
NSString *character = [dataString substringWithRange:NSMakeRange(i, 1)];
if([character lengthOfBytesUsingEncoding:NSUTF8StringEncoding] == 3)
{
sum++;
}
else
sum += 0.5;
}
return ceil(sum);
}
上面判断的方法是根据,当用NSUTF8StringEncoding来编码时,中文和中文状态下的字符都会是三个字节,英文状态下是1个字节,最后向下取整。
[cpp] view plaincopyprint?
-(void)pressDone
{
    [self.weiboText resignFirstResponder];
    if([self.weiboText.text isEqualToString:@""])
    {
        UIAlertView *alert = [[UIAlertView alloc] initWithTitle:@"weibo" message:@"content is empty! Please input something !" delegate:nil cancelButtonTitle:@"YES" otherButtonTitles:nil];
        [alert show];
        return ;
    }
    if([self textLength:self.weiboText.text] > 140)
    {
        UIAlertView *alert2 = [[UIAlertView alloc] initWithTitle:@"weibo" message:@"contents is more than 140!" delegate:nil cancelButtonTitle:@"YES" otherButtonTitles:nil];
        [alert2 show];
        return ;
    }

    NSString *url = [[NSString alloc]initWithString:UpdateUrl];

    NSString *params = [[NSString alloc] initWithFormat:@"access_token=%@&status=%@",self.access_token,self.weiboText.text];
    NSMutableData *postData = [[NSMutableData alloc] init];
    [postData appendData:[params dataUsingEncoding:NSUTF8StringEncoding]];

    NSMutableURLRequest *request = [NSMutableURLRequest requestWithURL:[NSURL URLWithString:url] cachePolicy:NSURLRequestReloadIgnoringCacheData timeoutInterval:3.0];
    [request setHTTPMethod:@"POST"];
    [request setHTTPBody:postData];

    self.connection = [[NSURLConnection alloc] initWithRequest:request delegate:self startImmediately:YES];
}
上面的代码便是当按下done按钮时候的响应函数,第一行的resignFirstResponder让UITextView放弃作为当前的响应者,让Controller恢复第一响应者的身份,由于UITextView不再是第一响应者,键盘也就消失咯,在接下来检测完如果微博的内容符合发送要求,那么就进行发送咯
仅发送文本内容的微博是使用statuses/update这个API,这个API是POST请求方式的,所以不能像之前的GET请求的API一样直接下载数据。
在ios中,使用NSMutableURLRequest和NSURLConnection来实现POST请求类型的API的发送。
首先是设置发送请求的URL,和之前的GET请求不一样的是,在这个URL中,不包含参数,所以URL就仅仅是update这个API的URLhttps://api.weibo.com/2/statuses/update.json
而这个API内需要设置两个必选的参数,一个是access_token,另一个是微博内容status,发送之前需要对内容进行URLencode。
为了发送POST请求的URL,首先是新建一个NSMutableURLRequest的对象,然后设置两个参数一个是HTTPMethod,还有一个是HTTPBody,从代码中可以看到,HTTPBody中放的就是要传的参数,是编完码之后的,然后再利用NEURLConnection来创建连接,就可以了。
那么要怎么知道是否发送成功了呢?
发现在NSURLConnection的创建函数中有一个delegate参数,我们就是通过delegate来获取连接状态的,看下面四个函数
[cpp] view plaincopyprint?
#pragma mark - NSURLConnection delegate Methods

-(void)connection:(NSURLConnection *)connection didReceiveResponse:(NSURLResponse *)response
{
    self.responseData = [[NSMutableData alloc] initWithLength:0];
}

-(void)connection:(NSURLConnection *)connection didReceiveData:(NSData *)data
{
    [self.responseData appendData:data];
}

-(void)connectionDidFinishLoading:(NSURLConnection *)theconnection
{
    NSError *error;
    NSDictionary *dict = [NSJSONSerialization JSONObjectWithData:self.responseData options:kNilOptions error:&error];
    NSLog(@"%@",dict);

    NSString *date = [dict objectForKey:@"created_at"];
    if(date)
    {
        UIAlertView *alert = [[UIAlertView alloc] initWithTitle:@"weibo" message:@"send succeed!" delegate:nil cancelButtonTitle:@"YES" otherButtonTitles:nil];
        [alert show];
    }
    else {
        UIAlertView *alert = [[UIAlertView alloc] initWithTitle:@"weibo" message:@"send Fail!" delegate:nil cancelButtonTitle:@"YES" otherButtonTitles:nil];
        [alert show];
    }

    [self.connection cancel];
}

-(void)connection:(NSURLConnection *)theconnection didFailWithError:(NSError *)error
{
    UIAlertView *alert = [[UIAlertView alloc] initWithTitle:@"weibo" message:@"send fail!" delegate:nil cancelButtonTitle:@"YES" otherButtonTitles:nil];
    [alert show];
    [self.connection cancel];
}
首先通过新浪的发送微博的API的说明文档可以知道,当发送成功时,会返回该微博的数据,当中会有该微博的发送时间,发送失败的话,当然也就不会有那个时间啦,所以我是以收到的数据中是否有创建时间。
上面的函数中第一个是当服务器有足够的资源并且准备响应这个连接时响应的,我在里面将存放返回数据的NSMutableData长度置0。
第二个函数是每次有数据传送的时候都会响应的函数,我在这里面就将数据存起来。
第三个函数就是当数据都接受完的时候响应的,在该函数中我也根据接收到的数据进行解析并判断是否发送成功,并且需要调用cancle方法来释放连接。
最后一个函数就是当连接发生错误的时候响应的咯,当连接出现错误时,也要释放连接,因为不会再接收到数据了。
以上就是发送微博的整个过程的实现了,通过这一个例子,其他的POST类型的API的调用,也就几乎一样了。
四、获取评论与发表评论
在前面的微博内容篇中有说获取评论和其他的有点不一样,其实就是在获取评论的时候,多存储一个评论的id,不仅仅是存储微博的id,其他的基本上和获取其他微博内容的一样操作。
重点是说下下面的对一条微博进行评论和恢复一条评论
这两个操作是不一样的,道理谁都知道的啦,评论一条微博使用comments/create这个API,使用方法和前面发微博的那个API的方法一样,多了个参数微博id而已。
回复一条评论,就使用comments/reply这个API,多了个参数,就是评论的id。
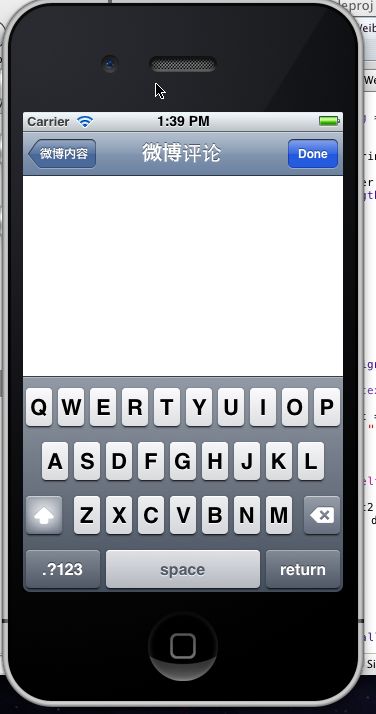
回复评论和评论微博我是在同一个VC中来控制的,在显示某一条评论的内容时,右边的按钮就会显示一个回复的按钮,按下就到评论界面
评论的这个VC和之前的发微博的那个一样,也是一个TextView,不一样的地方主要就是下面的按下done按钮后的响应。
[cpp] view plaincopyprint?
-(void)pressDone
{
    [self.pingLunText resignFirstResponder];

    if([self.pingLunText.text isEqualToString:@""])
    {
        UIAlertView *alert = [[UIAlertView alloc] initWithTitle:@"提示" message:@"内容为空,请输入要发布的内容再按发送!" delegate:nil cancelButtonTitle:@"确定" otherButtonTitles:nil];
        [alert show];
        return ;
    }
    if([self textLength:self.pingLunText.text] > 140)
    {
        UIAlertView *alert2 = [[UIAlertView alloc] initWithTitle:@"提示" message:@"内容超过140字,请删减后再按发送!" delegate:nil cancelButtonTitle:@"确定" otherButtonTitles:nil];
        [alert2 show];
        return ;
    }

    NSString *params,*url;

	if(!self.pinglunId)
    {
		url = [[NSString alloc] initWithString:HuiFuUrl];

		params = [[NSString alloc] initWithFormat:@"access_token=%@&comment=%@&id=%@",self.access_token,self.pingLunText.text,self.weiboId];
	}
	else
	{
		url = [[NSString alloc] initWithString:ReplyUrl];

		params = [[NSString alloc] initWithFormat:@"access_token=%@&comment=%@&cid=%@&id=%@",self.access_token,self.pingLunText.text,self.pinglunId,self.weiboId];
	}

	NSMutableData *postData = [[NSMutableData alloc] init];
    [postData appendData:[params dataUsingEncoding:NSUTF8StringEncoding]];

    NSMutableURLRequest *request = [NSMutableURLRequest requestWithURL:[NSURL URLWithString:url] cachePolicy:NSURLRequestReloadIgnoringCacheData timeoutInterval:3.0];
    [request setHTTPMethod:@"POST"];
    [request setHTTPBody:postData];

    self.connection = [[NSURLConnection alloc] initWithRequest:request delegate:self startImmediately:YES];

}
主要是通过判断是否存在评论id,存在的话,就是回复一条评论,不存在的话就是评论一条微博。调用相应的API即可。
剩下的就和发送微博的VC几乎一样了。
在代码中,可以看到在调用相应的API时,对应的URL我都是用一个变量来代替,我是将用到的URL都集中用宏定义定义在一个头文件中,便于管理和修改。
关于block 和GCD的博客已经更新 block && Grand Central Dispatch,有兴趣的朋友可以去看看
终于写完啦~,这个客户端还有很多地方可以再提升,加入查看每条微博的评论,增加转发功能等,还有用上core data(还没学,学完就改善)存储用户的数据,用来存储一些数据,让用户可以不用每次都进行授权登录。
源码放到了资源区了,需要5分下载 有兴趣的朋友就去下来看看咯 加上了简单的coredata的应用。漏洞有不少有兴趣的朋友就自己修改下咯 ios小项目——新浪微博客户端
