【笔记】distcc分布式编译
distcc分布式编译
1) 编译安装
# 下载"distcc-3.2rc1.tar.bz2"
tar jxvf distcc-3.2rc1.tar.bz2

# 前提:需要安装python支持,见"Issue 1"
yum install python python-devel

cd distcc-3.2rc1
# 编译安装
./configure \
--prefix=/usr/local/distcc-3.2 \
--with-gtk
# 加"--with-gtk"以生成GNOME监测器
make CFLAGS='-Wno-error=unused-but-set-variable'  # "Issue 2"
make install

# 添加环境变量,以便终端执行
vi /etc/profile
# 添加"/usr/local/distcc-3.2/bin"
source /etc/profile

# 添加帮助手册,以便查看
vi /etc/man.config
# 添加"MANPATH /usr/local/distcc-3.2/share/man"
man distccd
man distcc

# 修改配置,"make install"的没用
# vi /usr/local/distcc-3.2/etc/default/distcc

# 添加环境变量,以指明服务主机
vi /etc/profile
# 添加如下内容(DISTCC-PUMP MODE):
# export DISTCC_HOSTS='--randomize localhost 172.16.9.241,cpp,lzo'
# 类似"172.16.9.241,cpp,lzo",往后加服务机。ip可以用主机名替代。见第3节。
# 3.x添加的pump模式,可以将头文件也发送至编译服务器,改进编译流程。
source /etc/profile

# 查看hosts
distcc --show-hosts

# 启动distcc服务,用户join
distccd \
--daemon \
--user join \
--allow 172.16.0.0/16,cpp,lzo \
--log-file '/home/join/distcc.log' \
--log-level=debug
# "172.16.0.0"后斜杠值"/16"是指CIDR蒙版,具体见参考5。
# 可以添加到"/etc/rc.d/rc.local"以开机启动。
# vi /etc/rc.d/rc.local
# 注意用全路径"/usr/local/distcc-3.2/bin/distccd"

# 查看进程
ps aux | grep distccd
Issue 1: fatal error: Python.h: No such file or directory … #include “Python.h” …
yum install python python-devel
我这未卸载原装的Python2.6,同时又自己安装了Python2.7。在"checking for python2.6"时通过了。如果让用Python2.7的话,可以这样:
# 绕过python2.6的校验
mv /usr/bin/python2.6 /usr/bin/python2.6_backup
# 添加python2.7以被校验
ln -s /usr/local/py-2.7.6/bin/python2.7 /usr/bin/python2.7
# 查看确认下
ll /usr/bin | grep python
Issue 2: src/dotd.c:175:9: error: variable 'ret' set but not used [-Werror=unused-but-set-variable]
make CFLAGS='-Wno-error=unused-but-set-variable'
参考
- distcc INSTALL
- 使用distcc进行分布式编译来提高编译速度
- Android distcc实现分布式编译
- 使用distcc加速編譯
- IPv4_CIDR_blocks
2) 编译nginx
# 下载并解压
wget http://nginx.org/download/nginx-1.5.12.tar.gz
tar zxvf nginx-1.5.12.tar.gz

# 依赖pcre
yum install pcre pcre-devel -y

cd nginx-1.5.12
# 配置
./configure \
--prefix=/usr/local/nginx-1.5.12 \
--with-http_ssl_module \
--with-http_realip_module \
--with-http_gzip_static_module

# 另开个终端,查看编译主机
distccmon-text 2
# 或者用图像界面的监测器
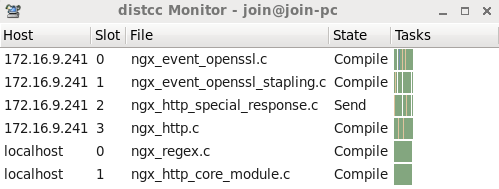
distccmon-gnome &

# 编译,C++为"CXX=distcc"
pump make -j8 CC=distcc  # 可能会遇到"Issue 1"
# "-j8"指明多少线程编译,这儿得看你有多少服务机及其各自核数。

# 查看distcc日志
vi /home/join/distcc.log
效果
问题
编译nginx,各种配置DISTCC_HOSTS,DISTCC_POTENTIAL_HOSTS,但总是只有localhost编译。我这主要是"Issue 23"两个问题。
Issue 1: /usr/local/distcc-3.2/bin/pump: error: pump mode requested, but distcc hosts list does not contain any hosts with ',cpp' option
man distcc
# 看"QUICKSTART FOR DISTCC-PUMP MODE"
Issue 2: 配主机名,连接不到。
# king-pc认为是202.102.110.205,连接不到。
distcc[7065] (dcc_select_for_write) ERROR: IO timeout
distcc[7065] ERROR: timeout while connecting to 202.102.110.205:3632
首先VMware下装的CentOS,网络要配为桥接模式。参考Vmware虚拟机下三种网络模式配置。
但是,如上述日志,本应是172.16.9.241,却认为是202.102.110.205。在路由表找错了?然后改配ip。
Issue 3: 直接配ip(172.16.9.241),路由表里找不到。
# 直接配的172.16.9.241,路由表里找不到。
distcc[9515] ERROR: nonblocking connect to 172.16.9.241:3632 failed: No route to host
172.16.9.241能ping通,但"No route to host”,防火墙?
# 查看iptables状态
service iptables status

# iptables开启/关闭开机自启动
chkconfig iptables on
chkconfig iptables off

# iptables开启/关闭服务
service iptables start
service iptables stop
确实关闭防火墙即可。
参考
- nginx documentation
3) 修改主机名
# 修改hosts
vi /etc/hosts
# 添加如下内容:
# 127.0.0.1   join-pc localhost.localdomain localhost4 localhost4.localdomain4

# 修改
vi /etc/sysconfig/network
# HOSTNAME如下修改:
# HOSTNAME=join-pc

hostname join-pc
reboot
4) 参考
略。
