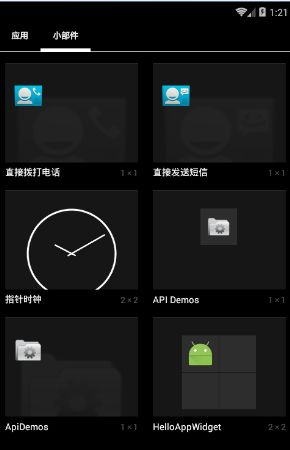
初识Android的Widget开发
一、Widget 、App Widget 、Web App 的概念
Widget最初的概念是98年一个叫Rose的苹果工程师提出,直到2003年的时候才正式为大家所知,不过随后无数大公司都开始接受并应用这一思路。现在我们看到在苹果系统里按下F4弹出的Dashboard里的小工具叫Widget,在Windows 7里侧边栏上的那些漂亮的小工具叫Gadget(widget变体?),除此以外还有yahoo Widget等等Widget产品。他们有一个共同的特点就是采用前台Web开发用的技术(譬如HTML、CSS、Javascript)来制作的小工具、小部件。
在Android系统里,几乎每个可视化的View组件都叫Widget,起这个名字可能当时是为了赶时髦。
App Widget是从Android 1.5以后才有的东东,就是可以放在Android桌面上的应用程序小组件。这一点上看他的功能很像windows的侧边栏小工具,可惜的是他的采用技术并不是HTML等技术。当然App Widget才是我们本讲的主角,本来他应该顺理成章叫做Widget的,至少也要叫做Gadget吧,可惜这个名字已经被他自己的系统占用了,所以只好改名叫App Widget。
最后讲一下Web App 或者说是Android Web Application,也许叫mobile web application 更准确些。我们发现现在智能机系统平台很多,譬如iOS、Android、Windows Phone 、WebOS、BlackBerry等等,它们采用的技术框架也各不相同,有没有办法写一个程序在各个系统上都能运行呢?答案是肯定的,写基于Webkit的浏览器的应用即可。我们使用 HTML5、CSS3、JavaScript、WebKit 等技术来写的Web Application也许是今后的一个大潮流也说不准啊。有机会我们再讲讲Android Web Application 的开发。
二、继续了解下App Widget框架的主要的类:
AppWidgetProvider:继承自BroadcastReceiver,在App Widget应用update,enable,disable和deleted时接受通知。其中onUpdate,onReceive是最常用到的方法。
AppWidgetProviderInfo:描述AppWidget的大小,更新频率和初始界面等信息,以xml文件的形式存在于应用中的res/xml目录下。
AppWidgetManager:负责管理AppWidget,向AppWidgetProvider发送通知。
RemoteViews:一个可以在其他应用进程中运行的类,是构造AppWidget的核心。
三、App Widget 的简单例子:WidgetTest
1】新建空文件项目,WidgetTest,注意新建时不用自动生成MAinActivity.Java和main_activity.xml文件;
在res下新建一个xml的文件夹,并在里面新建一个widget的配置文件,比如:widget_config_info.xml,下面贴出她的代码:
<?xml version="1.0" encoding="utf-8"?>
<!-- appwidget-provider Widget的配置文件  -->
<!-- android:minWidth 最小宽度 -->
<!-- android:minHeight 最小高度 -->
<!-- android:updatePeriodMillis 组件更新频率(毫秒) -->
<!-- android:initialLayout 组件布局XML的位置 -->
<!-- android:configure Widget设置用Activity -->
<appwidget-provider xmlns:android="http://schemas.android.com/apk/res/android"
    android:initialLayout="@layout/widget_config"
    android:minHeight="72dp"
    android:minWidth="100dp"
    android:updatePeriodMillis="86400000" />
里面有解释了,你们可以看得懂了,我就不用继续谈里面的每个属性的作用了。你们看解释就好了~~~~
2】然后在layout文件夹下新建一个widget的布局文件,如widget_config.xml,代码入下:
<?xml version="1.0" encoding="utf-8"?>
<LinearLayout xmlns:android="http://schemas.android.com/apk/res/android"
    android:id="@+id/layout"
    android:layout_width="match_parent"
    android:layout_height="match_parent"
    android:gravity="center"
    android:orientation="vertical">
    <TextView
        android:id="@+id/txtMonth"
        android:layout_width="wrap_content"
        android:layout_height="wrap_content"
        android:layout_margin="2dp"
        android:text=""
        android:textColor="#000000" />
    <TextView
        android:id="@+id/txtDay"
        android:layout_width="wrap_content"
        android:layout_height="wrap_content"
        android:text=""
        android:textColor="#990033"
        android:textSize="25dp" />
    <TextView
        android:id="@+id/txtWeekDay"
        android:layout_width="wrap_content"
        android:layout_height="wrap_content"
        android:layout_margin="2dp"
        android:text=""
        android:textColor="#000000" />
</LinearLayout>
只是在里面放入三个TextView控件而已,用来分别显示年月日等数据;
3】接下来,在包名的文件夹里新建一个Widget.java类,继承于AppWidgetProvider类,代码如下:
package com.yaowen.helloappwidget;

import android.app.PendingIntent;
import android.appwidget.AppWidgetManager;
import android.appwidget.AppWidgetProvider;
import android.content.Context;
import android.content.Intent;
import android.text.format.Time;
import android.util.Log;
import android.widget.RemoteViews;
import android.widget.Toast;

/**
 * @author YAOWEN
 * @create on 2015-11-7
 */
public class WidgetConfig extends AppWidgetProvider {
    private String[] months = {"一月", "二月", "三月", "四月", "五月", "六月", "七月", "八月", "九月", "十月", "十一月", "十二月"};
    private String[] days = {"周日", "周一", "周二", "周三", "周四", "周五", "周六"};

    @Override
    public void onReceive(Context context, Intent intent) {
        Log.i("yaowen", "HelloWidgetProvider --> onReceive");
        super.onReceive(context, intent);
        Toast.makeText(context, "点击了widget日历", Toast.LENGTH_SHORT).show();
    }

    @Override
    public void onUpdate(Context context, AppWidgetManager appWidgetManager, int[] appWidgetIds) {
        Log.i("yaowen", "HelloWidgetProvider --> onUpdate");
        RemoteViews remoteViews = new RemoteViews(context.getPackageName(), R.layout.widget_config);
        Time time = new Time();
        time.setToNow();
        String month = time.year + "年" + months[time.month];
        remoteViews.setTextViewText(R.id.txtDay, new Integer(time.monthDay).toString() + "日");
        remoteViews.setTextViewText(R.id.txtMonth, month);
        remoteViews.setTextViewText(R.id.txtWeekDay, days[time.weekDay]);
        Intent intent = new Intent("com.yaowen.helloappwidget");
        PendingIntent pendingIntent = PendingIntent.getBroadcast(context, 0, intent, 0);
        remoteViews.setOnClickPendingIntent(R.id.layout, pendingIntent);
        appWidgetManager.updateAppWidget(appWidgetIds, remoteViews);

        super.onUpdate(context, appWidgetManager, appWidgetIds);

    }

    @Override
    public void onDeleted(Context context, int[] appWidgetIds) {
        Log.i("yaowen", "HelloWidgetProvider --> onDeleted");
        super.onDeleted(context, appWidgetIds);
        Toast.makeText(context, "删除了widget日历", Toast.LENGTH_SHORT).show();
    }

    @Override
    public void onEnabled(Context context) {
        Log.i("yaowen", "HelloWidgetProvider --> onEnabled");
    }

    @Override
    public void onDisabled(Context context) {
        Log.i("yaowen", "HelloWidgetProvider --> onDisabled");
    }

}
上面代码忘记做注释了,在这类分别解释下,使用remoteViews类分别加载上来布局文件的相应ID设置好值,然后PendingIntent 这就没什么好解释的了。
4】最后,别忘记了在mainfests里添加这段话:
<receiver android:name=".WidgetConfig" >
    <intent-filter>
        <action android:name="android.appwidget.action.APPWIDGET_UPDATE" />
    </intent-filter>

    <meta-data
        android:name="android.appwidget.provider"
        android:resource="@xml/widget_config_info" />
</receiver>
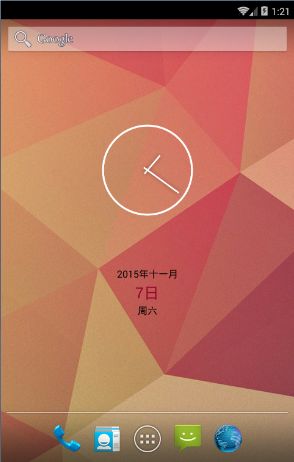
好了,所有代码都贴出来了,下面贴出改app的运行效果图吧:

