puppet集中配置管理
推荐Puppet学习网站:
http://puppet.wikidot.com
http://docs.puppetlabs.com
puppet 是一个配置管理工具, 典型的, puppet 是一个 C/S 结构, 当然,这里的 C 可以有很多,因
此,也可以说是一个星型结构. 所有的 puppet 客户端同一个服务器端的 puppet 通讯. 每个
puppet 客户端每半小时(可以设置)连接一次服务器端, 下载最新的配置文件,并且严格按照配
置文件来配置服务器. 配置完成以后,puppet 客户端可以反馈给服务器端一个消息. 如果出错,
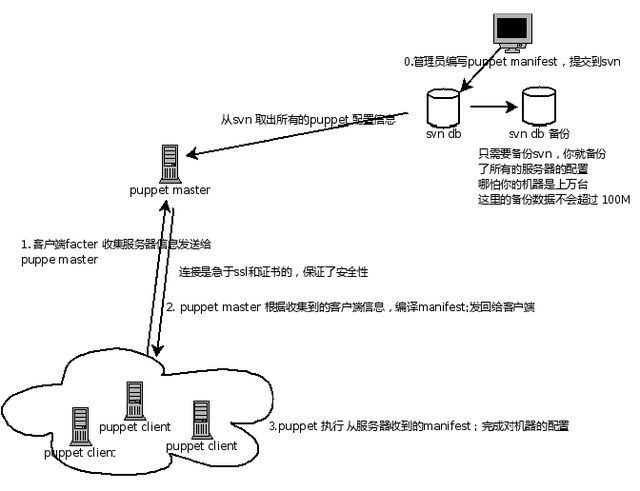
也会给服务器端反馈一个消息. 下图展示了一个典型的 puppet 配置的数据流动情况.
puppet 的细节和原理
puppet 的目的是让你只集中于你要管理的目标,而忽略实现的细节,例如命令名,参数或者文件
格式. puppet 把系统里面的用户,软件包,服务看作是"资源", puppet 的作用就是管理这些资源
以及资源之间的相互联系.
Puppet 采用了非常简单的 C/S 架构,所有数据的交互都通过 SSL 进行,以保证安全。它的工作
1. 客户端 Puppetd 向 Master 发起认证请求,或使用带签名的证书。
2. Master 告诉 Client 你是合法的。
3. 客户端 Puppetd 调用 Facter,Facter 探测出主机的一些变量,例如主机名、内存大小、IP 地址
等。Puppetd 将这些信息通过 SSL 连接发送到服务器端。
4. 服务器端的 Puppet Master 检测客户端的主机名,然后找到 manifest 对应的 node 配置,并对该
部分内容进行解析。Facter 送过来的信息可以作为变量处 理,node 牵涉到的代码才解析,其他
没牵涉的代码不解析。解析分为几个阶段,首先是语法检查,如果语法错误就报错;如果语法
没错,就继续解析,解析的结 果生成一个中间的“伪代码”(catelog),然后把伪代码发给客
户端。
5. 客户端接收到“伪代码”,并且执行。
6. 客户端在执行时判断有没有 File 文件,如果有,则向 fileserver 发起请求。
7. 客户端判断有没有配置 Report,如果已配置,则把执行结果发送给服务器。
8. 服务器端把客户端的执行结果写入日志,并发送给报告系统
现在我们开始配置:
环境:rhel6.3 selinux and iptables disabled
master:192.168.1.41 cluster1.example.com
client : 192.168.1.42 cluster2.example.com
192.168.1.43 cluster3.example.com
master 与所有的client之间需要解析,以及时间的同步,不然会失败。 //时间同步大家可以参见我的
ntp时间同步http://my.oschina.net/zhangxc73912/blog/207197
master端:
首先.yum仓库添加如下:
[root@cluster1 ~]# vim /etc/yum.repos.d/rhel-source.repo

[puppet]
name=puppet
baseurl=http://yum.puppetlabs.com/el/6Server/products/x86_64/
gpgcheck=0
[ruby]
name=ruby
baseurl=http://yum.puppetlabs.com/el/6Server/dependencies/x86_64/
gpgcheck=0
[optioal]
name=optional
baseurl=ftp://192.168.1.233/pub/puppet/optional
gpgcheck=0
//optional 包大家可以下载我的,包里面有所需要的资源
http://yunpan.cn/QIf54dLXyJwhB
安装puppet-server
[root@cluster1 ~]# yum install puppet-server
配置
[root@cluster1 ~]# cd /etc/puppet/manifests/
[root@cluster1 manifests]# touch site.pp    //puppet 的第一个执行的代码是在/etc/puppet/manifest/site.pp,
因此这个文件必须存在,而且其他的代码也要通过该文件来调用。也就是说没有此文件 puppet master 无法启动,配置后面再定义
启动
[root@cluster1 manifests]# /etc/init.d/puppetmaster start
[root@cluster1 manifests]# netstat -anltp
tcp        0      0 0.0.0.0:8140                0.0.0.0:*                   LISTEN      1335/ruby
clinet端:
yum配置和master相同
[root@cluster2 ~]# yum install puppet -y
我们首先不要开启pppute,即让服务在前端跑,且不要打入后端。
首先做的是测试,测试成功,再将其打入后端
[root@cluster2 ~]# puppet agent --server cluster1.example.com --no-daemonize --verbose
Info: Creating a new SSL key for cluster2.example.com
Info: Caching certificate for ca
Info: csr_attributes file loading from /etc/puppet/csr_attributes.yaml
Info: Creating a new SSL certificate request for cluster2.example.com
Info: Certificate Request fingerprint (SHA256):
 74:A1:FC:A7:BB:E1:9E:5B:F3:89:BB:0D:41:5B:10:59:76:D3:DF:2D:25:F4:6B:ED:78:14:9F:0C:87:76:02:B7
Info: Caching certificate for ca
client 向 master 发出证书验证请求,然后等待 master 签名并返回证书。
参数--server 指定了需要连接的 puppet master 的名字或是地址,默认连接名为“puppet”的主机
如要修改默认连接主机可以修改/etc/sysconfig/puppet 文件中的 PUPPET_SERVER=puppet 选项
参数--no-daemonize 是 puppet 客户端运行在前台
参数--verbose 使客户端输出详细的日志
在 master端
[root@cluster1 ~]# puppet cert list     //显示等待签名的证书
  "cluster2.example.com" (SHA256) 74:A1:FC:A7:BB:E1:9E:5B:F3:89:BB:0D:41:5B:10:59:76:D3:DF:2D:25:F4:6B:ED:78:14:9F:0C:87:76:02:B7
[root@cluster1 ~]# puppet cert sign cluster2.example.com  //签名证书
Notice: Signed certificate request for cluster2.example.com
Notice: Removing file Puppet::SSL::CertificateRequest cluster2.example.com at '/var/lib/puppet/ssl/ca/requests/cluster2.example.com.pem'
如果需要同时签名所有证书,则
[root@cluster1 ~]# puppet cert sign --all
如果要删除证书则
[root@cluster1 ~]# puppet cert clean cluster2.example.com
在签署完成之后(等待一段时间)在client端,会有如下输出:
Info: Caching certificate_revocation_list for ca
Info: Retrieving plugin
Info: Caching catalog for cluster2.example.com
Info: Applying configuration version '1395006768'
Info: Creating state file /var/lib/puppet/state/state.yaml
当然了,在实际当中,我们则需要它自动签署:
master端:
[root@cluster1 ~]# vi /etc/puppet/puppet.conf
[main]
        autosign = true   //允许所有客户认证
[root@cluster1 ~]# touch /etc/puppet/autosign.conf
[root@cluster1 ~]# vi /etc/puppet/autosign.conf
.example.com                 //允许该域的主机,当然我们还可以再添见域,另起一行书写
[root@cluster1 ~]# /etc/init.d/puppetmaster reload
client端:
[root@cluster3 ~]# puppet agent --server cluster1.example.com --no-daemonize --verbose //他就会自动被签署了
在实际中有时会修改 client 端的主机名,这样就需要重新生成证书:
1)在 server 端执行:
[root@cluster1 ~]# puppet cert --clean cluster2.example.com    //删除原有的client端主机名,ssl
Notice: Revoked certificate with serial 3
Notice: Removing file Puppet::SSL::Certificate cluster2.example.com at '/var/lib/puppet/ssl/ca/signed/cluster2.example.com.pem'
Notice: Removing file Puppet::SSL::Certificate cluster2.example.com at '/var/lib/puppet/ssl/certs/cluster2.example.com.pem'
2)在 client 端执行:rm -fr /var/lib/puppet/ssl/*
[root@cluster2 ~]# rm -rf  /var/lib/puppet/ssl/*
[root@cluster2 ~]# puppet agent --server cluster1.example.com --no-daemonize --verbose
puppet 资源定义
以下资源均定义在/etc/puppet/manifest/site.pp 文件中,在没有指定节点的情况下,对所有
已经经过验证的 client 都生效
<1-7 摘子讲义>
1. 创建文件
file { "/var/www/html/index.html": content => "www.example.com" }
mkdir /etc/puppet/files
echo www.westos.org > /etc/puppet/files/index.html
vi /etc/puppet/fileserver.conf
[files]
path /etc/puppet/files
allow *.example.com
service puppetmaster reload
file { "/var/www/html/index.html":
source => "puppet:///files/index.html",
}
2. 软件包定义
package { “httpd”: ensure => present;
“vsftpd”: ensure => absent
}
3. 服务定义
service { "httpd": ensure => running;
“vsftpd”: ensure => stopped
}
4. 组定义
group { "wxh": gid => 600 }
5. 用户定义
user { "wxh":
uid => 600,
gid => 600,
home => "/home/wxh",
shell => "/bin/bash" ,
password => westos
}
file { "/home/wxh":
owner => wxh,
group => wxh,
mode => 700,
ensure => directory
}
file { "/home/wxh/.bash_logout":
source => "/etc/skel/.bash_logout",
owner => wxh,
group => wxh
}
file { "/home/wxh/.bash_profile":
source => "/etc/skel/.bash_profile",
owner => wxh,
group => wxh
}
file { "/home/wxh/.bashrc":
source => "/etc/skel/.bashrc",
owner => wxh,
group => wxh
}
user { "test": uid => 900,
home => "/home/test",
shell => "/bin/bash",
provider => useradd,
managehome => true,
ensure => absent
}
exec { "echo westos | passwd --stdin test":
path => "/usr/bin:/usr/sbin:/bin",
onlyif => "id test"
}
6. 文件系统挂载
file { "/public":
ensure => directory
}
mount { "/public":
device => "192.168.0.254:/var/ftp/pub",
fstype => "nfs",
options => "defaults",
ensure => mounted
}
7. crontab 任务
cron { echo:
command => "/bin/echo `/bin/date` >> /tmp/echo",
user => root,
hour => ['2-4'],
minute => '*/10'
}
下面我举个例子,(后面我会给大家介绍模块的思想)
[root@cluster1 puppet]# vi /etc/puppet/fileserver.conf
[files]
path /etc/puppet/files
allow *
[root@cluster1 puppet]# mkdir /etc/puppet/files
[root@cluster1 puppet]# /etc/init.d/puppetmaster restart
例1:(文件)
master端:
[root@cluster1 files]# cp /etc/passwd /etc/puppet/files/passwd
[root@cluster1 files]# vim /etc/puppet/manifests/site.pp
file { "/tmp/zhang_1":
        source => "puppet:///files/index.html",
        mode => 600
}
client端:
[root@cluster3 tmp]# puppet agent --server cluster1.example.com --no-daemonize --verbose
[root@cluster3 tmp]# cat /tmp/zhang_1   //成功建立
zhangxc1
例2:(安装服务,卸载服务,启动服务)
master端:
[root@cluster1 puppet]# vi manifests/site.pp
package { ["vim-enhanced","httpd"]:
        ensure => present;
        ["vsftpd"]:
        ensure => absent;
}

service { "httpd":
        ensure => "running"     //stopped 为停止服务
}
clientd端:
[root@cluster3 ~]#  puppet agent --server cluster1.example.com --no-daemonize --verbose
...
Notice: /Stage[main]/Main/Service[httpd]/ensure: ensure changed 'stopped' to 'running'
...
当然在批量部署的时候,我们会选择主机,进行部署不同的服务:做法如下:(nodes.pp为指定节点,site.pp为全部节点)
master端:
[root@cluster1 manifests]# vi site.pp
import "nodes.pp"
[root@cluster1 manifests]# vi nodes.pp
node 'cluster2.example.com' {
file { "/tmp/zhangxc-cluster2":
        source => "puppet:///files/passwd",
        mode => 600
}
}

node 'cluster3.example.com' {
file { "/tmp/zhangxc-cluster3":
        source => "puppet:///files/index.html",
        mode => 600
}
}
client端:
[root@cluster2 ~]# puppet agent --server cluster1.example.com --no-daemonize --verbose
[root@cluster2 tmp]# ls
zhangxc-cluster2


[root@cluster3 ~]# puppet agent --server cluster1.example.com --no-daemonize --verbose
[root@cluster3 tmp]# ls
zhangxc-cluster3
当然在生产环境当中我们不能这样一步一步做,所以在这里我将经给大家介绍模块,当你需要对一个服务进行操作我们则可做成模块供各个节点使用。
大家可以举一反三,在这里我以在apache做虚拟主机为例:
master端:
[root@cluster1 ~]# cd /etc/puppet/modules/
[root@cluster1 modules]# mkdir httpd/
[root@cluster1 httpd]# mkdir files  manifests
[root@cluster1 httpd]# cd manifests/
[root@cluster1 manifests]# ls
config.pp  init.pp  install.pp  service.pp
[root@cluster1 manifests]# ls ../files/
httpd.conf
[root@cluster1 manifests]# cat install.pp
class httpd::install {
    package { "httpd":
        ensure => present
    }
}
[root@cluster1 manifests]# cat service.pp
class httpd::service {

    service { "httpd":

        ensure => running,
        require => Class["httpd::install","httpd::config"]
    }
}
[root@cluster1 manifests]# cat config.pp
class httpd::config {

    file { "/etc/httpd/conf/httpd.conf":

        ensure => present,
        source => "puppet:///modules/httpd/httpd.conf",
        require => Class["httpd::install"],
        notify => Class["httpd::service"]
    }
}
[root@cluster1 manifests]# cat init.pp
class httpd {
    include httpd::install,httpd::config,httpd::service
}

[root@cluster1 manifests]# vi ../files/httpd.conf
...
ServerName 192.168.1.43:80
...
<VirtualHost *:80>
    DocumentRoot /www-zhangxc-cluster3
    ServerName cluster3.example.com
</VirtualHost>

[root@cluster1 manifests]# vi ../../../manifests/nodes.pp
node 'cluster3.example.com' {
include httpd

file { ["/www-zhangxc-cluster3"]:
        ensure => directory;
        ["/www-zhangxc-cluster3/index.html"]:
        content => "zhangxc-192.168.1.43";

}
}
node 'cluster2.example.com' {
file { ["/www-zhangxc-cluster2"]:
        ensure => directory;
        ["/www-zhangxc-cluster2/index.html"]:
        content => "zhangxc-192.168.1.42";

}
}
client端:
[root@cluster3 ~]# puppet agent --server cluster1.example.com --no-daemonize --verbose
当让我clients端:
[root@cluster2 ~]# /etc/init.d/puppet start //当我们配置没有问题时,就可以启动该服务。(注意开头那些话)
这样就ok了,大家可以在这基础上扩展!
