学习 AngularJS (六) scope 续
继续昨天 scope 未学完的.
作用域层级和继承
在作用域中定义的属性对子作用域是可见的, 只要子作用域没有定义同名属性.
根据我们前面查看 scope 的结构, 推测 angular 用 __proto__ 链形成继承结构, 故而一个 scope 能访问到
祖先 scope 的所有属性. 实验一下: 在 repeater 中访问 ctrler 中定义的 {{name}}, 实验通过.
书上确实说了, 此作用域继承 (inheritance) 和 js 中原型继承 (prototypical inheritance) 遵循同样的规则.
作用域层级中读写的区别
在 scope 中读操作 (read access) 是可以访问到祖先层级的属性/方法, 写操作 (write acess) 是写到当前
作用域. (这也是因为用 __proto__ 链的原因).
如果想确切地读取/写入父 scope, 则需要使用 $parent 属性.
如双向: <input type='text' ng-model='$parent.name' >
此方案缺点也很明显, 这里假设 name 在 $parent 层级, 如果中间加入别的 scope 层级, 就会导致失效.
另一个解决方案, 将变量绑定 (binding) 为某对象的属性, 该对象本身在任何 scope不变并可访问到,
只变化该对象的属性. 实验一下:
<!-- 将变量 name 作为 user 对象属性. -->
<div ng-app ng-init="user = {name:'foo'}">
  <h1>Hello {{user.name}}!</h1>
  <div ng-controller='HelloCtrl'> <!-- 这里产生子 scope -->
    Say hello to: <input type='text' ng-model='user.name'>
    <h2>hello, {{user.name}}!</h2>
  </div>
</div>
现在, 在 input 框中输入内容, 可以看到 h1,h2 中内容都发生变化.
这个方案要好一点, 它没有对 DOM 树做不必要的假设.
作用域层级与事件系统
AngularJS 提供命名事件 (named events) 在任何作用域开始分发 (dispatch), 向上分发称为 $emit, 向下广播
为 $broadcast.
AngularJS 核心服务 (services) 与指令 (directives) 使用此机制发送信号, 通知应用状态的重要变化.
如当 url 变化时, 根作用域 $rootScope 广播 $locationChangeSuccess 事件, 子 scope 可通过监听
获得通知:
$scope.$on('$locationChangeSuccess', function (... event args) {
  // ...事件处理代码...
});
模仿 DOM 事件, 作用域事件 (scope-event) 对象也有 preventDefault(), stopPropagation() 等方法.
书上说, AngularJS (只)有 3 种 emit 事件, 7 种 broadcast 事件, 要谨慎使用. 大部分情况下, 最好用
数据双向绑定. (猜测: 可能事件传输成本比较高, 或者容易递归死循环?)
作用域生命周期
作用域提供了独立的命名空间, 避免变量的名称冲突. 如果不需要作用域了, 可以销毁它(垃圾回收掉).
手工调用 Scope 类的 $new(), $destroy() 可手工创建/销毁作用域.
======
以上基本了解了作用域 (scope) 的概念. 让我们继续看 kityminder-editor 部分的源码.
前篇我们看到 kityminder-editor directive, 继续深入下去, 找到它包含的 undo-redo directive, 让我们单独
拆离它出来研究:
<div ng-app='kityminderDemo' ng-controller='MainController'>
  <undo-redo editor="editor" ></undo-redo>
  <!-- 原来是下面的这个 directives, 我们先注释掉 -->
  <kityminder-editor ... />
</div>
此时界面上会出现 undo, redo 两个按钮, 对应 HTML 是根据 undo-redo 指令的模板文件生成的, 为学得细一点,
摘要如下:
<!-- 最外层的 ng-app, 对应的 scope.$id = 1 (后面为测试, 结构略有调整) -->
<div ng-controller="MainController" ng-app="kityminderDemo" class="ng-scope">
  <!-- 由 undo-redo 指令展开的模板, 对应的 scope.$id=2 -->
  <div class="km-btn-group do-group ng-isolate-scope" editor="editor">
    <!-- 通过 css 设定显示为按钮样子, css 细节略. -->
    <div title="撤销 (Ctrl + Z)" ng-click="editor.history.undo();" ng-disabled="editor.history.hasUndo() == false" class="km-btn-item undo">
        <i class="km-btn-icon"></i>
    </div>
    <div title="重做 (Ctrl + Y)" ng-click="editor.history.redo()" ng-disabled="editor.history.hasRedo() == false" class="km-btn-item redo">
        <i class="km-btn-icon"></i>
    </div>
  </div>
</div>
这里用各种 css class 产生界面效果的我们略去, 主要关心:
问题1: undo-redo 元素上的 editor 属性是什么意思; 以及
问题2: div.undo 按钮上 ng-click, ng-disabled 是什么意思.
为此我们 hack 进入 undoRedo.directive.js 中加点调试代码 console.log() ... :
angular.module('kityminderEditor')
  .directive('undoRedo', function() { // 注册 undo-redo 指令
    return {
      restrict: 'E',  // 此指令只能作为元素使用.
      templateUrl: 'ui/directive/undoRedo/undoRedo.html', // 模板路径
      scope: {        // 创建一个独立的/隔离的 scope
        editor: '='   // 等价于 '=editor', 映射父 scope 的 editor 属性.
      },
      replace: true,  // 使用模板内容替换掉此指令内容, 可设置为 false 实验下.
      link: function($scope) {  // 连接 scope & directive
        // 为方便调试, 我们在这里输出此 directive 所在 scope 等信息.
        console.log('undo-redo link(), $scope is: ', $scope);
      }
    }
  });
这里大概能部分解答我的问题1, 即 editor 是什么意思, 现在知道它 (editor) 是从父级 scope 映射过来的, 那我们
现在研究一下父级 scope 从哪里弄来 editor 的.
由于原来 undo-redo 指令是含于 kityminder-editor 指令里面的, 而后者又被含于... 看代码:
<body ng-app='demo'>   <!-- 第一层 scope, 也是 $rootScope -->
  <div ng-controller='MainController'>   <!-- 第二层 scope -->
    <kityminder-editor />   <!-- 第三层 scope, 展开有更多 scope -->
    <!-- 这里引用 kityminder-editor 指令原来还带 on-init 属性, 其不影响提供 editor,minder 属性 -->
  </div>
</body>
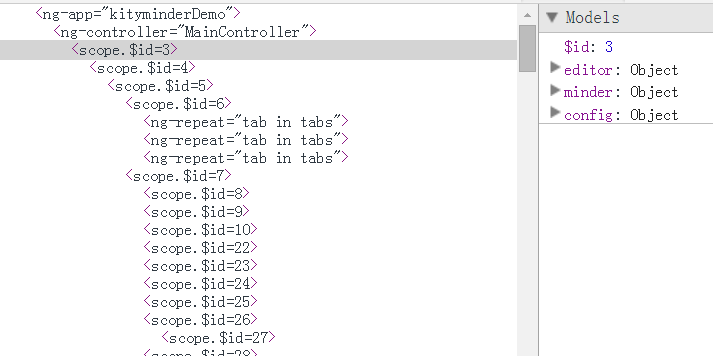
然后看 Chrome 中 Scope 图:

经过查看, 是 scope.$id=3 那一层提供的 editor, minder 对象. 其即对应 kityminder-editor 指令.
提供这两个对象和 on-init 也无关, HTML 中注释中说明了实验该情况的说明. 所以再细看该指令:
angular.module('km...')
  .directive('kityminderEditor', ... function() {
    return {
      // 各种复杂的暂时看不懂的先略去.
      link: function(scope, ...) {
        // 在某个嵌套又嵌套的函数中有:
        var KMEditor = seajs.require('editor');  // 引入 KMEditor 类.
        var editor = new KMEditor();  // 实例化一个 editor.

        scope.editor = editor;
        scope.minder = editor.minder;
        // 其它暂时不明白的略去, 总之这里为 scope 提供了域数据.
      }
    };
  });
为了验证, 实验在设置 scope.x=y 处加入一个 console.log(), 实验结果能看到该信息显示于 console.
以后有空再研究这里使用 seajs.require() 带来的回调/时序问题吧. 以及一些别的相关连接调用问题.
现在已知这里产生了 editor, minder 属性, 那为了仅测试 undo-redo, 我们不妨弄一个假的 controller,
提供测试用 editor, minder 属性和方法. 让我们实验吧:
<!-- 外面 body 及其 ng-app 略, 我们将 controller 换为 Fake 版的 -->
<div ng-controller='FakeController'>
  <undo-redo />  <!-- 这里我们连属性 editor='editor' 我们也去掉, 看看到底如何 -->
</div>
<script>
// 注册我们的 FakeController, 好为 scope 提供假的 editor, minder.
angular.module('demo')
  .controller('FakeController', function($scope) { // 注册此假 controller
    $scope.editor = 'fake-editor';  // 一会代换这些字符串为测试对象.
    $scope.minder = 'fake-minder';
  });
</script>
现在在元素 <div ng-controller> 上查看 scope, 果然有 editor, minder 属性了. (图就略了)
这里还实验出一个东西, 如果在 <undo-redo > 里面没有 editor='editor' , 则在 undo-redo 的 scope
中也就不会映射 parent-scope 的 editor 进入到自己. (似乎用起来麻烦点...?)
现在我们已经知道 undo-redo 中的 editor 从哪里来了, 让我们将其代换为一个测试对象:
// 在 FakeController 中添加/改写点测试代码:
var test_minder = {
  str: 'This is test-minder.'
};
var test_editor = {
  minder: test_minder,
  history: {
    undo: function() {
      console.log('您点击了 undo 按钮.');
    },
    redo: function() {
      console.log('您点击了 redo 按钮.');
    }
  },
};

$scope.editor = test_editor;
$scope.minder = test_minder;
这时, 让我们再点击 undo, redo 按钮, 此时在 console 上就能看到我们的 log 输出了! 此实验通过.
同样, 提供 hasUndo(), hasRedo() 方法于 editor.history 对象上, 也能看到 console 上对应输出 (略).
这样, 我们就基本明白了 undo-redo 指令的一般实现, 如何引用到对象, 处理 ng-click 事件等.
在这里, undo-redo 使用了 isolate-scope 机制, 我们之前看过但没有实例理解, 现在这就是一个实例.
通过 isolate scope 只引入了 editor 属性从 parent scope.
如果此 directive 不考虑复用因素, 其实不使用 isolate-scope, 甚至不创建自己的 scope 会更简单一点,
连元素上 editor='editor' 的似乎 ``自己=自己'' 的多余写法都不用写了.
休息一下, 以后接着学.