03-9 BGP route-map应用总结
在BGP进行路由过滤有几种类型:
prefix 的in和out策略
neighbor x.x.x.x distrubte in/out
最后就是强大的route-map.
route-map在BGP中的功能不仅仅是可以过滤路由。还有其他很多用途,今天我们来系统的看看到底route-map的主要功能在bgp中有哪些。
功能一:利用IP标准访问列表进行路由的过滤.
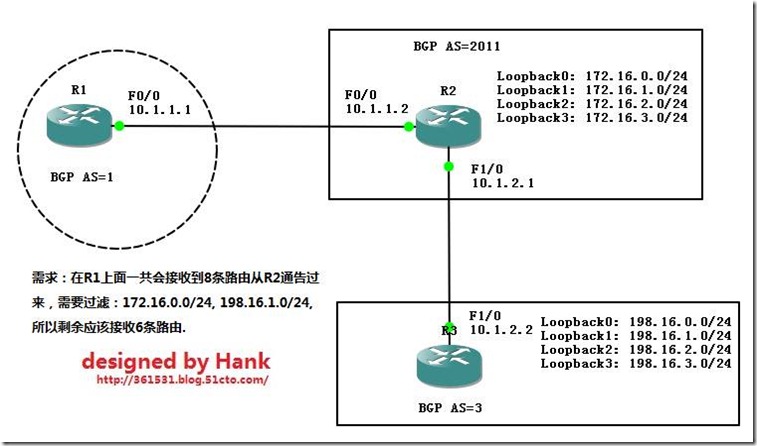
路由器R1要在入口方向做对端直连的EBGP邻居R2通告过来的所有路由做路由过滤.这个时候就可以用标准的访问列表进行控制。
R1#show run | be router bgp
router bgp 1
no synchronization
bgp log-neighbor-changes
neighbor 10.1.1.2 remote-as 2011
neighbor 10.1.1.2 route-map maipu in
no auto-summary
!
access-list 1 deny 172.16.0.0 0.0.0.255
access-list 1 deny 198.16.1.0 0.0.0.255
access-list 1 permit any
!
route-map maipu permit 10
match ip address 1
这里用route-map匹配标准访问列表,然后在邻居的入方向进行路由过滤。
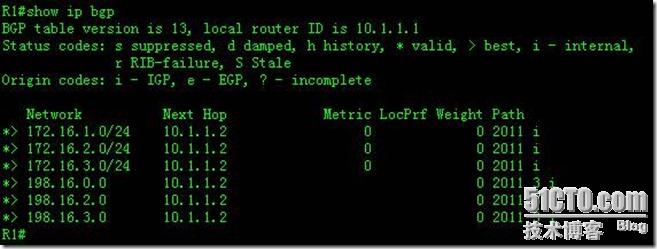
最后在R1上面只能收到6条路由,并且已经对172.16.0.0和198.16.1.0进行了过滤。
功能二:利用扩展访问列表进行基本的路由过滤功能:
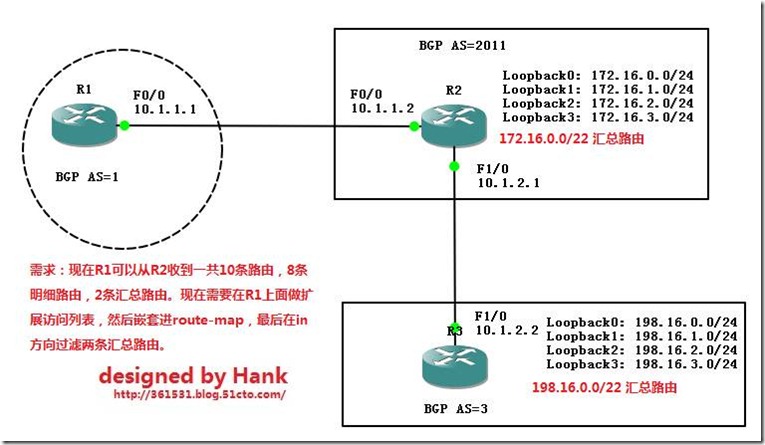
首先验证一下,在R1上面所收的路由:
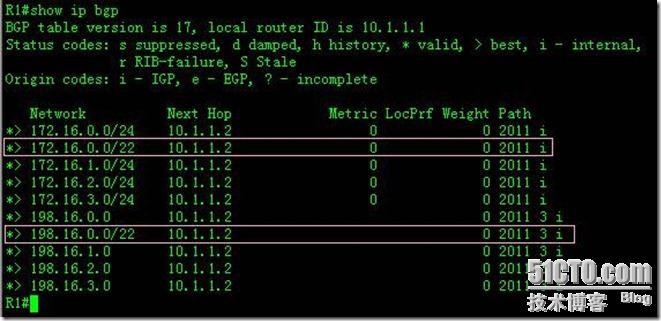
这里可以看到,R1确实从R2上面收了10条路由,8条明细,2条汇总路由。
这个时候在R1上面用扩展访问列表,需要达到的目的就是最后在R1上面收到8条明细路由。过滤2条汇总路由。
在R1上的配置应该为:
router bgp 1
no synchronization
bgp log-neighbor-changes
neighbor 10.1.1.2 remote-as 2011
neighbor 10.1.1.2 route-map aaa in
no auto-summary
!
access-list 101 deny ip 172.16.0.0 0.0.3.255 255.255.252.0 0.0.0.0
access-list 101 deny ip 198.16.0.0 0.0.3.255 255.255.252.0 0.0.0.0
access-list 101 permit ip any any
!
route-map aaa permit 10
match ip address 101
!
上面配置通过扩展访问列表特殊的语法可以达到的效果就是禁止两条掩码为22位的汇总路由,允许其他所有路由。
在本地的in方向应用。
最后我们再来看看R1的结果:
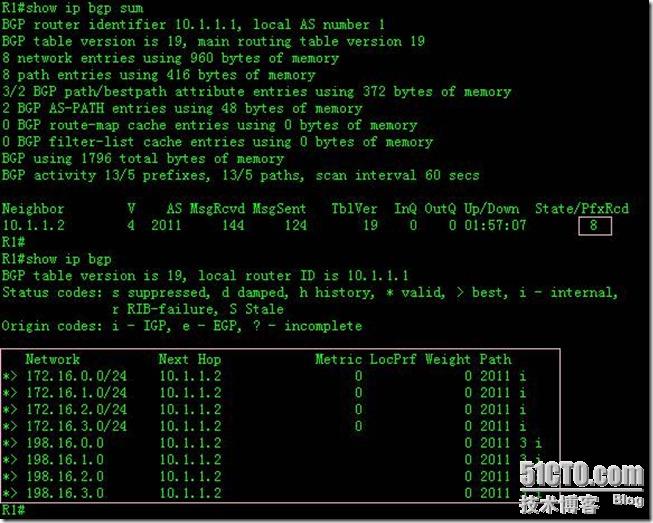
只收到8条明细路由,再也没有汇总路由过来了。
功能三:通过route-map有选择性的将weight属性在本地都设置为45.

这个只需要在以前的配置基础上加上设置weight权重的命令就可以了。
R1#show run | be router bgp
router bgp 1
no synchronization
bgp log-neighbor-changes
neighbor 10.1.1.2 remote-as 2011
neighbor 10.1.1.2 route-map aaa in
no auto-summary
!
access-list 101 deny ip 172.16.0.0 0.0.3.255 host 255.255.252.0
access-list 101 deny ip 198.16.0.0 0.0.3.255 host 255.255.252.0
access-list 101 permit ip any any
!
route-map aaa permit 10
match ip address 101
set weight 45
!
最后来看R1的结果:
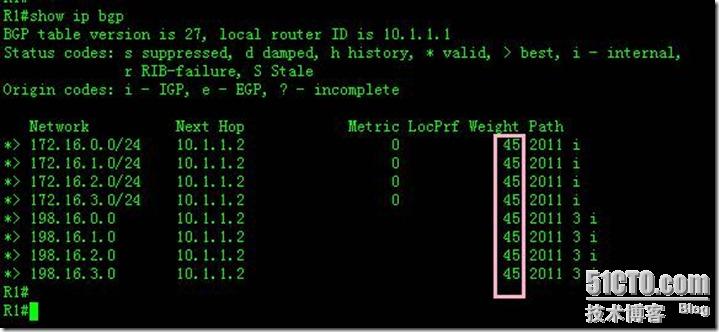
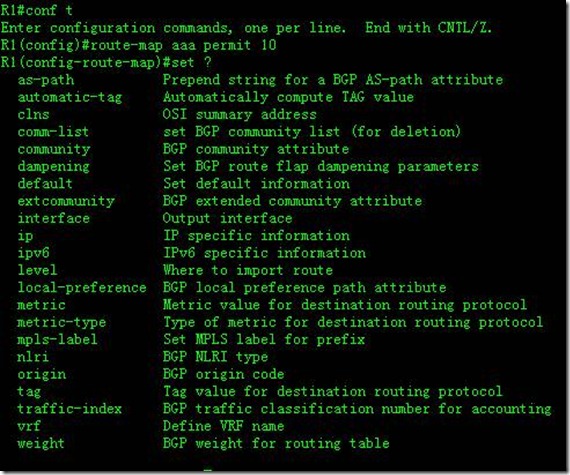
当然route-map可以控制还不仅仅是weight。可以设置的东西相当多。
功能4:用正则表达式来对路由进行过滤。也用route-map进行调用。
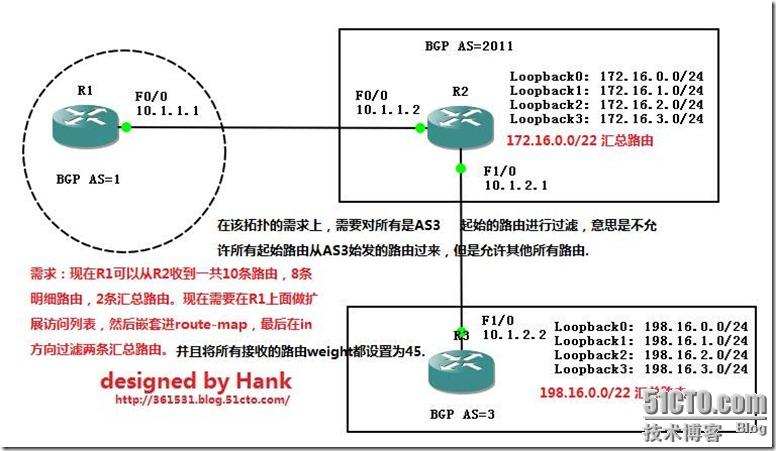
这里我们在R1上面用正则表达式进行过滤:
R1的配置:
router bgp 1
no synchronization
bgp log-neighbor-changes
neighbor 10.1.1.2 remote-as 2011
neighbor 10.1.1.2 filter-list 25 in
no auto-summary
!
ip as-path access-list 25 deny _3$
ip as-path access-list 25 permit .*
!
route-map bbb permit 10
match ip address 26
!
在这里用正则表达式,禁止起源于AS3的路由,允许其他的路由。
所以最后在R1上面只能收到AS2011通告过来的关于AS2011的路由。
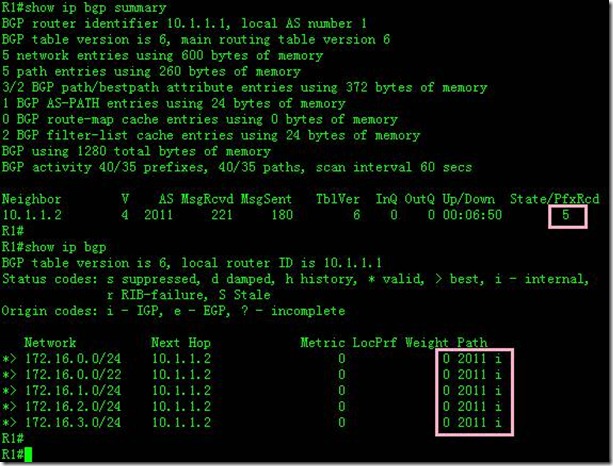
这里可以看到,一共R2 只通告了2011的路由过来,起源于AS3的5条路由被过滤掉了。
功能五:为选定的路由追加AS-path属性的信息
这里我们将就这个拓扑图:
![clip_image018[1] clip_image018[1]](http://img1.51cto.com/attachment/201111/23/351531_1322051648onQK.jpg)
这里,假如说我需要做的事情是将AS2的所有经过AS2011的路由的as-path都追加400,500,600.
这里可以在R2上面做下面的配置:
router bgp 2011
no synchronization
bgp log-neighbor-changes
network 172.16.0.0 mask 255.255.255.0
network 172.16.1.0 mask 255.255.255.0
network 172.16.2.0 mask 255.255.255.0
network 172.16.3.0 mask 255.255.255.0
aggregate-address 172.16.0.0 255.255.252.0
neighbor 10.1.1.1 remote-as 1
neighbor 10.1.1.1 route-map aaa out
neighbor 10.1.2.2 remote-as 3
no auto-summary
!
ip as-path access-list 1 permit _2011_
!
route-map aaa permit 10
match ip address 1
set as-path prepend 400 500 600
最后在R1上面看结果:

所有从R2通告过来途径了AS2011的路由全部都加上了AS信息:400,500,600.
当然route-map的功能还远不止这些。有兴趣的还可以在route-map上面再深入挖掘一下。功能很强大。