LNMP最新源码包一般安装过程及常见问题
LNMP最新源码包一般安装过程及常见问题
l 什么是LNMP
l 源码包下载地址
l 安装过程
l 常见错误
l 参考资料
什么是LNMP
Lnmp就是(linux+nginx+mysql+php)架构,Linux就是环境所在的操作系统;Nginx则是一个高性能的HTTP和反向代理服务器;MySQL则是开源数据库;PHP则是用来处理具体请求的脚本语言。
源码包下载地址
Nginx: http://nginx.org/download/nginx-1.8.0.tar.gz
Mysql数据库: http://mirror.bit.edu.cn/mysql/Downloads/MySQL-5.6/mysql-5.6.26.tar.gz
php: http://cn2.php.net/distributions/php-5.6.12.tar.gz
安装过程
Nginx安装:
首先,安装nginx,方法如下:
安装准备工作,安装编译开发工具(autoconf、automake、gcc、gcc-c++、make)等
[root@lab01 ~]# yum -y pcre-devel && yum -y groupinstall Development\ tools
[root@lab01 ~]# wget http://nginx.org/download/nginx-1.8.0.tar.gz -O /usr/src/nginx-1.8.0.tar.gz
[root@lab01 ~]# useradd -M -s /sbin/nologin nginx
[root@lab01 ~]# tar -zxvf /usr/src/nginx-1.8.0.tar.gz && cd nginx-1.8.0
[root@lab01 nginx-1.8.0]# yum -y install pcre-devel openssl-devel zlib-devel
[root@lab01 nginx-1.8.0]# mkdir /usr/local/nginx && chown nginx:nginx /usr/local/nginx
[root@lab01 nginx-1.8.0]#./configure --prefix=/usr/local/nginx --user=nginx --group=nginx --with-http_ssl_module --with-http_realip_module --with-pcre
注意:--with-pcre 为支持正则表达式(regular expressions)
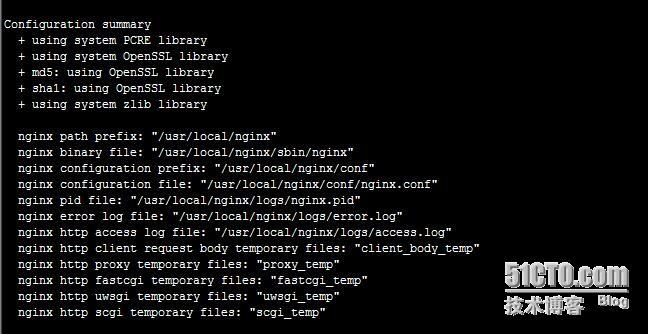
编译后可以看到如下图,如果没有错误就表示编译成功了,接下可以进行nginx安装。

接下来,执行行安装:
[root@lab01 nginx-1.8.0]# make && make install
到此,nginx安装完成,启动nginx:
[root@lab01 nginx-1.8.0]# cd /usr/local/nginx/
[root@lab01 nginx]# pwd
/usr/local/nginx
再启动前,我们先用-t参数来测试下nginx配置文件有没有错误,当现下面红色字的两行时表示没有错误,接下来可以启动nginx了。
[root@lab01 nginx]# ./sbin/nginx -t
nginx: the configuration file /usr/local/nginx/conf/nginx.conf syntax is ok
nginx: configuration file /usr/local/nginx/conf/nginx.conf test is successful
启动nginx
[root@lab01 nginx]# ./sbin/nginx
测试nginx是否启动OK:
可以用命令查看端口:netstat -tlunp

还可用ps -ef |grep nginx

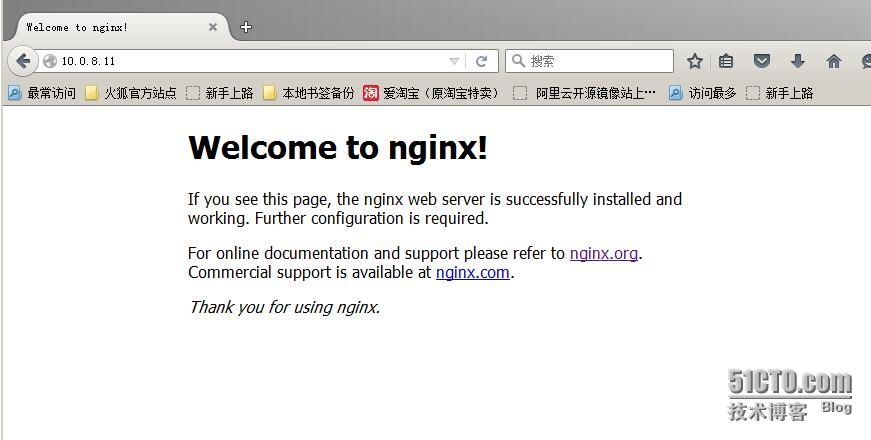
还有一种最直接的方法:浏览器直接访问:http://10.0.8.11 (10.0.8.11为我的服务器ip地址 )

Nginx到此结束。
Msql数据库安装:
Mysql的安装,和lamp时安装一样,我以前博客中有,这里引用链接:http://qiaomiao.blog.51cto.com/484197/1701566 ,不再重复。
php安装:
php安装和lamp时有所不同,安装过程如下:
安装前,参考官网说明:
有两个方法将 PHP 连接到服务器上。对于很多服务器,PHP 均有一个直接的模块接口(也叫做 SAPI)。这些服务器包括 Apache、Microsoft Internet Information Server、Netscape 和 iPlanet 等服务器。其它很多服务器支持 ISAPI,即微软的模块接口(OmniHTTPd 就是个例子)。如果 PHP 不能作为模块支持 web 服务器,总是可以将其作为 CGI 或 FastCGI 处理器来使用。这意味着可以使用 PHP 的 CGI 可执行程序来处理所有服务器上的 PHP 文件请求。
php就是通过php-fpm (FastCGI Process Manager) 与 nginx 相连接的。
首先,安装:
[root@lab01 ~]# wget http://cn2.php.net/distributions/php-5.6.12.tar.gz -O /usr/src/php-5.6.12.tar.gz
[root@lab01 ~]# tar -zxvf /usr/src/php-5.6.12.tar.gz && cd php-5.6.12
[root@lab01 php-5.6.12]# yum -y install autoconf automake libtool re2c flex bison libxml2-devel gd-devel libmcrypt-devel
[root@lab01 php-5.6.12]# ./configure --prefix=/usr/local/php --enable-fpm --with-mysql--with-mysqli --enable-mbstring --with-mcrypt
[root@lab01 php-5.6.12]# make && make install
配置php,php-fpm
[root@lab01 php-5.6.12]#cp php.ini-development /usr/local/php/php.ini 或用 cp php.ini-production /usr/local/php/php.ini
[root@lab01 php-5.6.12]#cp /usr/local/php/etc/php-fpm.conf.default /usr/local/php/etc/php-fpm.conf
[root@lab01 php-5.6.12]#ln -s /usr/local/php/sbin/php-fpm /usr/local/php/sbin/
再对php-fpm.conf的内容进行修改,将「user = nobody」,「group = nobody」分别改为「user = nginx」,「group = nginx」
[root@lab01 php-5.6.12]# vim /usr/local/php/etc/php-fpm.conf

还可修改php-fpm的 pid文件(默认为/usr/local/php/var/run/php-fpm.pid),日志文件(默认为/usr/local/php/var/log/php-fpm.log),启动时端口(默认为9000)等很多设置。
这样PHP的安装配置工作就大体完成了。
测试php是否安装成功:
在临时目录/tmp,建立phpinfo.phpw文件输入如下代码:
[root@lab01 php-5.6.12]# cd /tmp
[root@lab01 tmp]# vim ./phpinfo.php
<?php
/** /home/reetsee/tmp/phpinfo.php **/
echo phpinfo();
?>
然后执行
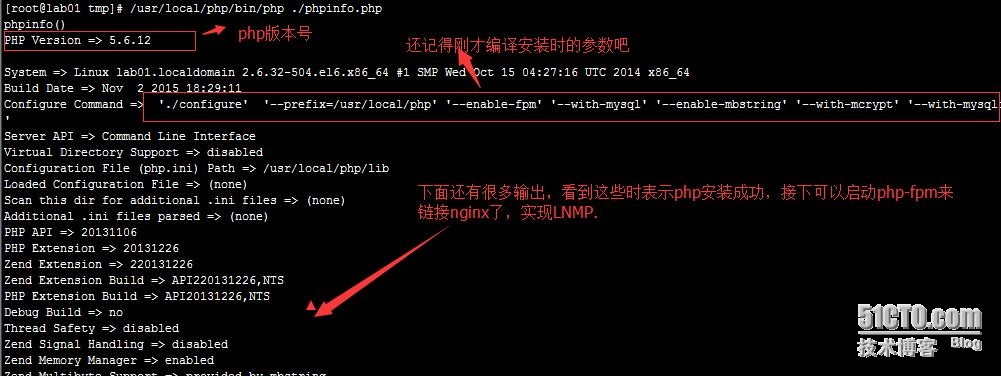
[root@lab01 tmp]# /usr/local/php/bin/php ./phpinfo.php

启动php-fpm来连接nginx实现LNMP.

php-fpm启动完毕后,我们要修改nginx的配置文件,支持php-fpm,在配置文件中找到如下文字:
# pass the PHP scripts to FastCGI server listening on 127.0.0.1:9000
#
#location ~ \.php$ {
# root html;
# fastcgi_pass 127.0.0.1:9000;
# fastcgi_index index.php;
# fastcgi_param SCRIPT_FILENAME /scripts$fastcgi_script_name;
# include fastcgi_params;
#}
取掉#号,修改为如下:
# pass the PHP scripts to FastCGI server listening on 127.0.0.1:9000
#
location ~ \.php$ {
root html;
fastcgi_pass 127.0.0.1:9000;
fastcgi_index index.php;
fastcgi_param SCRIPT_FILENAME $document_root$fastcgi_script_name;
include fastcgi_params;
}
也可以取掉#号,修改为如下:
# pass the PHP scripts to FastCGI server listening on 127.0.0.1:9000
#
location ~ \.php$ {
root html;
fastcgi_pass 127.0.0.1:9000;
fastcgi_index index.php;
fastcgi_param SCRIPT_FILENAME /usr/local/nginx/html/$fastcgi_script_name;
include fastcgi_params;
}
最后重新启动nginx:
[root@lab01 tmp]# /usr/local/nginx/sbin/nginx -s reload
测试LNMP,到此全部完成。可以用下面这个脚本来检测下。
移到刚才那个文件,到nginx的网页根目录。并编辑。
[root@lab01 tmp]# mv /tmp/phpinfo.php /usr/local/nginx/html/
[root@lab01 tmp]# vim /usr/local/nginx/html/phpinfo.php
加入如下代码

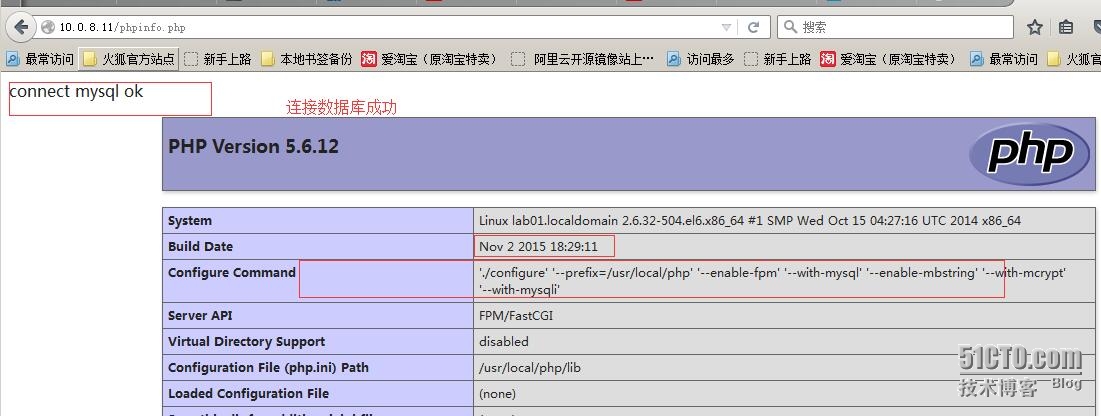
保存后在浏览器查看,如果有显示 connect mysql ok,还显示phpinfo();的信息表示lnmp安装成功,如果出现 connect mysql failed,可以检查下mysql 的账号 密码,ip是不是正确的,账号有没权根连接等。假如数据库在别的服务器,还要考虑防火墙等……

常见错误:
在上面的测试LNMP时,如果出现File not found,可是明明有这个文件(phpinfo.php)啊,
同时在nginx错误日志中看到:
代码如下:
[root@lab01 tmp]# cat /usr/local/nginx/logs/error.log
2015/11/03 11:02:47 [error] 128900#0: *7 FastCGI sent in stderr: "Primary script unknown" while reading response header from upstream, client: 10.0.8.222, server: localhost, request: "GET /phpinfo.php HTTP/1.1", upstream: "fastcgi://127.0.0.1:9000", host: "10.0.8.11"
错误解决方法:
在Nginx配置文件中找到定义调用脚本文件的地方,如:
复制代码 代码如下:
fastcgi_param SCRIPT_FILENAME /scripts$fastcgi_script_name;
修改成如下方式($document_root):
复制代码 代码如下:
fastcgi_param SCRIPT_FILENAME $document_root$fastcgi_script_name;
本文是 巧妙绝情 一个字一个图打出来,参考了好多资料,感谢他们的分享,基于open source分享精神,转载请注明出出。
支持我,请点击 巧妙绝情 谢谢
参考资料:
安装nginx:http://nginx.org/en/docs/configure.html
php和nginx整合:http://php.net/manual/zh/install.general.php
51cto博客:http://os.51cto.com/art/201410/454231.htm