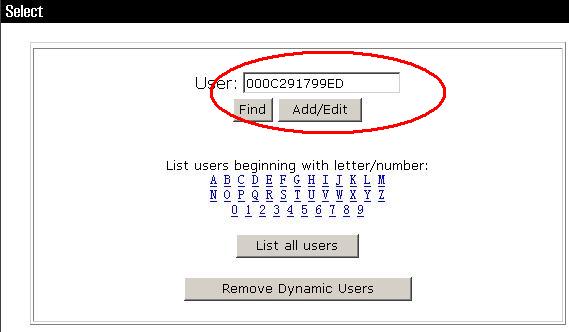
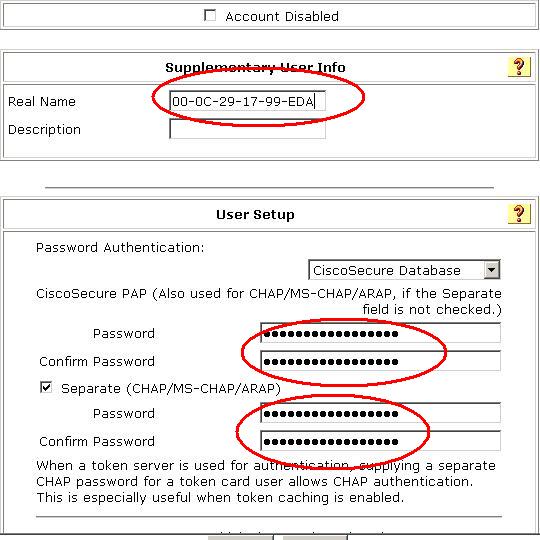
二层交换机的安全方案与实施
实验环境:
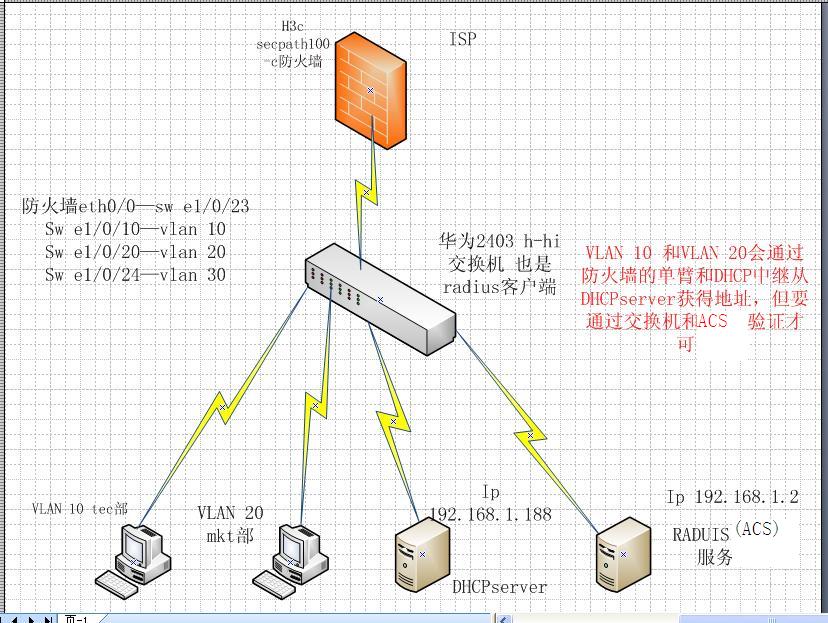
三个VLAN环境,VLAN 10 与VLAN 20 分别用于测试,VLAN 30 为服务器所在VLAN(DHCP服务器 一台,ACS服务器一台(radius);
DHCP服务器基于centos系统;
ACS服务器基于windows server 2003 系统;
实验拓扑如下:
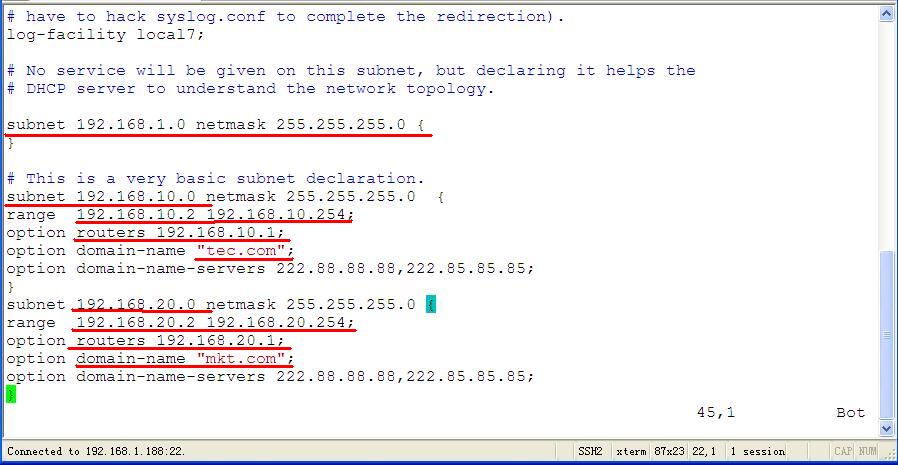
DHCP服务器的具体配置内容:
server 2003 上ACS的配置步骤:
因为ACS客户端是基于Java编写的,所以要先确定你的系统上具有支持Java的环境;可以安装jdk等软件
ACS安装:

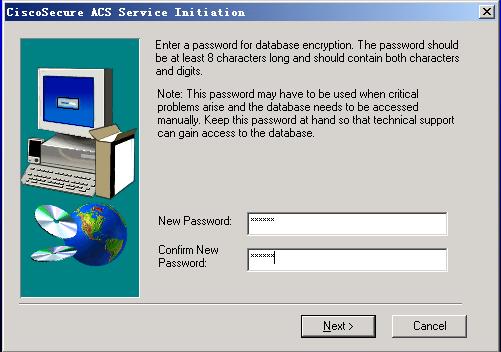
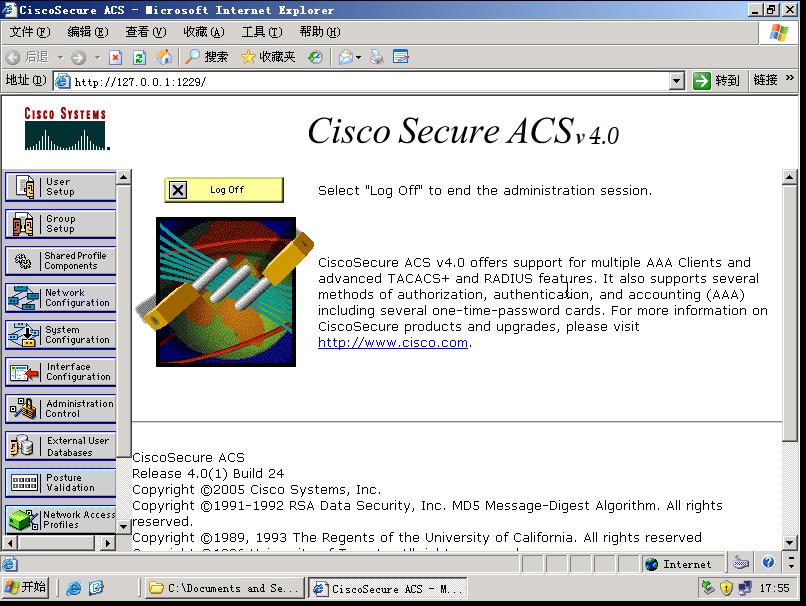
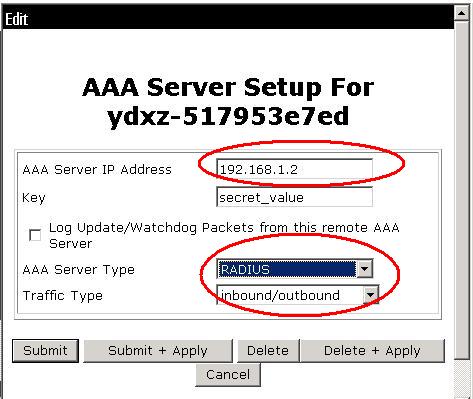
服务器端的配置步骤;
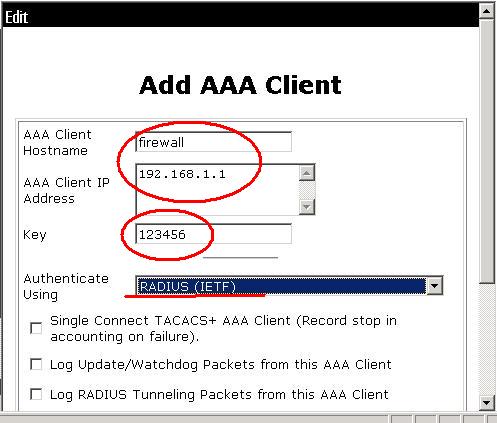
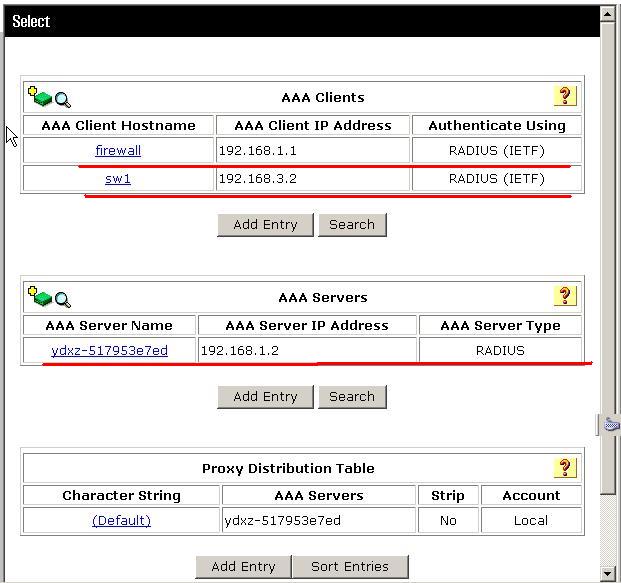
还要添加用于账号验证的账户,并配置口令:
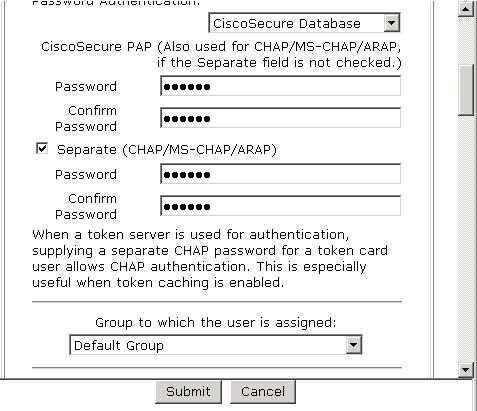
设备的具体配置:
<Quidway>sys
<Quidway>system-view
System View: return to User View with Ctrl+Z.
[Quidway]sysname sw1
[sw1]vlan 10
[sw1-vlan10]port e1/0/10
[sw1-vlan10]vlan 20
[sw1-vlan20]port e1/0/20
[sw1-vlan20]vlan 30
[sw1-vlan30]port e1/0/24
[sw1-vlan30]q
[sw1]int Vlan-interface 1
[sw1-Vlan-interface1]
[sw1-Vlan-interface1]ip add 192.168.3.2 24
[sw1-Vlan-interface1]q
[sw1]int e1/0/1
[sw1-Ethernet1/0/1]port link-type trunk
[sw1-Ethernet1/0/1]port trunk permit vlan all
Please wait........................................... Done.
[sw1-Ethernet1/0/1]q
[sw1]ip route-static 0.0.0.0 0.0.0.0 192.168.3.1
[sw1]
[sw1]
<H3C>sys
<H3C>system-view
System View: return to User View with Ctrl+Z.
[H3C]sysname firewall
[firewall]int eth0/0.1
[firewall-Ethernet0/0.1]ip add 192.168.10.1 24
[firewall-Ethernet0/0.1]vlan-type dot1q vid 10
[firewall-Ethernet0/0.1]int eth0/0.2
[firewall-Ethernet0/0.2]vlan-type dot1q vid 20
[firewall-Ethernet0/0.2]ip add
[firewall-Ethernet0/0.2]ip address 192.168.20.1 24
[firewall-Ethernet0/0.2]int eth0/0.3
[firewall-Ethernet0/0.3]vlan-type dot1q vid 30
[firewall-Ethernet0/0.3]ip address 192.168.1.1 24
[firewall-Ethernet0/0.3]q
[firewall]int eth0/0
[firewall-Ethernet0/0]ip add 192.168.3.1 24
[firewall-Ethernet0/0]q
[firewall]firewall zone trust
[firewall-zone-trust]
[firewall-zone-trust]add int eth0/0.1
[firewall-zone-trust]add int eth0/0.2
[firewall-zone-trust]add int eth0/0.3
[firewall-zone-trust]q
[firewall]undo insulate
[firewall]
[firewall]dhcp ?
enable DHCP service enable
relay DHCP relay
select Specify process mode of DHCP packet
server DHCP server
[firewall]dhcp enable
DHCP task has already been started!
[firewall]dhcp select ?
global Global dhcp ip pool mode
interface Interface dhcp ip pool mode
relay Relay mode
[firewall]dhcp select relay interface eth0/0.1 to eth0/0.2
[firewall]int eth0/0.1
[firewall-Ethernet0/0.1]ip relay add 192.168.1.188
[firewall-Ethernet0/0.1]q
[firewall]int eth0/0.2
[firewall-Ethernet0/0.2]ip relay add 192.168.1.188
[firewall-Ethernet0/0.2]q
注意DHCP的配置步骤,不要忘了中继目标,这一点错了几次。。。
[firewall]radius ? 在此视图下怎加一个radius方案
client Radius Client config
nas-ip Specify RADIUS source ip address
scheme Add RADIUS scheme or modify radius-scheme attributes
trap Specify trap configuration
[firewall]radius scheme qw 并且指定方案的具体内容
[firewall-radius-qw]?
Radius-template view commands:
accounting Specify accounting mode
data-flow-format Specify data flow format
display Display current system information
key Specify the shared encryption key of RADIUS server
nas-ip Specify RADIUS source ip address
nslookup Query Internet name servers
ping Ping function
primary Specify IP address of primary RADIUS server
quit Exit from current command view
retry Specify retransmission times
return Exit to User View
save Save current configuration
secondary Specify IP address of secondary RADIUS server
security-policy-server Specify security policy server's IP address
server-type Specify the type of RADIUS server
state Specify state of primary/secondary
authentication/accounting RADIUS server
stop-accounting-buffer Enable stop-accounting packet buffer
timer Specify timer parameters
tracert Trace route function
undo Cancel current setting
user-name-format Specify user-name format sent to RADIUS server
vrbd Show application version
[firewall-radius-qw]primary authentication 192.168.1.2
[firewall-radius-qw]server-type standard
[firewall-radius-qw]user-name-format without-domain
[firewall-radius-qw]accounting optional
[firewall-radius-qw]key authentication 123456
[firewall-radius-qw]q
[firewall] 并且还要在防火墙和交换机山新建一个域,并在此域应用刚才建立的radius方案
[firewall]domain 123.com
New Domain added.
[firewall-isp-123.com]radius-scheme qw
[firewall-isp-123.com]access-limit enable 20
[firewall-isp-123.com]accounting optional
[firewall-isp-123.com]q
[firewall]
接下来是二层交换机上启用dot1x验证,并在端口开启,同样也要制定radius方案,并在端口应用
<sw1>system-view
System View: return to User View with Ctrl+Z.
[sw1]dot1x
802.1X is enabled globally.
[sw1]int e1/0/10
[sw1-Ethernet1/0/10]dot1x
802.1X is enabled on port Ethernet1/0/10.
[sw1-Ethernet1/0/10]int e1/0/20
[sw1-Ethernet1/0/20]dot1x
802.1X is enabled on port Ethernet1/0/20.
[sw1-Ethernet1/0/20]q 并且要选择验证类型
[sw1]dot1x authentication-method pap
PAP authentication is enabled.
[sw1]radius scheme qw
New Radius scheme 方案内容如下,与防火墙类似
[sw1-radius-qw]primary authentication 192.168.1.2
[sw1-radius-qw]server-type standard
[sw1-radius-qw]accounting optional
[sw1-radius-qw]user-name-format without-domain
[sw1-radius-qw]key authentication 123456
[sw1-radius-qw]q
[sw1]domain acs.com
New Domain added.
[sw1-isp-acs.com]radius-scheme qw
[sw1-isp-acs.com]accounting op
[sw1-isp-acs.com]accounting optional
[sw1-isp-acs.com]q
这时我们的网络环境(radius)已经基本搭建完毕,已经可以进行认证并在服务器查看到有关的认证信息,如图,
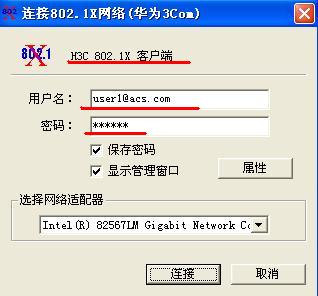
我们在VLAN 10的相应端口进行测试,利用(此时因为我们的客户端(交换机,防火墙)华为的认证软件,进行账号认证测试(利用思科软件作为服务端,华为为客户端是可以的。因为我们客户端机器的验证类型为standard),
查看主机的具体地址信息:
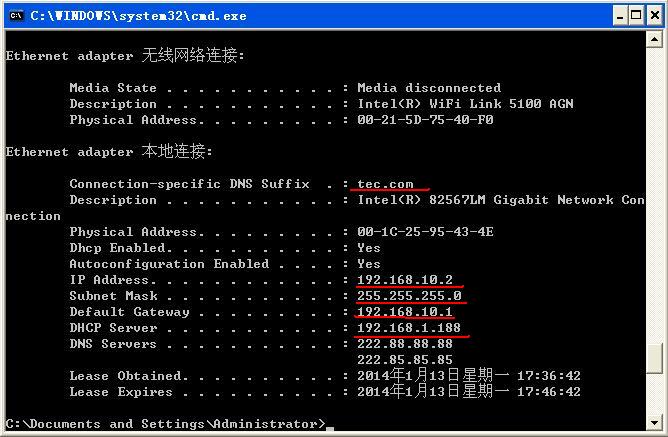
然后是 VLAN 20 的主机:
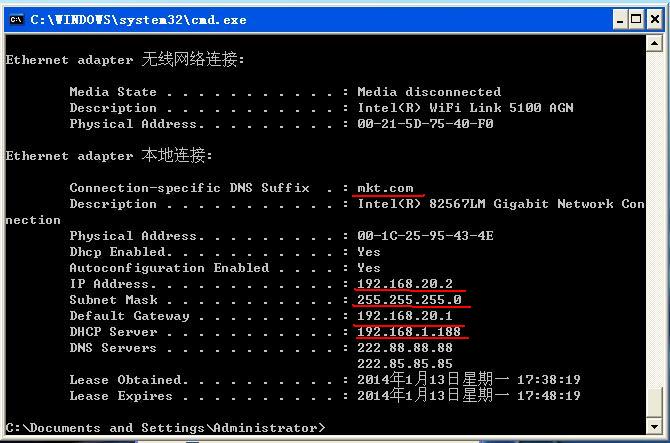
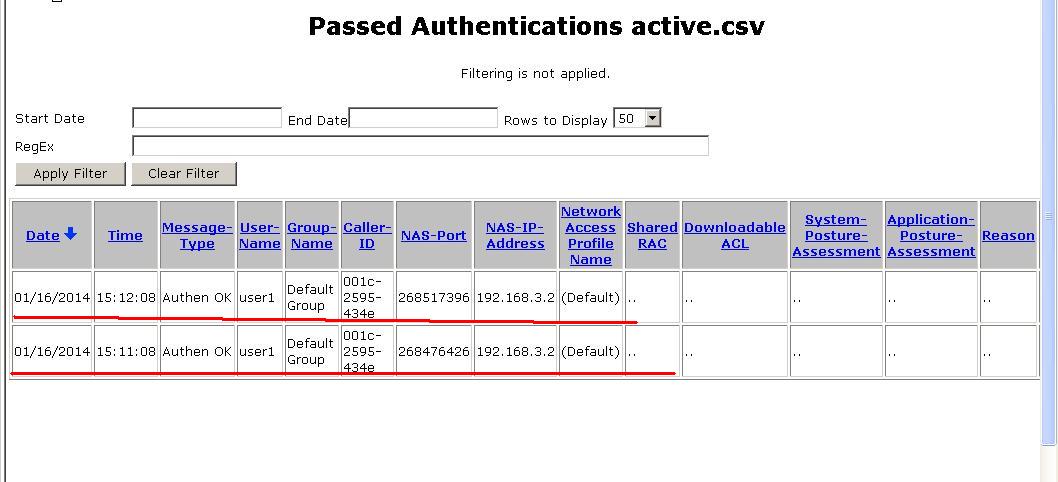
然后从我们的的ACS服务器的相关日志页面可以看到我们刚才的登录信息,以构成完整的3A方案
设置telnet的有关属性
如果此时我们直接登录的话会出现如下界面,他表示登录是被允许的,但要验证口令,而口令没有被设置,所以直接被退了出来,
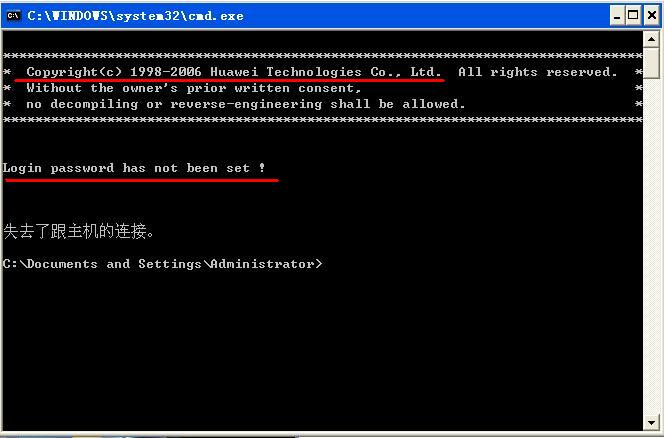
而这只是口令验证,并不是我们要实现的身份验证,口令验证是在用户接口模式下直接配置的,可以直接指定验证的类型,none ,password,或shcme,当我们配置完用户后,即使能登录,权限也是很受限制的,如图:
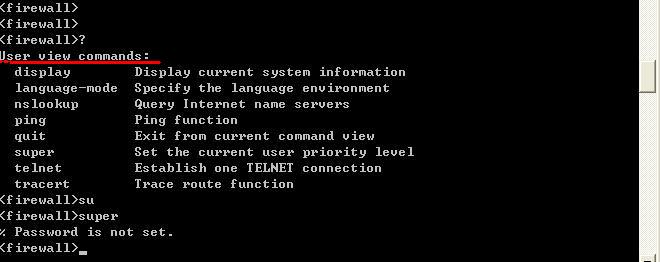
这时,我们有两种解决方案,一是在交换上配置超级用户密码,用于终端的身份切换,如图:

二是通过配置3A服务器端账户的私有属性(华为)来实现,我们要实现的是在radius服务器上的身份验证,所以我们要在交换机山做如下操作
[sw1]user-interface vty 0 4
[sw1-ui-vty0-4]authentication-mode ?
none Login without checking
password Use terminal interface password
scheme Use RADIUS scheme
[sw1-ui-vty0-4]authentication-mode scheme
[sw1]super ?
password Specify password
[sw1]super password level 3 cipher 123456
这时候我们要将防火墙和交换机的服务器类型应该为扩展型或华为私有型
<firewall>system-view
System View: return to User View with Ctrl+Z.
[firewall]radius scheme qw
[firewall-radius-qw]ser
[firewall-radius-qw]server-type ?
extended Server based on RADIUS extensions
standard Server based on RFC protocol(s)
[firewall-radius-qw]server-type extended
[firewall-radius-qw]q
[firewall]
[sw1]radius sc
[sw1]radius scheme qw
[sw1-radius-qw]server-type ex
[sw1-radius-qw]server-type ?
huawei Server based on HUAWEI RADIUS extensions
standard Server based on RFC protocol(s)
[sw1-radius-qw]server-type hua
[sw1-radius-qw]server-type huawei
Such scheme is used by online user or stop-accounting buffer is not empty, can not be modified
注意此时如果设备上证在有用户使用,那么修改服务类型是不允许的所以,在用户退出后我们进行修改
[sw1-radius-qw]
%Apr 2 01:51:14:485 2000 sw1 SHELL/5/LOGOUT:- 1 - [email protected](192.168.20.2) in unit1 logout
[sw1-radius-qw]server-type huawei
[sw1-radius-qw]dis radius sch
[sw1-radius-qw]dis radius scheme
------------------------------------------------------------------
SchemeName =system Index=0 Type=huawei
Primary Auth IP =127.0.0.1 Port=1645
Primary Acct IP =127.0.0.1 Port=1646
Second Auth IP =0.0.0.0 Port=1812
Second Acct IP =0.0.0.0 Port=1813
Auth Server Encryption Key= Not configured
Acct Server Encryption Key= Not configured
Accounting method = required
Accounting-On packet disable, send times = 15 , interval = 3s
TimeOutValue(in second)=3 RetryTimes=3 RealtimeACCT(in minute)=12
Permitted send realtime PKT failed counts =5
Retry sending times of noresponse acct-stop-PKT =500
Quiet-interval(min) =5
Username format =without-domain
Data flow unit =Byte
Packet unit =1
unit 1 :
Primary Auth State=active, Second Auth State=block
Primary Acc State=active, Second Acc State=block
------------------------------------------------------------------
SchemeName =qw Index=1 Type=huawei
Primary Auth IP =192.168.1.2 Port=1812
Primary Acct IP =0.0.0.0 Port=1813
Second Auth IP =0.0.0.0 Port=1812
Second Acct IP =0.0.0.0 Port=1813
Auth Server Encryption Key= 123456
Acct Server Encryption Key= Not configured
Accounting method = optional
Accounting-On packet disable, send times = 15 , interval = 3s
TimeOutValue(in second)=3 RetryTimes=3 RealtimeACCT(in minute)=12
Permitted send realtime PKT failed counts =5
Retry sending times of noresponse acct-stop-PKT =500
Quiet-interval(min) =5
Username format =without-domain
Data flow unit =Byte
Packet unit =1
unit 1 :
Primary Auth State=active, Second Auth State=block
Primary Acc State=block , Second Acc State=block
------------------------------------------------------------------
Total 2 RADIUS scheme(s). 2 listed
[sw1-radius-qw]
全局配置后
<firewall>dis cu
#
sysname firewall
#
firewall packet-filter enable
firewall packet-filter default permit
#
undo insulate
#
firewall statistic system enable
#
radius scheme system
server-type extended
radius scheme qw
server-type extended
primary authentication 192.168.1.2
accounting optional
key authentication 123456
user-name-format without-domain
#
domain 123.com
scheme radius-scheme qw
access-limit enable 20
accounting optional
domain system
#
local-user admin
password cipher .]@USE=B,53Q=^Q`MAF4<1!!
service-type telnet terminal
level 3
service-type ftp
#
interface Ethernet0/0
ip address 192.168.3.1 255.255.255.0
#
interface Ethernet0/0.1
ip address 192.168.10.1 255.255.255.0
ip relay address 192.168.1.188
dhcp select relay
vlan-type dot1q vid 10
#
interface Ethernet0/0.2
ip address 192.168.20.1 255.255.255.0
ip relay address 192.168.1.188
dhcp select relay
vlan-type dot1q vid 20
#
interface Ethernet0/0.3
ip address 192.168.1.1 255.255.255.0
vlan-type dot1q vid 30
#
#
firewall zone trust
add interface Ethernet0/0
add interface Ethernet0/0.1
add interface Ethernet0/0.2
add interface Ethernet0/0.3
set priority 85
#
ip route-static 0.0.0.0 0.0.0.0 192.168.3.2 preference 60
#
user-interface con 0
user-interface aux 0
user-interface vty 0 4
authentication-mode scheme
#
return
<sw1>dis cu
#
sysname sw1
#
super password level 3 cipher OUM!K%F<+$[Q=^Q`MAF4<1!!
#
dot1x
dot1x authentication-method pap
#
radius scheme system
radius scheme qw
server-type huawei
primary authentication 192.168.1.2
accounting optional
key authentication 123456
user-name-format without-domain
#
domain acs.com
scheme radius-scheme qw
access-limit enable 20
accounting optional
domain system
#
vlan 1
#
vlan 10
#
vlan 20
#
vlan 30
#
interface Vlan-interface1
ip address 192.168.3.2 255.255.255.0
#
interface Aux1/0/0
#
interface Ethernet1/0/1
port link-type trunk
port trunk permit vlan all
interface Ethernet1/0/10
port access vlan 10
dot1x
interface Ethernet1/0/15
port access vlan 10
#
interface Ethernet1/0/20
port access vlan 20
dot1x
#
interface Ethernet1/0/24
port access vlan 30
#
interface NULL0
#
ip route-static 0.0.0.0 0.0.0.0 192.168.3.1 preference 60
#
user-interface aux 0
user-interface vty 0 4
authentication-mode scheme
#
return
服务器的配置如图所示:(服务器中添加华为私有属性)
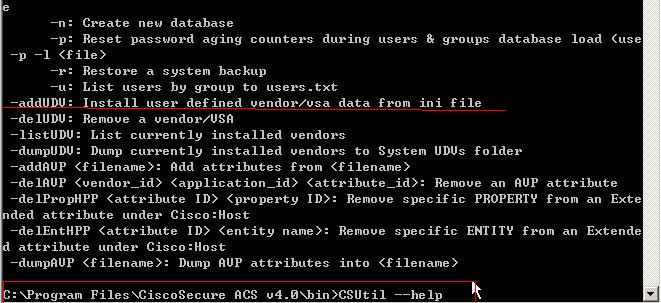
将华为的属性文件复制到如下图所示的命令下并在dos命令下执行GCSutl命令,



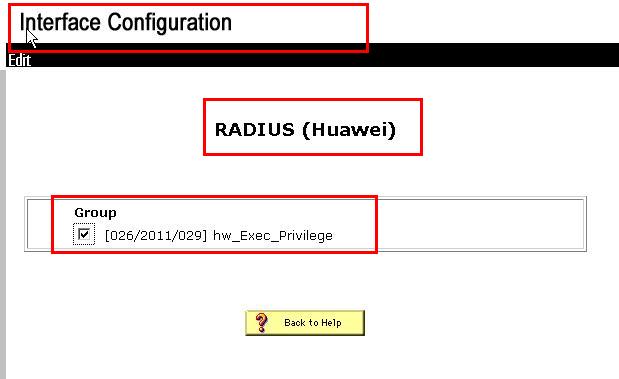
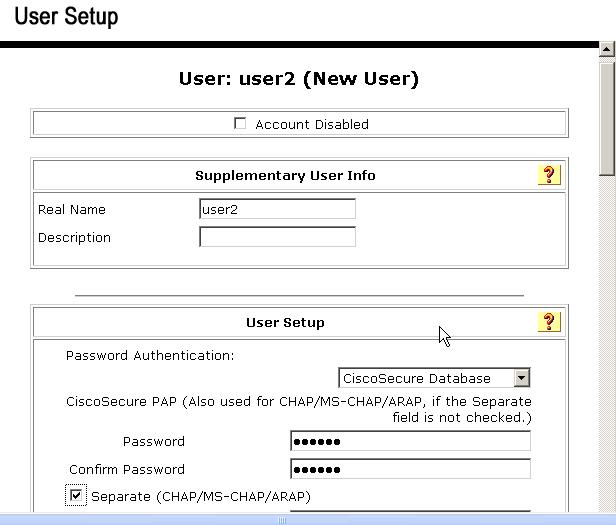
然后我们新建一个用户并把它分到其它的组中去,并配置验证信息:
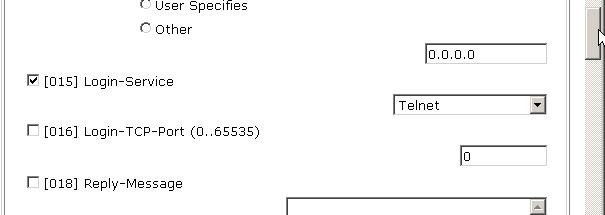
还有用户的登录方式一定要勾选
而且要把我们的客户端的相关属性改为华为的私有型并定义级别为“管理员”
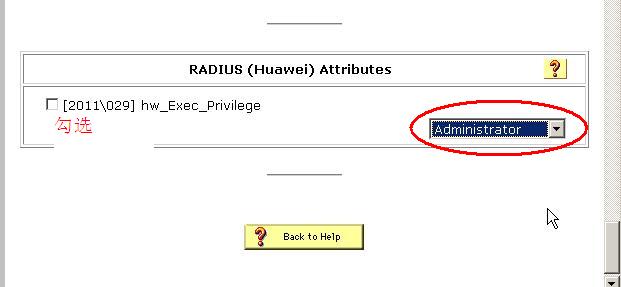
结果如下:
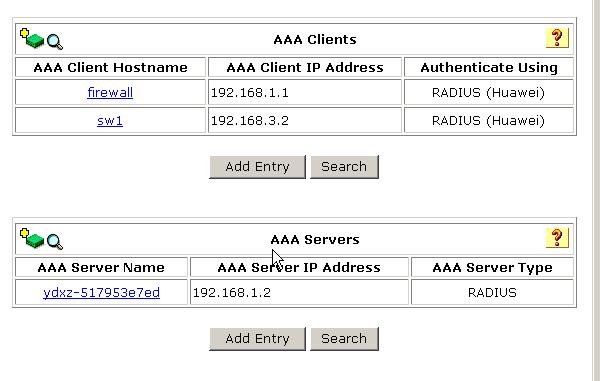
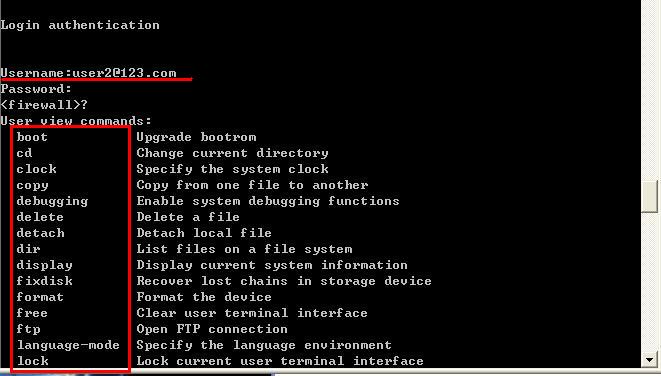
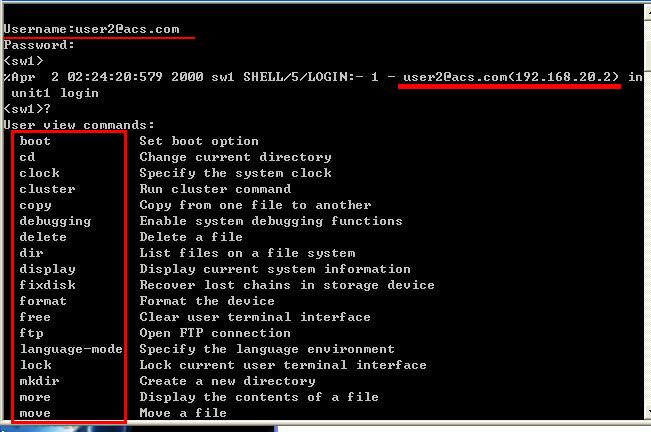
分别用VLAN 10 和VLAN 20 的主机进行测试,
<二>应用MAC地址绑定验证:
具体配置步骤:
[sw1]mac-authentication
MAC-authentication is enabled globally.
[sw1]mac-authentication authmode usernameasmacaddress usernameformat without-hyphen
[sw1]int e1/0/20
[sw1-Ethernet1/0/20]mac-authentication
MAC-authentication is enabled on port Ethernet1/0/20
[sw1-Ethernet1/0/20]int e1/0/10
[sw1-Ethernet1/0/10]mac-authentication
MAC-authentication is enabled on port Ethernet1/0/10
[sw1-Ethernet1/0/10]quit
[sw1]dis mac-authentication int e1/0/20
Ethernet1/0/20 is link-up
MAC address authentication is Enabled
Authenticate success: 1, failed: 0
Current online user number is 1
