初识Lucene 4.5全文搜索
近期想研究下lucene,但网络上的教程大多都是lucne 3.x版本的讲解。可是lucene版本的更新速度快的惊人,目前已经到了4.8版了,只好去查阅官方文档。虽然英文不大好,但稍微对比了下发现3.x版本至4.x版本的修改非常之大。接下来我就以4.5版来操作,分享下我对luence的初步认识。
先给大家看一张图(来至《Lucene in action》):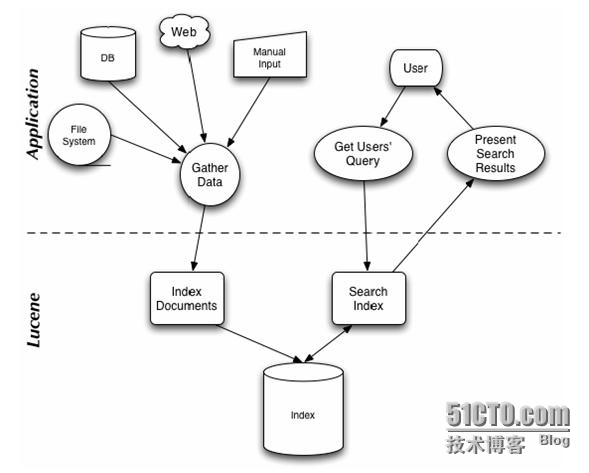
此图很形象的描述了lucene的基本流程,简而言之就是:1、创建索引;2、检索索引。
太深的道理与原理我目前也还是一知半解,所以就以小白的思维来阐述。
|
数据库
|
Luecene
|
|
|
基本概念
|
列
/
字段
|
Field
|
|
行
/
记录
|
Document
|
|
|
基本操作
|
查询
(SELECT)
|
Searcher
|
|
添加
(INSERT)
|
IndexWriter. addDocument |
|
|
删除
(DELETE)
|
IndexReader.delete
|
|
|
修改
(UPDATE)
|
不支持
(
可删除后重新添加
)
|
上面的表格式某位网友博文里的对比,我觉得挺好理解的。可以这么去认为吧,lucene把你数据库里的数据做了个索引,以后你要全文查找某数据时就可以从索引中查找,就好比字典的索引目录!
废话说了一大堆,还是用代码来说话,首先要往代码里导入三个包:
lucene-analyzers-common-4.5.0、lucene-core-4.5.0、lucene-queryparser-4.5.0
要有面向对象的思维嘛,先创建一个javabean:luceneBeans,用来存放你所要的数据
package pojo;
public class LuceneBeans {
private String id;
private String title;
private String introduce;
private String addtime;
private String category;
public LuceneBeans() {
super();
}
public LuceneBeans(String id, String title, String introduce,
String addtime, String category) {
super();
this.id = id;
this.title = title;
this.introduce = introduce;
this.addtime = addtime;
this.category = category;
}
public String getId() {
return id;
}
public void setId(String id) {
this.id = id;
}
public String getTitle() {
return title;
}
public void setTitle(String title) {
this.title = title;
}
public String getIntroduce() {
return introduce;
}
public void setIntroduce(String introduce) {
this.introduce = introduce;
}
public String getAddtime() {
return addtime;
}
public void setAddtime(String addtime) {
this.addtime = addtime;
}
public String getCategory() {
return category;
}
public void setCategory(String category) {
this.category = category;
}
}
以下代码把lucene基本操作方法封装在了IndexUtil类中,其中考虑到创建indexReader开销过大,就设计了单实例模式。注释中会穿插些4.x版本与3.x版本的不同之处。
package lucene;
import java.io.File;
import java.io.IOException;
import java.util.ArrayList;
import java.util.Date;
import java.util.List;
import org.apache.lucene.analysis.Analyzer;
import org.apache.lucene.analysis.standard.StandardAnalyzer;
import org.apache.lucene.document.Document;
import org.apache.lucene.document.Field;
import org.apache.lucene.document.StringField;
import org.apache.lucene.document.TextField;
import org.apache.lucene.document.Field.Store;
import org.apache.lucene.index.DirectoryReader;
import org.apache.lucene.index.IndexReader;
import org.apache.lucene.index.IndexWriter;
import org.apache.lucene.index.IndexWriterConfig;
import org.apache.lucene.index.Term;
import org.apache.lucene.index.IndexWriterConfig.OpenMode;
import org.apache.lucene.queryparser.classic.ParseException;
import org.apache.lucene.queryparser.classic.QueryParser;
import org.apache.lucene.search.IndexSearcher;
import org.apache.lucene.search.Query;
import org.apache.lucene.search.ScoreDoc;
import org.apache.lucene.search.TopDocs;
import org.apache.lucene.store.Directory;
import org.apache.lucene.store.FSDirectory;
import org.apache.lucene.util.Version;
import pojo.LuceneBeans;
public class IndexUtil {
private static Directory directory = null;
private static IndexReader reader = null;
/**
* 设置存储路径
* @return
*/
public static String getIndexDir(){
//得到.class文件所在路径
String classpath = LuceneUtil.class.getResource("/").getPath();
//将class中的%20替换成为空格
classpath = classpath.replaceAll("%20", " ");
//索引存储位置:WEB-INF/classes/index
String path = classpath+"index/";
return path;
}
public IndexUtil(){
try {
//存储方式有CompoundFileDirectory, FileSwitchDirectory, FSDirectory,
//NRTCachingDirectory, RAMDirectory……等分别对应的不同方式
//用FSDirectory的好处就在于它会自动帮你分配该使用哪种方式
directory = FSDirectory.open(new File(getIndexDir()));
//3.x是reader=IndexReader.open(directory);
//但4.x后已经不建议使用,改成了DirectoryReader.open(directory)
reader = DirectoryReader.open(directory);
} catch (IOException e) {
e.printStackTrace();
}
}
/**
* 创建IndexWriter
* @return
*/
public static IndexWriter getIndexWriter(){
//创建分词器,分词器可根据自己需求去自定义创建,此处以lucene自带的标准分词器分词
Analyzer analyzer=new StandardAnalyzer(Version.LUCENE_45);
IndexWriter indexWriter = null;
try {
IndexWriterConfig iwConfig = new IndexWriterConfig(Version.LUCENE_45, analyzer);
iwConfig.setOpenMode(OpenMode.CREATE_OR_APPEND);
indexWriter = new IndexWriter(directory, iwConfig);
return indexWriter;
} catch (IOException e) {
e.printStackTrace();
return null;
}
}
//--------省略余下方法代码
嗯~创建索引前我们需要先获得IndexWriter,其实步骤就像你往数据库中插入一条数据(document),得再这条数据中加入字段(Field),得给这个字段做个说明(Store、Index)……
/**
* 批量创建索引
* @param list
* @return
*/
public boolean createIndexList(List<LuceneBeans> list){
boolean result = false;
IndexWriter indexWriter = IndexUtil.getIndexWriter();
try {
if(list!=null&&list.size()>0){
Document doc = null;
for(int i=0;i<list.size();i++){
doc = new Document();
LuceneBeans lb = list.get(i);
doc.add(new StringField("id",lb.getId(),Store.YES));
doc.add(new TextField("title",lb.getTitle(),Store.YES));
doc.add(new TextField("introduce",lb.getIntroduce(),Store.YES));
doc.add(new StringField("addtime",lb.getAddtime(),Store.YES));
doc.add(new StringField("category",lb.getCategory(),Store.YES));
indexWriter.addDocument(doc);
indexWriter.commit();
result = true;
}
}
} catch (IOException e) {
e.printStackTrace();
}finally{
if(indexWriter!=null){
try {
indexWriter.close();
} catch (IOException e) {
e.printStackTrace();
}
}
}
return result;
}
之前3.x版本是这样写的:
doc.add(new Field("id",lb.getI(),Field.Store.YES,Field.Index.NOT_ANALYZED_NO_NORMS));
那我们就顺便来分析下store、index
(存储域选项)Store判断是否把域存入文件(yes存入,可还原;no不存入,不可还原但可被索引)
(索引域选项)Index:
//|----ANALYZED进行分词和索引,适用于标题、内容等
//|----NO_ANALYZED进行索引但是不进行分词,身份号、姓名、ID等,适用于精确搜索
//|----ANALYZED_NOT_NORMS进行分词但不存储norms信息,这个norms中包括了创建索引的时间和权值等信息
//|----NOT_ANALYZED_NOT_NORMS既不进行分词也不存储norms信息
但4.x之后就改变了,它需要更为精确的StringField、TextField、IntField……

那为什么4.x版本只写了Store而没Index?还是让我们看看官方文档上的描述吧:
先看TxetField:自动分词
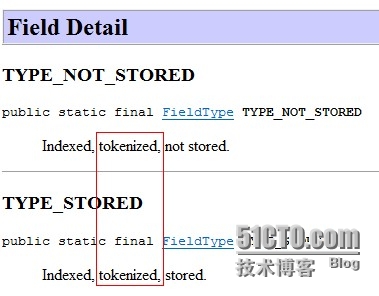
再看看StringField:不分词
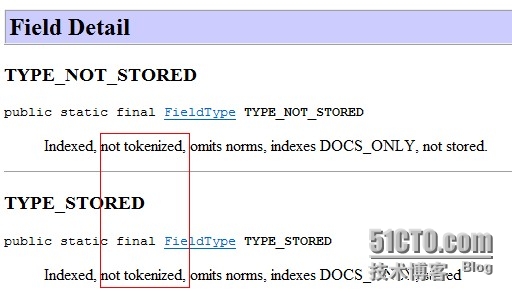
所以,4.x有很多写法是与3.x不同的,虽然还可以向下兼容,但总是要跟着时代的脚步前进嘛!
那接下来我们可以写个测试方法看看效果,至于luceneBeans的数据我就不贴出来了,大家可以自己导入,我们不仅可以用javaBean的数据来创建索引,像txt、pdf、ini等文件的数据也是可以导入来创建索引的;
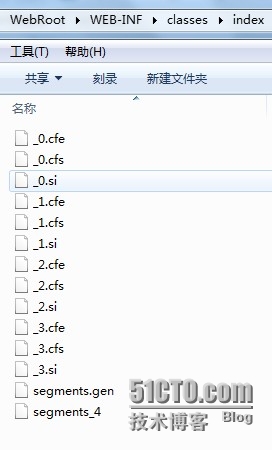
如果你创建成功了则在对应的index文件夹下会多出这些文件:
创建好索引后,当然我们要开始检索索引咯,重要的是获得indexReader,然后创建indexSearch去检索。我知识举个最常规的用法,其中还有很多东西还需个人去体会。(接上面代码写在IndexUtil类内)
/**
* 创建IndexReader
* 为保证检索时,索引的同步更新,需对reader进行判断
* @return
*/
public static IndexSearcher getIndexSearcher(){
try {
//判断reader是否为空
if(reader==null){
reader = DirectoryReader.open(directory);
}else{
//3.x版本是用IndexReader.openIfChange(reader);来判断reader是否有改变。
//reader有改变则返回改变后的;若无改变则返回null
IndexReader ir = DirectoryReader.openIfChanged((DirectoryReader)reader);
if(ir!=null){
//reader已改变则关闭原先的,再将改变后的赋值给reader
reader.close();
reader = ir;
}
}
return new IndexSearcher(reader);
} catch (IOException e) {
e.printStackTrace();
return null;
}
/**
* 从索引中检索
* @param content
* @return
*/
public List<LuceneBeans> searchIndex(String content){
List<LuceneBeans> list = new ArrayList<LuceneBeans>();
try {
System.out.println("文档数numDocs:"+reader.numDocs());
System.out.println("文档总数maxDocs:"+reader.maxDoc());
System.out.println("删除数deleteDocs:"+reader.numDeletedDocs());
IndexSearcher searcher = IndexUtil.getIndexSearcher();
//使用查询解析器创建Query(Version.LUCENE_45对应版本号,“introduce”默认索引域)
//new StandardAnalyzer(Version.LUCENE_45))标准分词器
//Query的方法还有很多种,例如TermQuery精确查询、PrefixQuery前缀查询、WildcardQuery通配符查询……等
QueryParser questParser = new QueryParser(Version.LUCENE_45,"introduce",
new StandardAnalyzer(Version.LUCENE_45));
Query query = null;
try {
query = questParser.parse(content);
} catch (ParseException e) {
e.printStackTrace();
}
System.out.println("查询语句:"+query.toString());
long begin = new Date().getTime();
TopDocs topDocs = searcher.search(query, 15);//15为检索出的个数
if(topDocs!=null){
ScoreDoc[] scoreDoc = topDocs.scoreDocs;
System.out.println("共搜索到("+topDocs.totalHits+")条匹配结果");
for(ScoreDoc sd : scoreDoc){
Document doc = searcher.doc(sd.doc);
System.out.println("标题:"+doc.get("title")+"  评分score:"+sd.score);
LuceneBeans lb = new LuceneBeans();
lb.setId(doc.get("id"));
lb.setTitle(doc.get("title"));
lb.setIntroduce(doc.get("introduce"));
lb.setAddtime(doc.get("addtime"));
lb.setCategory(doc.get("category"));
list.add(lb);
}
}
long end = new Date().getTime();
System.out.println("搜索完毕... ... 共用时:" + (end - begin) +"毫秒...");
} catch (IOException e) {
e.printStackTrace();
}
return list;
}
具体的每个方法和属性,就不一一讲解,毕竟挺别人说不一定全对,还是去查看官方文档更为准确。写个测试方法看看上面那段代码:
@Test
public void search(){
IndexUtil lu = new IndexUtil();
List<LuceneBeans> list = lu.searchIndex("小王子");
if(list!=null&&list.size()>0){
System.out.println("检索到的结果数据:");
for(LuceneBeans lb:list){
System.out.println("===================================");
System.out.println("id:"+lb.getId()+"===title:"+lb.getTitle());
}
}
}
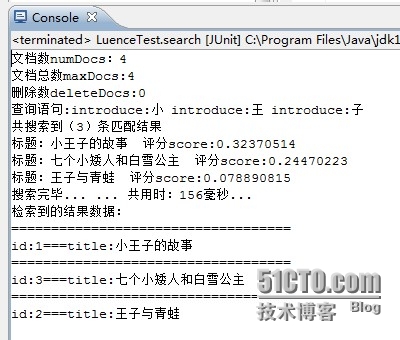
嗯~夜已深,先分享到这边。之后陆续还会再分享关于lucene的相关博文,希望对您有所帮助。初出茅如,若文中有错误之处还望包涵指正。喜欢交流、喜欢分享~