通过IPMI实现Stonith机制
转载自:http://blog.sina.com.cn/s/blog_88337d960101g9iv.html#cmt_2885544
1 stonith简介
Stonith,即Shoot The Other Node In The Head,是集群Fence技术的一种实现。stonith的目的是在HA机制判断其中一台机器死亡后,确保这台机器进入死亡状态。通过这种方式,避免集群中“脑裂”(split-brain)现象的出现。
2 Heartbeat安装
源码包下载地址:http://linux-ha.org/wiki/Downloads
安装顺序为:Cluster-glue,Resource-agent,Heartbeat。
安装可以参考用户手册:http://www.linux-ha.org/doc/users-guide/users-guide.html
注意:本文Stonith配置基于Release 1,配置简单,但不够灵活,需要修改源代码。所以在安装第三个包Heartbeat之前,请先确定Stonith机制(见后文)。
配置可以参考另一篇转载博文:http://blog.sina.com.cn/s/blog_88337d960101dxog.html
3.确定Stonith策略
由于Heartbeat调用stonith设备时,默认采用的是“重启”操作,这是在代码中写死的。因此,如果需要使用stonith,请先确定将要实现的stonith策略。如果需要采取“关机”操作,请修改相应代码。如果可以接受重启方式,则跳过此节。实现关机操作的方法如下:
tar -xjvf Heartbeat-3-0-7e3a82377fa8.tar.bz2
cd Heartbeat-3-0-7e3a82377fa8
vi heartbeat/hb_resource.c
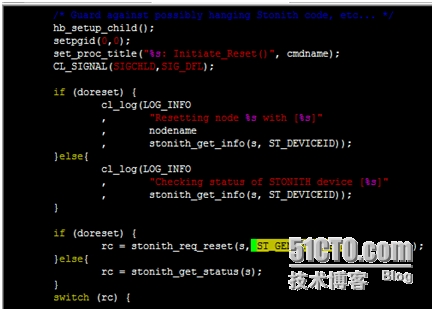
查找ST_GENERIC_RESET,位置在第2191行。如下图所示:

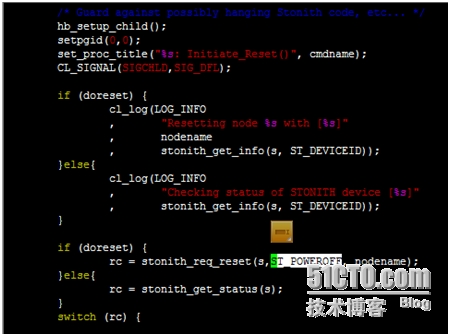
该字段表示stonith将采用重启的操作。如果需要使用关机操作,将该字段改为:ST_POWEROFF即可。如下图所示:

该类字段的定义可以参考/usr/include/stonith/stonith.h头文件。位置在78行。如下图所示:

修改保存之后。按照流程继续编译安装即可。
需要注意的是,如果有两套stonith设备,彼此都要采用关机操作。那么两台机器的Heartbeat安装都需要修改后再编译安装。
tar -xjvf Heartbeat-3-0-7e3a82377fa8.tar.bz2
cd Heartbeat-3-0-7e3a82377fa8
./bootstrap
./ConfigureMe configure --prefix=/usr --localstatedir=/var --sysconfdir=/etc
make
make install
4.测试环境介绍
node1:ipmi IP:192.168.1.1 Netmask:255.255.255.0
eth0:1 IP:192.168.1.251 Netmask:255.255.255.0(保证同网段,使得能访问ipmi)
node2:ipmi IP:192.168.1.2 Netmask:255.255.255.0
eth0:1 IP:192.168.1.252 Netmask:255.255.255.0(保证同网段,使得能访问ipmi)
5.Stonith配置与测试
stonith包含在HA的Reusable-Cluster-Components-glue--glue-1.0.9.tar.bz2包内。安装完成后,通过以下命令可以查看支持的所有stonith设备。
[root@node4 ha.d]# stonith -L
apcmaster
apcmastersnmp
apcsmart
baytech
cyclades
drac3
external/drac5
external/dracmc-telnet
external/hetzner
external/hmchttp
external/ibmrsa
external/ibmrsa-telnet
external/ipmi
external/ippower9258
external/kdumpcheck
external/libvirt
external/nut
external/rackpdu
external/riloe
external/sbd
external/ssh
external/vcenter
external/vmware
external/xen0
external/xen0-ha
ibmhmc
meatware
null
nw_rpc100s
rcd_serial
rps10
ssh
suicide
wti_mpc
wti_nps
本文以ipmi设备为例,配置stonith。
在确认要使用的设备后,可以通过下列stonith �Ct 设备名 �Ch的方式查看具体使用帮助:
[root@node4 ha.d]# stonith -t external/ipmi -h
STONITH Device: external/ipmi - ipmitool based power management. Apparently, the power off
method of ipmitool is intercepted by ACPI which then makes
a regular shutdown. If case of a split brain on a two-node
it may happen that no node survives. For two-node clusters
use only the reset method.
For more information see http://ipmitool.sf.net/
List of valid parameter names for external/ipmi STONITH device:
hostname
ipaddr
userid
passwd
interface
For Config info [-p] syntax, give each of the above parameters in order as
the -p value.
Arguments are separated by white space.
Config file [-F] syntax is the same as -p, except # at the start of a line
denotes a comment
通过上述帮助,可以看到当要使用ipmi设备时,需要提供的参数包括节点名、ipmi的ip地址、ipmi账号、ipmi密码、ipmi接口。这些参数与使用ipmitool命令中的参数一致。比如:
# ipmitool -I lan -P 192.168.1.1 -U admin -P admin power off
此命令表示:ipmi接口为lan,地址为192.168.1.1,账号为admin,密码为admin。
stonith在Heartbeat中的配置位于/etc/ha.d/ha.cf文件中:
打开文件可以看到如下字段:
#stonith baytech /etc/ha.d/conf/stonith.baytech
#
# STONITH support
# You can configure multiple stonith devices using this directive.
# The format of the line is:
# stonith_host
# is the machine the stonith device is attached
# to or * to mean it is accessible from any host.
# is the type of stonith device (a list of
# supported drives is in /usr/lib/stonith.)
# are driver specific parameters. To see the
# format for a particular device, run:
# stonith -l -t
#
# Note that if you put your stonith device access information in
# here, and you make this file publically readable, you're asking
# for a denial of service attack ;-)
#
# To get a list of supported stonith devices, run
# stonith -L
# For detailed information on which stonith devices are supported
# and their detailed configuration options, run this command:
# stonith -h
#
#stonith_host * baytech 10.0.0.3 mylogin mysecretpassword
#stonith_host ken3 rps10 /dev/ttyS1 kathy 0
#stonith_host kathy rps10 /dev/ttyS1 ken3 0
stonith_host node4 null node3
ha.cf文件中通过stonith_host来配置stonith设备。格式为:
stonith_host 当前节点名 设备名 设备所需参数
当需要测试时,可以使用null设备。这个设备不会做出任何操作,但可以检测stonith是否正常工作。null设备参数可通过stonith �Ct null �Ch查看。
针对本文环境,如果要使用null设备测试,配置如下
node1 : stonith_host node1 null node2
node2 : stonith_host node2 null node1
当断掉node2的心跳网时,观察node1的HA日志,可以看到如下信息:
[root@node4 ha.d]# tail �Cf /var/log/ha-log
Feb 26 16:08:17 node1 heartbeat: [20500]: WARN: node node2: is dead
Feb 26 16:08:17 node1 ipfail: [20744]: info: Status update: Node node3 now has status dead
Feb 26 16:08:17 node1 heartbeat: [20500]: info: Link node3:eth0 dead.
Feb 26 16:08:17 node1 heartbeat: [21413]: info: Resetting node node2 with [NULL STONITH device]
Feb 26 16:08:17 node1 heartbeat: [21413]: info: glib: Host null-reset: node2
Feb 26 16:08:17 node1 heartbeat: [21413]: info: node node2 now reset.
Feb 26 16:08:17 node1 heartbeat: [20500]: info: Managed STONITH node2 process 21413 exited with return code 0.
Feb 26 16:08:17 node1 heartbeat: [20500]: info: Resources being acquired from node2.
可以看到null设备对node2执行了重置,并正确结束,返回了0.
说明stonith工作正常。
下面配置ipmi。根据上文介绍,node1和node2的ha.cf中stonith配置如下:
node1:stonith_host node1 external/ipmi node2 192.168.1.2 admin admin lan
node2:stonith_host node2 external/ipmi node1 192.168.1.1 admin admin lan
******需要注意的是,默认情况下,heartbeat调用stonith设备时采用的是“重启”操作。该操作是写死在代码内部的。因此,如果希望使用“关机”操作,需要修改相应源代码后编译安装。具体修改方式参考5.3.1节。下面的配置均已“关机”操作为例。******
完成配置后,重启heartbeat。并按照上面测试null设备的方法测试:拔掉node2的心跳线。并监控node1的ha日志:
[root@node1 ~]#tail �Cf /var/log/ha-log
Feb 26 16:41:57 node1 heartbeat: [25483]: WARN: node node2: is dead
Feb 26 16:41:57 node1 ipfail: [25723]: info: Status update: Node node2 now has status dead
Feb 26 16:41:57 node1 heartbeat: [25483]: info: Link node2:eth0 dead.
Feb 26 16:41:57 node1 heartbeat: [3649]: info: Resetting node node2 with [IPMI STONITH device]
external/ipmi[3717]: debug: 2014/02/26_16:41:57 ipmitool output: Chassis Power Control: Down/Off
Feb 26 16:41:58 node1 ipfail: [25723]: info: NS: We are still alive!
Feb 26 16:41:58 node1 ipfail: [25723]: info: Link Status update: Link node2/eth0 now has status dead
Feb 26 16:41:58 node1 heartbeat: [3649]: info: node node2 now reset.
Feb 26 16:41:58 node1 heartbeat: [25483]: info: Managed STONITH node2 process 3649 exited with return code 0.
Feb 26 16:41:58 node1 heartbeat: [25483]: info: Resources being acquired from node2.
可以看到,stonith通过ipmi对node2执行了关机命令。并正确结束(返回值为0)。检查node2,此时已经关机。
至此,stonith配置完毕。