pxe详解
一、PXE到底是什么东东?
PXE(Preboot Execution Environment) 预启动执行环境 是由Intel设计的协议,它可以使计算机通过网络启动。协议分为client和server两端,PXE client在网卡的ROM中,当计算机引导时,BIOS把PXE client调入内存执行,并显示出命令菜单,经用户选择后,PXE client将放置在远端的操作系统通过网络下载到本地运行。
既然是通过网络传输,就需要IP地址;也就是说在其启动过程中,客户端请求服务器分配IP地址,之后PXE Client使用TFTP Client 通过TFTP(Trivial File Transfer Protocol)协议下载启动安装程序所需的文件。
简单地说PXE网络安装,客户机通过支持PXE的网卡向网络中发送请求DHCP信息的广播请求IP地址等信息,DHCP服务器给客户端提供IP地址和其它信息(TFTP服务器、启动文件等),之后请求并下载安装需要的文件。在这个过程中需要一台服务器来提供启动文件、安装文件、以及安装过程中的自动应答文件等。
二、pxe工作过程
下图中介绍了Linux中自动安装系统的详细工作过程:

第一步:PXE Client向DHCP发送请求
首先,将支持PXE的网络接口卡(NIC)的客户端的BIOS设置成为网络启动,通过PXE BootROM(自启动芯片)会以UDP(简单用户数据报协议)发送一个广播请求,向网络中的DHCP服务器索取IP地址等信息。
第二步:DHCP服务器提供信息
DHCP服务器收到客户端的请求,验证是否来至合法的PXE Client的请求,验证通过它将给客户端一个提供“响应”,这个提供“响应”中包含了为客户端分配的IP地址、pxelinux启动程序(TFTP)位置,以及配置文件所在位置。
第三步:PXE客户端请求下载启动文件
客户端收到服务器的“回应”后,会回应一个帧,以请求下载启动所需文件。
这些启动文件包括:pxelinux.0、pxelinux.cfg/default、vmlinuz、initrd.img等文件。
第四步:Boot Server响应客户端请求并传送文件
当服务器收到客户端的请求后,他们之间之后将有更多的信息在客户端与服务器之间作应答, 用以决定启动参数。BootROM 由 TFTP 通讯协议从Boot Server下载启动安装程序所必须的文件(pxelinux.0、pxelinux.cfg/default)。default文件下载完成后,会根据该文件中定义的引导顺序,启动Linux安装程序的引导内核。
第五步:请求下载自动应答文件
客户端通过pxelinux.cfg/default文件成功的引导Linux安装内核后,安装程序首先必须确定你通过什么安装介质来安装linux,如果是通过网络安装(NFS, FTP, HTTP),则会在这个时候初始化网络,并定位安装源位置。或许你会说,刚才PXE不是已经获取过IP地址了吗?为什么现在还需要一次?这是由于PXE获取的是安装用的内核以及安装程序等,而安装程序要获取的是安装系统所需的二进制包以及配置文件。由于它们需要的内容不同造成PXE模块和安装程序是相对独立的,PXE的网络配置并不能传递给安装程序。从而进行两次获取IP地址过程。
接着会读取该文件中指定的自动应答文件ks.cfg所在位置,根据该位置请求下载该文件。
第六步:客户端安装操作系统
将ks.cfg文件下载回来后,通过该文件找到OS Server,并按照该文件的配置请求下载安装过程需要的软件包。OS Server和客户端建立连接后,将开始传输软件包,客户端将开始安装操作系统。
安装完成后,将提示重新引导计算机。这个时候注意,在重新引导的过程中一定要将BIOS修改回从硬盘启动,不然的话又会重复的自动安装操作系统。
注意:在上面介绍中PXE client是需要安装Linux的计算机,DHCP Server、TFTP Server、和NFS(http) Server运行在另外一台Linux Server上。Bootstrap文件、配置文件、Linux内核都放置在Linux Server上TFTP服务器的根目录下。而Linux根文件系统存放于NFS Server的共享目录中。
PXE client在工作过程中,需要三个二进制文件:bootstrap、Linux 内核和Linux根文件系统。Bootstrap文件是可执行程序,它向用户提供简单的控制界面,并根据用户的选择,下载合适的Linux内核以及Linux根文件系统。
三、DHCP是什么?
dhcp:dynamic host configuration protocol(动态主机配置协议)是一个局域网的网络协议,使用UDP协议工作。
dhcp提供的信息包括:
ip,netmask,gateway,dns server,dns search domain(搜索域名),nis server ,lease time(租约期限)
主要有两个用途:给内部网络或网络服务供应商自动分配IP地址,给用户或者内部网络管理员作为对所有计算机作中央管理的手段,在RFC 2131中有详细的描述。DHCP有3个端口,其中UDP67和UDP68为正常的DHCP服务端口,分别作为DHCP Server和DHCP Client的服务端口;546号端口用于DHCPv6 Client,而不用于DHCPv4,是为DHCP failover服务,这是需要特别开启的服务,DHCP failover是用来做“双机热备”的。
C/S架构
dhcp客户端第一次获取IP过程:广播
Client:dhcpdiscover
Server:dhcpoffer
Client:dhcprequest
Server:dhcpack
续租:单播(租约达到一半即需要续租)
50%--》75%--》87.5%--》93.75
客户端租约达到一半时向服务器续租,没响应时再过50%再次向服务器续租
续租成功:
dhcprequest--》dhcpack
续租失败:
dhcprequest-->dhcpnack
169.254.x.x
客户端获取Ip失败后,自动配置的Ip
路由器隔离DHCP报文,此时可以配置dhcp中继服务器
四、tftp是什么?
TFTP(Trivial File Transfer Protocol,简单文件传输协议)是TCP/IP协议族中的一个用来在客户机与服务器之间进行简单文件传输的协议,提供不复杂、开销不大的文件传输服务。端口号为69。
TFTP是一个传输文件的简单协议,它基于UDP协议而实现,但是我们也不能确定有些TFTP协议是基于其它传输协议完成的。此协议设计的时候是进行小文件传输的。因此它不具备通常的FTP的许多功能,它只能从文件服务器上获得或写入文件,不能列出目录,不进行认证,它传输8位数据。
传输中有三种模式:
netascii,这是8位的ASCII码形式,
另一种是octet,这是8位源数据类型;
最后一种mail已经不再支持,它将返回的数据直接返回给用户而不是保存为文件。
五、构建pxe环境
1、安装DHCP服务
1)环境
CentOS6.5-x86_64
node1: Server
eth0 192.168.100.179
eth1 192.168.200.1
node2: Client
2)安装dhcp
[root@www network-scripts]# yum install dhcp -y
[root@www network-scripts]# rpm -ql dhcp
/etc/dhcp
/etc/dhcp/dhcpd.conf
/etc/dhcp/dhcpd6.conf     # ipv6
/etc/openldap/schema/dhcp.schema
/etc/portreserve/dhcpd
/etc/rc.d/init.d/dhcpd
/etc/rc.d/init.d/dhcpd6
/etc/rc.d/init.d/dhcrelay  # dhcp中继
/etc/sysconfig/dhcpd
/etc/sysconfig/dhcpd6
/etc/sysconfig/dhcrelay
/usr/bin/omshell
/usr/sbin/dhcpd
/usr/sbin/dhcrelay
/usr/share/doc/dhcp-4.1.1
3)配置dhcp
[root@www network-scripts]# cd /etc/dhcp/
[root@www dhcp]# ls
dhclient.d  dhclient-eth0.conf  dhcpd6.conf  dhcpd.conf
[root@www dhcp]# vi dhcpd.conf

  1 #
  2 # DHCP Server Configuration file.
  3 #   see /usr/share/doc/dhcp*/dhcpd.conf.sample
  4 #   see 'man 5 dhcpd.conf'
  5 #
[root@www dhcp]# cp /usr/share/doc/dhcp-4.1.1/dhcpd.conf.sample /etc/dhcp/dhcpd.conf
cp:是否覆盖"/etc/dhcp/dhcpd.conf"? y
dhcp配置文件详解:
[root@www dhcp]# cat dhcpd.conf
# dhcpd.conf
#
# Sample configuration file for ISC dhcpd
#

# option definitions common to all supported networks...
option domain-name "example.org";        #搜索域名 (全局)
option domain-name-servers ns1.example.org, ns2.example.org;  #DNS服务器 (全局)

default-lease-time 600;     #默认租约期限
max-lease-time 7200;        #最大租约期限
# Use this to enble / disable dynamic dns updates globally.
#ddns-update-style none;

# If this DHCP server is the official DHCP server for the local
# network, the authoritative directive should be uncommented.
#authoritative;

# Use this to send dhcp log messages to a different log file (you also
# have to hack syslog.conf to complete the redirection).
log-facility local7;         #日志记录

# No service will be given on this subnet, but declaring it helps the
# DHCP server to understand the network topology.

subnet 10.152.187.0 netmask 255.255.255.0 {   #标记一个为其分配ip地址的网络  (例1)
}

# This is a very basic subnet declaration.

subnet 10.254.239.0 netmask 255.255.255.224 {       (例2)
  range 10.254.239.10 10.254.239.20;        #ip地址池范围
  option routers rtr-239-0-1.example.org, rtr-239-0-2.example.org;  #设置网关
}

# This declaration allows BOOTP clients to get dynamic addresses,
# which we don't really recommend.

subnet 10.254.239.32 netmask 255.255.255.224 {      (例3)
  range dynamic-bootp 10.254.239.40 10.254.239.60;
  option broadcast-address 10.254.239.31;
  option routers rtr-239-32-1.example.org;
}

# A slightly different configuration for an internal subnet.
subnet 192.168.200.0 netmask 255.255.255.0 {    (例4,这个例子最详细了,真正配置时可以把前面的例子都删掉,修改这个例子)
  range 192.168.200.21 192.168.200.100;
 # option domain-name-servers ns1.internal.example.org;
 # option domain-name "internal.example.org";
  option routers 192.168.200.1;
   # option broadcast-address 10.5.5.31;
  default-lease-time 600;
  max-lease-time 7200;

 next-server 192.168.200.1;
 filename "pxelinux.0";    #告诉客户端接下来去这个服务器下载这个文件

  }
配置好后,启动dhcp服务:
[root@www dhcp]# service dhcpd start
正在启动 dhcpd:                                           [确定]
[root@www dhcp]# netstat -nlptu
Active Internet connections (only servers)
Proto Recv-Q Send-Q Local Address               Foreign Address             State       PID/Program name
tcp        0      0 0.0.0.0:22                  0.0.0.0:*                   LISTEN      1110/sshd
tcp        0      0 127.0.0.1:25                0.0.0.0:*                   LISTEN      1198/master
tcp        0      0 127.0.0.1:6012              0.0.0.0:*                   LISTEN      31964/sshd
tcp        0      0 0.0.0.0:3306                0.0.0.0:*                   LISTEN      9271/mysqld
udp        0      0 0.0.0.0:67                  0.0.0.0:*                               32106/dhcpd
使用客户机测试:
配置客户机从dhcp服务器获取ip,如果能正确获取到192.168.200.21-100段的ip说明
在服务器端查看租约信息:
[root@www dhcp]# cat /var/lib/dhcpd/dhcpd.leases
# The format of this file is documented in the dhcpd.leases(5) manual page.
# This lease file was written by isc-dhcp-4.1.1-P1

server-duid "\000\001\000\001\036!\014(\000\014)S\3663";

lease 192.168.200.21 {
  starts 4 2016/01/07 11:48:51;
  ends 4 2016/01/07 11:58:51;
  cltt 4 2016/01/07 11:48:51;
  binding state active;
  next binding state free;
  hardware ethernet 00:0c:29:f9:cb:14;
}
lease 192.168.200.21 {
  starts 4 2016/01/07 11:52:49;
  ends 4 2016/01/07 12:02:49;
  cltt 4 2016/01/07 11:52:49;
  binding state active;
  next binding state free;
  hardware ethernet 00:0c:29:f9:cb:14;
}
为特定主机分配特定ip:
 host passacaglia {          #定义一个名字标记
    hardware ethernet 0:0:c0:5d:bd:95;  #指定MAC地址
  #  filename "vmunix.passacaglia";
  # server-name "toccata.fugue.com";
    fixed-address 192.168.200.110;     #分别固定ip地址,此地址不能是地址池里的地址,优先级高于地址池分配地址
    }
2、安装tftp服务
[root@www ~]# yum install tftp-server

Dependencies Resolved

=============================================================================================================
 Package                   Arch                 Version                         Repository              Size
=============================================================================================================
Installing:
 tftp-server               x86_64               0.49-7.el6                      c6-media                39 k
Installing for dependencies:
 xinetd                    x86_64               2:2.3.14-39.el6_4               c6-media               121 k

Transaction Summary
=============================================================================================================
Install       2 Package(s)
[root@www ~]# rpm -ql tftp-server
/etc/xinetd.d/tftp                      #可以看到tftp是超级守护进程xinetd代为守护的服务
/usr/sbin/in.tftpd
/usr/share/doc/tftp-server-0.49
/usr/share/doc/tftp-server-0.49/CHANGES
/usr/share/doc/tftp-server-0.49/README
/usr/share/doc/tftp-server-0.49/README.security
/usr/share/doc/tftp-server-0.49/README.security.tftpboot
/usr/share/man/man8/in.tftpd.8.gz
/usr/share/man/man8/tftpd.8.gz
/var/lib/tftpboot                      # tftp默认提供下载的目录
3、提供安装程序所需的文件
1)pxelinux.0
[root@www ~]# yum install syslinux -y

[root@www ~]# rpm -ql syslinux
/usr/bin/gethostip
/usr/bin/isohybrid
/usr/bin/memdiskfind
/usr/bin/syslinux
/usr/share/doc/syslinux-4.02
/usr/share/doc/syslinux-4.02/COPYING
/usr/share/doc/syslinux-4.02/CodingStyle.txt
/usr/share/doc/syslinux-4.02/NEWS
/usr/share/doc/syslinux-4.02/README
/usr/share/doc/syslinux-4.02/SubmittingPatches.txt
/usr/share/doc/syslinux-4.02/comboot.txt
/usr/share/doc/syslinux-4.02/distrib.txt
/usr/share/doc/syslinux-4.02/extlinux.txt
/usr/share/doc/syslinux-4.02/gpt.txt
/usr/share/doc/syslinux-4.02/isolinux.txt
/usr/share/doc/syslinux-4.02/keytab-lilo.txt
/usr/share/doc/syslinux-4.02/mboot.txt
/usr/share/doc/syslinux-4.02/memdisk.txt
/usr/share/doc/syslinux-4.02/menu.txt
/usr/share/doc/syslinux-4.02/pxelinux.txt
/usr/share/doc/syslinux-4.02/rfc5071.txt
/usr/share/doc/syslinux-4.02/sample
/usr/share/doc/syslinux-4.02/sample/Makefile
/usr/share/doc/syslinux-4.02/sample/README
/usr/share/doc/syslinux-4.02/sample/atou.c
/usr/share/doc/syslinux-4.02/sample/c32echo.c
/usr/share/doc/syslinux-4.02/sample/c32echo.c32
/usr/share/doc/syslinux-4.02/sample/c32entry.S
/usr/share/doc/syslinux-4.02/sample/c32exit.S
/usr/share/doc/syslinux-4.02/sample/comecho.asm
/usr/share/doc/syslinux-4.02/sample/comecho.com
/usr/share/doc/syslinux-4.02/sample/conio.c
/usr/share/doc/syslinux-4.02/sample/fd.c
/usr/share/doc/syslinux-4.02/sample/fd.c32
/usr/share/doc/syslinux-4.02/sample/filetest.c
/usr/share/doc/syslinux-4.02/sample/filetest.c32
/usr/share/doc/syslinux-4.02/sample/hello.c
/usr/share/doc/syslinux-4.02/sample/hello.c32
/usr/share/doc/syslinux-4.02/sample/hello2.c
/usr/share/doc/syslinux-4.02/sample/hello2.c32
/usr/share/doc/syslinux-4.02/sample/m16-640x640-syslinux.jpg
/usr/share/doc/syslinux-4.02/sample/printf.c
/usr/share/doc/syslinux-4.02/sample/sample.msg
/usr/share/doc/syslinux-4.02/sample/skipatou.c
/usr/share/doc/syslinux-4.02/sample/syslinux_splash.jpg
/usr/share/doc/syslinux-4.02/sample/syslogo.lss
/usr/share/doc/syslinux-4.02/sample/syslogo.ppm.gz
/usr/share/doc/syslinux-4.02/sdi.txt
/usr/share/doc/syslinux-4.02/syslinux.txt
/usr/share/doc/syslinux-4.02/usbkey.txt
/usr/share/man/man1/extlinux.1.gz
/usr/share/man/man1/gethostip.1.gz
/usr/share/man/man1/syslinux.1.gz
/usr/share/man/man1/syslinux2ansi.1.gz
/usr/share/syslinux
/usr/share/syslinux/altmbr.bin
/usr/share/syslinux/altmbr_c.bin
/usr/share/syslinux/altmbr_f.bin
/usr/share/syslinux/cat.c32
/usr/share/syslinux/chain.c32
/usr/share/syslinux/cmd.c32
/usr/share/syslinux/config.c32
/usr/share/syslinux/cpuid.c32
/usr/share/syslinux/cpuidtest.c32
/usr/share/syslinux/disk.c32
/usr/share/syslinux/dmitest.c32
/usr/share/syslinux/dosutil
/usr/share/syslinux/dosutil/copybs.com
/usr/share/syslinux/dosutil/eltorito.sys
/usr/share/syslinux/dosutil/mdiskchk.com
/usr/share/syslinux/elf.c32
/usr/share/syslinux/ethersel.c32
/usr/share/syslinux/gfxboot.c32
/usr/share/syslinux/gptmbr.bin
/usr/share/syslinux/gptmbr_c.bin
/usr/share/syslinux/gptmbr_f.bin
/usr/share/syslinux/gpxecmd.c32
/usr/share/syslinux/gpxelinux.0
/usr/share/syslinux/hdt.c32
/usr/share/syslinux/host.c32
/usr/share/syslinux/ifcpu.c32
/usr/share/syslinux/ifcpu64.c32
/usr/share/syslinux/ifplop.c32
/usr/share/syslinux/int18.com
/usr/share/syslinux/isohdpfx.bin
/usr/share/syslinux/isohdpfx_c.bin
/usr/share/syslinux/isohdpfx_f.bin
/usr/share/syslinux/isohdppx.bin
/usr/share/syslinux/isohdppx_c.bin
/usr/share/syslinux/isohdppx_f.bin
/usr/share/syslinux/isolinux-debug.bin
/usr/share/syslinux/isolinux.bin
/usr/share/syslinux/kbdmap.c32
/usr/share/syslinux/linux.c32
/usr/share/syslinux/ls.c32
/usr/share/syslinux/lua.c32
/usr/share/syslinux/mboot.c32
/usr/share/syslinux/mbr.bin
/usr/share/syslinux/mbr_c.bin
/usr/share/syslinux/mbr_f.bin
/usr/share/syslinux/memdisk
/usr/share/syslinux/memdump.com
/usr/share/syslinux/meminfo.c32
/usr/share/syslinux/menu.c32
/usr/share/syslinux/pcitest.c32
/usr/share/syslinux/pmload.c32
/usr/share/syslinux/poweroff.com
/usr/share/syslinux/pwd.c32
/usr/share/syslinux/pxechain.com
/usr/share/syslinux/pxelinux.0           #注:启动映象文件
/usr/share/syslinux/reboot.c32
/usr/share/syslinux/rosh.c32
/usr/share/syslinux/sanboot.c32
/usr/share/syslinux/sdi.c32
/usr/share/syslinux/sysdump.c32
/usr/share/syslinux/syslinux.com
/usr/share/syslinux/syslinux.exe
/usr/share/syslinux/syslinux64.exe
/usr/share/syslinux/vesainfo.c32
/usr/share/syslinux/vesamenu.c32
/usr/share/syslinux/vpdtest.c32
/usr/share/syslinux/whichsys.c32

[root@www ~]# cp /usr/share/syslinux/pxelinux.0 /var/lib/tftpboot/
[root@www ~]# ls /var/lib/tftpboot/
pxelinux.0
2)复制CentOS操作系统中光盘的文件
[root@www ~]# ls /mnt    #已挂载了光盘镜像
CentOS_BuildTag  images                    repodata                       RPM-GPG-KEY-CentOS-Testing-6
EFI              isolinux                  RPM-GPG-KEY-CentOS-6           TRANS.TBL
EULA             Packages                  RPM-GPG-KEY-CentOS-Debug-6
GPL              RELEASE-NOTES-en-US.html  RPM-GPG-KEY-CentOS-Security-6
[root@www ~]# cd /mnt/images/
[root@www images]# ls
efiboot.img  efidisk.img  install.img  pxeboot  TRANS.TBL
[root@www images]# cd pxeboot/
[root@www pxeboot]# ls
initrd.img  TRANS.TBL  vmlinuz
[root@www pxeboot]# cp vmlinuz initrd.img /var/lib/tftpboot/    #内核+引导映象文件
[root@www pxeboot]# cd ../../
CentOS_BuildTag                isolinux/                      RPM-GPG-KEY-CentOS-Security-6
.discinfo                      Packages/                      RPM-GPG-KEY-CentOS-Testing-6
EFI/                           RELEASE-NOTES-en-US.html       TRANS.TBL
EULA                           repodata/                      .treeinfo
GPL                            RPM-GPG-KEY-CentOS-6
images/                        RPM-GPG-KEY-CentOS-Debug-6
[root@www pxeboot]# cd ../../isolinux/
[root@www isolinux]# ls
boot.cat  grub.conf   isolinux.bin  memtest     TRANS.TBL     vmlinuz
boot.msg  initrd.img  isolinux.cfg  splash.jpg  vesamenu.c32
[root@www isolinux]# cp isolinux.cfg vesamenu.c32 splash.jpg boot.msg /var/lib/tftpboot/
注意:如果记不清楚要复制哪些文件可以把镜像中/mnt/images/pxeboot/和/mnt/isolinux/目录下所有文件都复制过去
[root@www ~]# mkdir /var/lib/tftpboot/pxelinux.cfg
[root@www ~]# cd /mnt/isolinux/
[root@www isolinux]# ls
boot.cat  grub.conf   isolinux.bin  memtest     TRANS.TBL     vmlinuz
boot.msg  initrd.img  isolinux.cfg  splash.jpg  vesamenu.c32
[root@www isolinux]# cp isolinux.cfg /var/lib/tftpboot/pxelinux.cfg/default
编辑/var/lib/tftpboot/pxelinux.cfg/default文件可以自定义安装界面(需要强制保存)
[root@www isolinux]# cat /var/lib/tftpboot/pxelinux.cfg/default
default vesamenu.c32
#prompt 1
timeout 600

display boot.msg

menu background splash.jpg
menu title Welcome to CentOS 6.5 magedu!    #####
menu color border 0 #ffffffff #00000000
menu color sel 7 #ffffffff #ff000000
menu color title 0 #ffffffff #00000000
menu color tabmsg 0 #ffffffff #00000000
menu color unsel 0 #ffffffff #00000000
menu color hotsel 0 #ff000000 #ffffffff
menu color hotkey 7 #ffffffff #ff000000
menu color scrollbar 0 #ffffffff #00000000

label linux
  menu label ^Install or upgrade an existing system
  menu default
  kernel vmlinuz
  append initrd=initrd.img     (ks=)    #指定kickstart文件
label vesa
  menu label Install system with ^basic video driver
  kernel vmlinuz
  append initrd=initrd.img xdriver=vesa nomodeset
label rescue
  menu label ^Rescue installed system
  kernel vmlinuz
  append initrd=initrd.img rescue
label local
  menu label Boot from ^local drive
  localboot 0xffff
label memtest86
  menu label ^Memory test
  kernel memtest
  append -
3)指定系统安装树
http或nfs服务
[root@www isolinux]# service httpd start
正在启动 httpd:                                           [确定]
[root@www isolinux]# vi /etc/httpd/conf/httpd.conf
[root@www isolinux]# cd /var/www/html/
[root@www html]# ls
index.html  index.html.orig
[root@www html]# vi index.html
[root@www html]# mkdir /var/www/html/CetnOS6.5-x86_64
[root@www html]# umount /mnt
[root@www html]# mount /dev/sr0 /var/www/html/CetnOS6.5-x86_64/
mount: block device /dev/sr0 is write-protected, mounting read-only
6、客户机测试
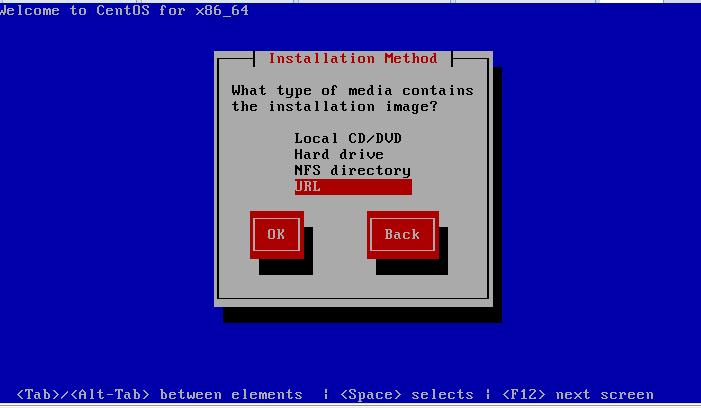
安装媒介选择URL方式:

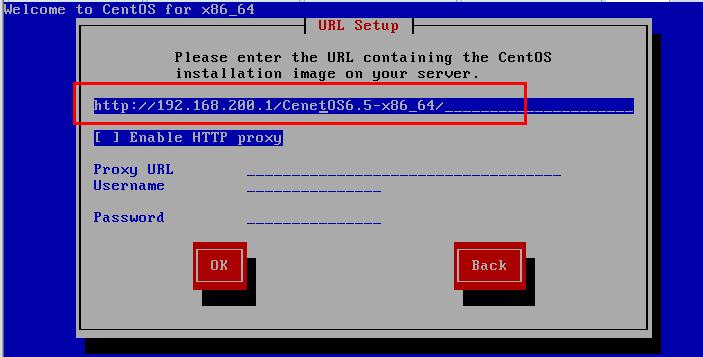
填写正确的URL:

注意:如果指定了kickstart文件就会自动安装