标准ACL配置
今天为大家写出ACL(访问控制列表)的配置:
ACL分为:标准ACL,扩展ACL,命名ACL这三种配置,不同的ACL应用于不同的网络和场合;
标准ACL最为简单是通过使用IP 包中的源IP 地址进行过滤,表号范围1-99 或1300-1999;
下面是今天的实验拓扑:

实验目标:
PC1不能访问R1也不能ping通,在PC上ping不通R1后面的网络
PC2能telnet R1能ping通任何网络---注:172.16.1.0/24 PC1除外
PC0也不能telnet R1 但是可以ping通能正常通信;
IP地址规划:
R0----F0/0=192.168.1.1/24
----F0/1=172.16.1.1/24
-----E1/0=10.10.10.1/24
R1-----F0/0=192.168.1.2/24
------F0/1=20.20.20.1/24
R2-----F0/0=20.20.20.2/24
-----F0/1=30.30.30.1/24
PC0=10.10.10.100/24
PC1=172.16.1.100/24
PC2=30.30.30.100/24
路由器之间启用RIP路由协议;
R0(config)#int f0/0
R0(config-if)#ip add 192.168.1.1 255.255.255.0 配置接口IP地址
R0(config-if)#no shut
R0(config)#int f0/1
R0(config-if)#ip add 172.16.1.1 255.255.255.0
R0(config-if)#no shut 配置接口IP地址并激活接口
R0(config)#int e1/0
R0(config-if)#ip add 10.10.10.1 255.255.255.0
R0(config-if)#no shut 配置接口IP地址并激活接口
R1(config)#int f0/0
R1(config-if)#ip add 192.168.1.2 255.255.255.0
R1(config-if)#no shut 配置接口IP地址并激活接口
R1(config)#int f0/1
R1(config-if)#ip add 20.20.20.1 255.255.255.0
R1(config-if)#no shut 配置接口IP地址并激活接口
R2(config)#int f0/0
R2(config-if)#ip add 20.20.20.2 255.255.255.0
R2(config-if)#no shut 配置接口IP地址并激活接口
R2(config)#int f0/1
R2(config-if)#ip add 30.30.30.1 255.255.255.0
R2(config-if)#no shut 配置接口IP地址并激活接口
R0(config)#router rip 启用RIP协议
R0(config-router)# version 2 启用版本 2
R0(config-router)#no auto-summary 关闭路由汇总
R0(config-router)#network 10.10.10.0
R0(config-router)#network 172.16.1.0
R0(config-router)#network 192.168.1.0 宣告直连网络
R1(config)#router rip 启用RIP协议
R1(config-router)#version 2 启用版本 2
R1(config-router)#no auto-summary 关闭路由汇总
R1(config-router)#network 192.168.1.0
R1(config-router)#network 20.20.20.0 宣告直连网络
R2(config)#router rip 启用RIP协议
R2(config-router)#version 2 启用版本 2
R2(config-router)#no auto-summary 关闭路由汇总
R2(config-router)#network 20.20.20.0
R2(config-router)#network 30.30.30.0 宣告直连网络
现在网络全部连通,互相之间都能Ping通
查看R0的路由表:
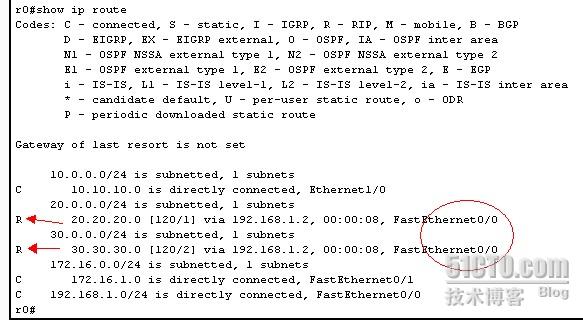
已经学习到路由条目!
完成开始的目标:
R1(config)#access-list 1 deny 172.16.1.0 0.0.0.255 在表:1 里面拒绝172.16.1.0网络
R1(config)#access-list 1 permit any 允许其他所有的网络通过
R1(config)#int f0/0 在接口绑定
R1(config-if)#ip access-group 1 in 在进入的接口绑定时:in
R1(config)#enable sercet cisco 配置密码
R1(config)#username admin password 12345 创建用户名和密码
R1(config)#access-list 2 permit 30.30.30.100 允许30.100这个IP地址访问
R1(config)#line vty 0 4 配置远程登陆的控制台
R1(config-line)#ip access-class 2 in 在进入的控制台绑定
R1(config-line)#login local 在本地保存
现在PC1已经Ping不通R1接口上的IP地址后面的网络都不通了
虽然在R2上面还是可以学习到172.16.1.0的网络但是不能通信
在登陆R1的PC机现在只有PC2可以登陆!
下面有两个附件
一个是基本连通刚配置好RIP
另一个是完成实验时的PKT