PHP(14) 文件上传(含动态文件)
PHP(14) 文件上传(含动态文件)
在很多的PHP项目中经常涉及到文件上传,那么今天我们就来看一看在PHP中如何实现文件上传!
一、表单
我们先来研究一下表单。如果想实现文件上传,那么在表单内必须存在浏览框(File Field),而且表单的两个属性必须注意:
表单的提交方式只能为POST;
必须设置表单的编码方式(enctype=”multipart/form-data”)。
源代码如下:
<form name=”uploadForm” id=”uploadForm” action=”upload.php” method=”POST” enctype=”multipart/form-data”>
<form name=”uploadForm” id=”uploadForm” action=”upload.php” method=”POST” enctype=”multipart/form-data”>
…
…
</form>
二、$_FILES
$_FILES['userfile']['name']
客户端机器文件的原名称
$_FILES['userfile']['type']
文件的 MIME 类型。
$_FILES['userfile']['size']
已上传文件的大小,单位为字节。
$_FILES['userfile']['tmp_name']
文件被上传后在服务端储存的临时文件名。
$_FILES['userfile']['error']
和该文件上传相关的错误代码
三、案例
1.单个文件上传(具体代码在附件1)
addBlog.php的代码如下:
<!DOCTYPE html PUBLIC "-//W3C//DTD XHTML 1.0 Transitional//EN" " http://www.w3.org/TR/xhtml1/DTD/xhtml1-transitional.dtd">
<html xmlns=" http://www.w3.org/1999/xhtml">
<head>
<meta http-equiv="Content-Type" content="text/html; charset=gb2312" />
<title>Untitled Document</title>
<link href="style/common.css" rel="stylesheet" type="text/css" media="all" />
</head>
<body>
<div id="container">
<h1 id="subject">发表文章</h1>
<form action="uploadFile.php" method="post" enctype="multipart/form-data" name="uploadForm" id="uploadForm">
<table border="0" cellspacing="0" cellpadding="0">
<tr>
<td class="borderBottom rowNum">文章标题:</td>
<td class="borderBottom">xxx</td>
</tr>
<tr>
<td class="borderBottom rowNum">文章正文:</td>
<td class="borderBottom">xxx</td>
</tr>
<tr>
<td class="borderBottom rowNum">文章附件:</td>
<td class="borderBottom">
<input name="uploadFile" type="file" id="uploadFile" />
</td>
</tr>
<tr>
<td> </td>
<td><input type="image" name="imageField" src="images/submit.gif" /></td>
</tr>
</table>
</form>
</div>
</body>
</html>
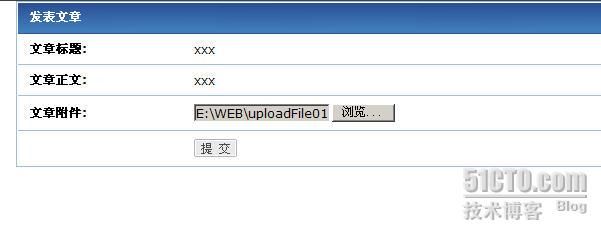
效果如图一所示:
<!DOCTYPE html PUBLIC "-//W3C//DTD XHTML 1.0 Transitional//EN" " http://www.w3.org/TR/xhtml1/DTD/xhtml1-transitional.dtd">
<html xmlns=" http://www.w3.org/1999/xhtml">
<head>
<meta http-equiv="Content-Type" content="text/html; charset=gb2312" />
<title>Untitled Document</title>
<link href="style/common.css" rel="stylesheet" type="text/css" media="all" />
</head>
<body>
<?php
$fileName = $_FILES["uploadFile"]["name"];
$tmpName = $_FILES["uploadFile"]["tmp_name"];
$error = $_FILES["uploadFile"]["error"];
if($error == 0)
{
move_uploaded_file($tmpName,"./uploadFile/{$fileName}");
}
else
{
echo("文件上传错误");
}
?>
</body>
</html>
2.多个文件的上传(具体的代码在附件2)
如果要实现多个文件的上传,浏览框的命名必须以数组形式命名,所谓数组形式,就是在原有名称的基础上添加中括号(如uploadFile[])。
addBlog.php
<!DOCTYPE html PUBLIC "-//W3C//DTD XHTML 1.0 Transitional//EN" " http://www.w3.org/TR/xhtml1/DTD/xhtml1-transitional.dtd">
<html xmlns=" http://www.w3.org/1999/xhtml">
<head>
<meta http-equiv="Content-Type" content="text/html; charset=gb2312" />
<title>Untitled Document</title>
<link href="style/common.css" rel="stylesheet" type="text/css" media="all" />
</head>
<body>
<div id="container">
<h1 id="subject">发表文章</h1>
<form action="uploadFile.php" method="post" enctype="multipart/form-data" name="uploadForm" id="uploadForm">
<table border="0" cellspacing="0" cellpadding="0">
<tr>
<td class="borderBottom rowNum">文章标题:</td>
<td class="borderBottom">xxx</td>
</tr>
<tr>
<td class="borderBottom rowNum">文章正文:</td>
<td class="borderBottom">xxx</td>
</tr>
<tr>
<td class="borderBottom rowNum">文章附件:</td>
<td class="borderBottom">
<input name="uploadFile[]" type="file" id="uploadFile[]" />
</td>
</tr>
<tr>
<td class="borderBottom rowNum"> </td>
<td class="borderBottom">
<input name="uploadFile[]" type="file" id="uploadFile[]" />
</td>
</tr>
<tr>
<td class="borderBottom rowNum"> </td>
<td class="borderBottom">
<input name="uploadFile[]" type="file" id="uploadFile[]" />
</td>
</tr>
<tr>
<td class="borderBottom rowNum"> </td>
<td class="borderBottom">
<input name="uploadFile[]" type="file" id="uploadFile[]" />
</td>
</tr>
<tr>
<td class="borderBottom rowNum"> </td>
<td class="borderBottom">
<input name="uploadFile[]" type="file" id="uploadFile[]" />
</td>
</tr>
<tr>
<td> </td>
<td><input type="image" name="imageField" src="images/submit.gif" /></td>
</tr>
</table>
</form>
</div>
</body>
</html>
效果如图二所示

uploadFile.php
<!DOCTYPE html PUBLIC "-//W3C//DTD XHTML 1.0 Transitional//EN" " http://www.w3.org/TR/xhtml1/DTD/xhtml1-transitional.dtd">
<html xmlns=" http://www.w3.org/1999/xhtml">
<head>
<meta http-equiv="Content-Type" content="text/html; charset=gb2312" />
<title>Untitled Document</title>
<link href="style/common.css" rel="stylesheet" type="text/css" media="all" />
</head>
<body>
<?php
$fileNames = $_FILES["uploadFile"]["name"];
$tmpNames = $_FILES["uploadFile"]["tmp_name"];
$errors = $_FILES["uploadFile"]["error"];
foreach($errors as $key => $val)
{
if($val == 0)
{
move_uploaded_file($tmpNames[$key],"./uploadFile/{$fileNames[$key]}");
}
}
?>
</body>
</html>
3.多个文件的上传(具体的代码在附件3)
在案例2中,我们虽然实现了多个文件的上传,但是附件的数目最多只能是5个,那么,我们可不可以实现动态数目的附件呢?也就是用户可以随意设置附件的数目。如果要实现这个功能,只能通过JS来实现了。并且在本案例中,我们还通过JS来检测文件的类型是否合法!为上传文件更名的部分大家自己实现吧!^_^
JS代码如下:
function
$(objId)
{
return
document.getElementById(objId);
}
function
getFileName(filePath)
{
var
fileName =
""
;
if
(filePath.indexOf(
"\\"
) == -1)
{
fileName = filePath;
}
else
{
fileName = filePath.substr(filePath.lastIndexOf(
"\\"
)+1);
}
return
fileName;
}
function
getExtName(fileName)
{
var
extName =
""
;
extName = fileName.substr(fileName.lastIndexOf(
"."
)+1).toLowerCase();
return
extName;
}
function
validFileType(fileName)
{
var
extName = getExtName(fileName);
if
(allowFileType.indexOf(extName) == -1)
{
return false
;
}
else
{
return true
;
}
}
function
addAttach()
{
var
attachObj = $(
"attach"
);
var
attachListObj = $(
"attachList"
);
var
newAttObj = attachObj.cloneNode(
true
);
var
rowId =
"row_"
+ i;
newAttObj.id = rowId;
newAttObj.style.display =
""
;
attachListObj.appendChild(newAttObj);
var
fileObj = newAttObj.getElementsByTagName(
"input"
)[0];
var
spanObj = newAttObj.getElementsByTagName(
"span"
)[0];
var
linkObj = newAttObj.getElementsByTagName(
"a"
)[0];
linkObj.style.display =
"none"
;
fileObj.onchange =
function
()
{
var
fileObjVal = fileObj.value;
var
fileName = getFileName(fileObjVal);
if
(validFileType(fileName))
{
spanObj.innerHTML = fileName;
fileObj.style.display =
"none"
;
linkObj.style.display =
""
;
addAttach();
}
else
{
removeAttach(rowId);
addAttach();
showInfo(unValidFileType);
}
}
linkObj.onclick =
function
()
{
removeAttach(rowId);
}
i++;
}
function
removeAttach(rowId)
{
var
attachListObj = $(
"attachList"
);
attachListObj.removeChild($(rowId));
}
function
showInfo(pro)
{
window.alert(pro);
}
var
unValidFileType = "文件类型错误"
;
关于"文章正文"部分,在以后的博文中我们会采用FCKEditor编辑器来实现
本文出自 “吴华” 博客,转载请与作者联系!
