安装sersync实现服务器同步和镜像
该工具详细说明和下载地点:
http://code.google.com/p/sersync/
一
.
拓扑图
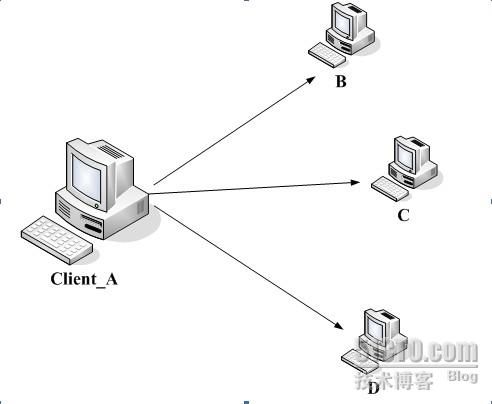
说明:图中
A
为源文件服务器,同步数据到
B
、
C
、
D
三台服务器
二.相关配置说明
1
,
A
、
B
、
C
、
D
分别开启
rsync,
以守护进程的方式。
2
,
A
机上安装
sersync
。
3
,
A
机的
sersync
是以
rsync
能正常工作为前提,请测试好了再安装。
三.具体安装
1)A、B、C、D分别安装3.0以下的rsync
# yum �Cy install rsync
2)
编辑配置文件
rsyncd.conf
gid = root
use chroot = no
max connections = 4000
log file=/var/log/rsyncd.log
pid file=/var/run/rsyncd.pid
lock file=/var/run/rsyncd.lock
[tongbu] #
定义了一个
tongbu
的模块
path=/opt/tongbu
comment = 123
ignore errors = yes
auth users = root #
开启认证模块
secrets file = /etc/rsyncd.secrets#
密码文件
read only = no
hosts allow =192.168.109.0/24#
访问权限设置
hosts deny = *
3)配置密码文件rsyncd. secrets
这个密码文件只能在
B
、
C
、
D
上写如下内容:
# cat /etc/rsyncd.secrets
root:root1
在
A
上只是一个单纯的写了密码的文件
# cat /etc/rsyncd.secrets
root1
然后都
chmod 600
4)
开启
rsync
并测试
A
、
B
、
C
、
D
机分别以守护进程的方式开启
rsync --daemon --config=/etc/rsyncd.conf
测试
:
在
A
机上推
:
在
A
机上拉
rsync -vzrtopg --progress [email protected]::tongbu /opt/tongbu --password-file=/etc/rsyncd.secrets
5)确实测试无误了,再在A机上安装sersync
tar -zxvf sersync2.4_64bit_binary.tar.gz
cd GNU-Linux-x86/
vi confxml.xml
<?xml version="1.0" encoding="ISO-8859-1"?>
<head version="2.4">
<host hostip="localhost" port="8008"></host>#1,
本地主机配置
<filter start="false">
<exclude expression="(.*)\.gz"></exclude>
<exclude expression="^info/*"></exclude>
</filter>
<inotify>
<delete start="true"/>
</inotify>
<sersync>
<localpath watch="/opt/tongbu" debug="false"> #2,watch
填写需同步的本地路径
<remote ip="192.168.109.4" name="tongbu"/> #3,remote
填写要同步的远程主机
IP
与模块名称即
B
、
C
、
D
机的
IP
<!--<remote ip="192.168.8.39" name="tongbu"/>--> #
注释掉无用的
IP
<!--<remote ip="192.168.8.40" name="tongbu"/>-->
</localpath>
<rsync>
<auth start="true" users="root" passwordfile="/etc/rsyncd.secrets"/> #4,
为
true
,
开启密码认证
</rsync>
<crontab start="true" schedule="60"> #start
标签设置为
true
,
即设定多长时间对监控项目彻底同步一次
<crontabfilter start="false">
<exclude expression="*.php"></exclude>
<exclude expression="info/*"></exclude>
</crontabfilter>
</crontab>
<plugin start="false" name="refreshCDN"/> #plugin
标签是在同步过程中使用插件
</sersync>
<plugin name="refreshCDN">#
插件
1
<localpath watch="/data0/htdocs/cms.xoyo.com/site/">
<cdninfo domainname="ccms.chinacache.com" port="80" username="xxxx" passwd="xxxx"/>
<sendurl base="http://pic.xoyo.com/cms"/>
<regexurl regex="false" match="cms.xoyo.com/site([/a-zA-Z0-9]*).xoyo.com/images"/>
</localpath>
</plugin>
<plugin name="socket">#
插件
2
<localpath watch="/opt/tongbu">
<deshost ip="192.168.0.151" port="8009"/>
</localpath>
</plugin>
</head>
要注意的有这么几个地方:
1,
本地
IP
和端口
2,
本地同步路径
3,
远程主机
B
、
C
、
D
的
IP
4,
是否开启密码认证
6)
启动
./sersync2 �Cd �Cr

这个是日志信息

这样的日志输出是正常的,至于产生“
/.
”的报错。和作者的命令设置有关。
本文出自 “西瓜皮” 博客,谢绝转载!